ICEINSPACE

|
Total Solar Eclipse, 13th-14th November 2012
Submitted: Wednesday, 21st February 2007 by Mike Salway
The Total Solar Eclipse on November 14th, 2012 occurs in Earth's southern hemisphere, early in the morning on Wednesday 14th November. The path of totality will cross North Australia and the Southern Pacific. This is the first total solar eclipse for Australia since the South Australian eclipse in 2002. Looking for Eclipse Glasses? Protect your eyes while viewing the solar eclipse. Purchase IceInSpace Eclipse Glasses from the IceInSpace Shop for $4 each, or $3.50 each if you buy 4 or more. Schools or groups, please contact me for bulk discounts.
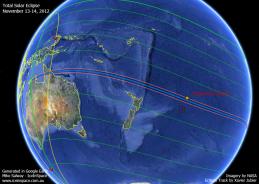
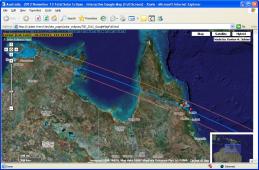
The eclipse starts at dawn in the very north of Australia, passing over Cairns then narrowly missing Norfolk Island. The eclipse track then crosses the Pacific Ocean without making landfall anywhere. The diagrams below shows the path of the eclipse. Read on for more information including what is an eclipse, local timings, eclipse tours, and hints and tips for viewing and photographing the eclipse. If you're not travelling to Cairns and want to know more about the Partial Solar Eclipse, try this article. Feel free to ask questions or post your images on the thread linked down below, or on our Facebook page.
Use the links below to find the information you're after:
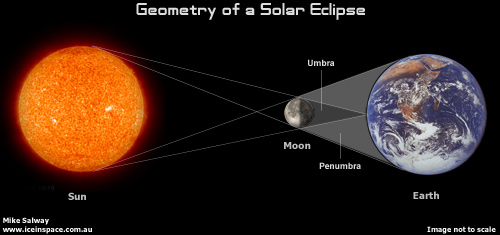
What is a Solar Eclipse?A Solar Eclipse occurs when the Moon passes in front of part or all of the Sun, which casts a shadow over a certain area of the Earth. This can only happen at New Moon, when the Sun, Moon and Earth are in a straight line. A Solar Eclipse doesn't happen every New Moon though, because the Moon's orbit is actually tipped about 5° with respect to Earth's orbit around the Sun. This means that during most New Moon's, the shadow cast by the Moon actually passes above or below the Earth, and therefore we do not see a Solar Eclipse. The diagram below shows the basic geometry of a Solar Eclipse. The Moon's shadow has two parts - the Umbra, which is the darker inner shadow, and the Penumbra, which is the fainter outer shadow. Please contact me if you'd like a larger version of the diagram below.
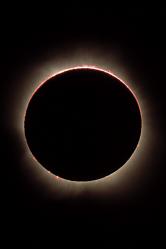
About two times per year when the alignment is just right, the Earth passes through the Moon's shadow and at that location on Earth they'll see a Solar Eclipse. There are three types of Solar Eclipse: Partial Solar EclipseA Partial Solar Eclipse is when the Earth passes into the Moon's penumbral shadow. From Earth, the Moon only partly covers the Sun. This type of eclipse can be seen by a larger area on Earth because the broader Penumbral shadow is cast across a wider track of ground on Earth. During a Partial Solar Eclipse, the Sun will appear to have a bite taken out of it. Depending on the amount of obscuration (how much of the Sun is obscured by the Moon), you may not notice any difference to the daylight. If a large part of the Sun is obscured, the Sun can take on a crescent shape and the daylight will be dimmed, similar to an overcast day. It is extremely dangerous to directly look at the sun without special eye protection during a Partial Solar Eclipse. Please see the Safe Viewing Guide below for options on safe viewing techniques. Total Solar EclipseA Total Solar Eclipse is when the Earth passes completely into the Moon's umbral shadow, described as "Totality". From Earth, the Moon completely covers the Sun. This type of eclipse can be seen from only a very small area on Earth - a ground track approximately 150km wide and up to 15,000 km long. The region swept out by the Umbral shadow is referred to as the "Path of Totality". To see the totally eclipsed Sun, you need to be positioned in that path of totality - so it is extremely rare to see a Total Solar Eclipse from a given geographic location. The time during Totality, which can last only a few minutes, is described as one of the most awe-inspiring and magnificent natural events you are ever likely to witness. Day turns into night as the Moon completely covers the Sun, and the Sun's spectacular corona reveals itself as a halo surrounding the Moon. Due the extremely small geographic footprint of a Total Solar Eclipse, people known as "Eclipse chasers" travel to sometimes very remote and barely accessible places on Earth to witness totality. Travel companies now set up special tour groups to accommodate these eclipse chasers, and organise their travel etc to allow them to observe this once in a lifetime event. A Total Solar Eclipse starts with a Partial phase, before the Moon completely covers the Sun (as seen from the path of totality), and then back to the Partial phase as the Moon moves off the Sun. It is extremely dangerous to directly look at the sun without special eye protection during a Total Solar Eclipse, except during the brief few minutes of Totality - even then, proper care should be taken. Please see the Safe Viewing Guide below for options on safe viewing techniques. Annular Solar EclipseAn Annular Solar Eclipse is a special type of a Solar Eclipse, where the Moon doesn't completely cover the disc of the Sun, and a small "annulus" (ring) of Sun surrounds the Moon. This happens due to the fact that the Moon is on an elliptical orbit, and its distance from Earth can vary as much as 13% between it's closest approach (perigee) and furthest approach (apogee). When at apogee, the Moon's apparent size on the sky is smaller than the Sun, so the Moon does not completely cover the Sun. Annular Eclipses are slightly more common than Total Solar Eclipses. They are still beautiful sights, but are not as spectacular as Total Solar Eclipses. It is extremely dangerous to directly look at the sun without special eye protection during an Annular Solar Eclipse. Please see the Safe Viewing Guide below for options on safe viewing techniques. The images below show what each of the types of Solar Eclipse can look like.
When and Where Can I See it?The path of the Total Solar Eclipse on the November 13th-14th 2012 tracks a narrow path starting in Arnhem Land at dawn where totality lasts 1min 40sec. It crosses the Gulf of Carpentaria and heads towards Cairns, passing on the coast between Cairns and Port Douglas at 6:39am local time (AEST) where totality will last 2 minutes and 4 seconds with the Sun approximately 14deg above the horizon. The path of totality then crosses the Pacific, passing just north of New Zealand and finishing just before it hits South America. The partial eclipse phase will be seen by most of Australia and all of New Zealand and Papua New Guinea. The further North and East you are, the greater the partial eclipse will be. More info about the partial eclipse. If you're planning on making your own way to the eclipse, now is the time to start organising your travel and accommodation because it will fill up fast! If you don't want to try and organise it yourself, be sure to see the Eclipse Tours section for more information on joining a tour. For a zoomable map showing the Total Eclipse track, check out the NASA Eclipse Page. The table below shows the timings for the points of contact during the Solar Eclipse. The times are given in local time for that city. The last column is the percentage of the Sun that will obscured by the Moon (ie: how much of a "bite" will be taken out of the Sun).
Eclipse ToursDue the extremely small geographic footprint of a Total Solar Eclipse, people known as "Eclipse chasers" travel to sometimes very remote and barely accessible places on Earth to witness totality. Travel companies now set up special tour groups to accommodate these eclipse chasers, and organise their travel etc to allow them to observe this once in a lifetime event. Trying to organise your own travel and accommodation will usually mean booking years in advance. With Eclipse Tours you may be able plan your trip much later. Here's a few examples of eclipse tours. More will be added in coming months:
Eclipse Tours will be a great way to meet like-minded individuals and have all the worry taken out of finding and booking travel and accommodation. They will fill fast though, so get in early! PS: Looking for something to do and somewhere to observe AFTER the eclipse? Try the 3RF Safe Viewing GuideWARNING! Never look directly at the Sun with the unaided or unfiltered eye, or permanent eye damage can result. You must take precautions - use properly filtered "eclipse glasses", or use special techniques to view the Partial Solar Eclipse. Never view the Sun through a telescope or binoculars unless it is fitted with a specially designed Solar Filter. Read below for a number of techniques to view the Partal Solar Eclipse. Pinhole Projection MethodThis is the easiest way to view the Partial Eclipse, and does not require any special equipment apart from one or two thin, stiff pieces of cardboard (white is best). Use a pin to poke a small, crisp hole in a piece of cardboard - this allows an inverted image of the Sun to be projected onto the second piece of cardboard below. Do not look through the pinhole at the Sun! Make sure the pinhole is as small and crisp as possible - the larger the hole, the fuzzier the image will be. Use this method with your back to the Sun, and the cardboard should be perpendicular (at 90° angle) to the direction of sunlight to give the least distorted image. Some resources for building Pinhole Projectors:
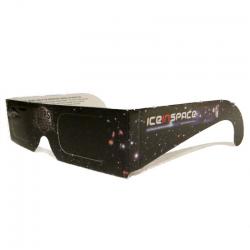
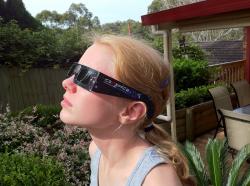
Eclipse GlassesSpecial "Eclipse Shades" or "Eclipse Glasses" are available to purchase from the IceInSpace Shop, which use a specially filtered film which you can directly view the Sun safely. The "frames" are made from light carboard and it's best to hold onto them securely while observing the Sun. The filters in the glasses are optical density 5 or greater and are “CE” certified which meets the transmission requirements of scale 12-16 of EN 169/1992 (Australian standard AS 1338.2 and 1338.3). The lenses are made of exclusive scratch resistant optical density 5, “Black Polymer” material. Eclipse Shades filter out 100% of harmful ultra-violet, 100% of harmful infrared, and 99.999% of intense visible light. These premium filters create a sharper ORANGE coloured image of the sun. The backside is printed with information for safe use and warnings about correct usage. Buy in bulk for family and friends, teachers and work mates, classrooms and hobby groups, and look cool in IceInSpace branded Eclipse Glasses for safe viewing of the Sun. You can purchase IceInSpace Eclipse Glasses from the IceInSpace Shop for $4 each, or $3.50 each if you buy 4 or more. Our Eclipse Glasses are 100% certified safe for direct viewing of the Sun. Buy with confidence. Schools or groups, please contact me for bulk discounts.
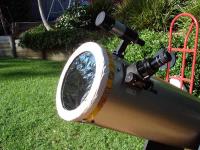
Solar Filters and Binocular and Telescope ObservingThe only safe way to view the Sun through Binoculars or a Telescope, is to fit a proper solar filter to the Sun-facing end of the optics. Never use "eyepiece" solar filters that screw into the eyepiece-end of a telescope. These are not safe and can crack under the intensified heat from the Sun. Solar Filters are usually white-light filters, cutting out harmful wavelengths and allowing only safe white-light through the filter. These will allow you to view the Sun through your binoculars or telescope. The Sun will appear as a white (or yellow, depending on the filter) disc, and you will see the (dark, featureless) Moon covering part of the Sun. You will also see any sunspots that are visible at the time. You can also get special Hydrogen-Alpha Solar telescopes or filters, which allow you to view the Sun in narrowband wavelengths so you can see surface details on the Sun and prominences rising out from the limb. Again yuo will see the dark Moon covering part of the Sun. Hydrogen-Alpha telescopes (such as the Coronado PST) and filters are much more expensive than white-light filters. Some resources for where you can buy, and how to make safe Solar filters:
Final Warning!Do not try to observe the eclipse with your naked eye, or with normal or cross-polarised sunglasses - these do not offer protection against blindness if you stare at the Sun. Never use "eyepiece" solar filters that screw into the eyepiece-end of a telescope. These are not safe and can crack under the intensified heat from the Sun. IceInSpace offers this information as a guide only and does not take responsibility for anyone using unsafe observing practises. By their very nature, Solar Eclipses are viewed outside in the Sun. Ensure you have adequate skin protection including hat and sunscreen. We'd love to hear about your Eclipse observing experiences! Please register and post your observing reports in the Observational Astronomy section. Photography / Imaging GuidePhotographing a Solar Eclipse isn't extremely difficult, but does take some special planning and preparation if you want to do it well. The eclipse happens quite quickly too, so you don't have a lot of time to get it right. Totality can last only a few minutes, while the partial phases can last an hour or two. First things first - how do you want to capture and present your Eclipse images? There are many ways to photographically present a Total or Partial Solar Eclipse. A landscape view with foreground? Long focal length to get close-up on the Sun? Following are a few ideas. These ideas will be focused on digital imaging - if you still use film then the techniques will be similar, but you lose the ability to preview your shots and re-shoot if needed! 1) Short Focal Length Telescope ViewEnsure your telescope is fitted with a properly designed solar filter before attempting to observe or photograph the eclipse through a telescope! High-resolution, high-magnification views through a telescope are likely to be quite disappointing due to the fact that there's really not a lot to see. Ideally you want to see the whole solar disc. So to photograph the Eclipse through a telescope, the best results will be obtained where you can fit the whole Sun in the Field Of View (FOV) of your telescope and imaging device. Some examples of this could include:
You can take images during various stages of the eclipse to present a final composite showing all phases on the same image, or you could simply use a single totality image (for example) to present the Sun and it's corona during a Total Solar Eclipse. Some examples, courtesy Fred Espanek: You could also take a sequence of images over the entire eclipse (for example, every 10 minutes), resize them down and present an animated gif showing a "movie" of the Sun going through the entire eclipse phases. Two examples showing an animated gif like this, are courtesy Fred Espanek - both from eclipses in 1994. Annular Solar Eclipse Animation. Total Solar Eclipse animation. 2) Long Focal Length Camera ViewDuring the partial phases, you need to use a Solar filter fitted to the end of your lens. It can be removed during the totality phase, but ensure you put it back on once totality is over. Using a normal digital camera sitting on a tripod or equatorial mount, choose your longest zoom setting or longest focal length lens (using a DSLR) and frame the Sun. Take test shots to check your composition and exposure. Make sure you use the histogram function on your camera to ensure that you're not clipping either end of the histogram (not overexposing or underexposing). Zoom in on the preview screen to check that your focus is sharp. Most cameras should be able to get an autofocus lock on a bright object like the Sun, so focus shouldn't be too much of an issue. If your camera is able, once you've got a focus lock, change the focus to Manual so that it doesn't change between shots. For a normal compact digital camera (not a SLR/DSLR) change the focus to the "infinity" setting and leave it there. The exposure won't likely need to change during the partial phases (likely to be in the range of 1/500th - 1/2000th second @ f8 ISO400), but will change during totality - especially once you remove the solar filter. Typical exposures will range between 1/250th second to 1/4 @ f8 ISO400. Exposures will need to be longer if you use a lower ISO. It will be impossible to capture the vast dynamic range of a total solar eclipse in a single exposure, so plan on bracketing and taking multiple exposures with both fast and slower shutter speeds to capture the outer corona, inner corona and prominences. These can be combined digitally using photoshop magic later on. Keep your ISO setting low (eg: ISO100) to minimise the noise. It's also worth bracketing your shots or simply check the image afterwards and re-shoot if necessary. During haze, fog or high cloud you will need to increase the exposure. You can take images during various stages of the eclipse to present a final composite showing all phases on the same image, or you could simply use a single totality image (for example) to present the Sun and it's corona during a Total Solar Eclipse. Some examples, courtesy Fred Espanek: You could also take a sequence of images over the entire eclipse (for example, every 10 minutes), resize them down and present an animated gif showing a "movie" of the Sun going through the entire eclipse phases. Two examples showing an animated gif like this, are courtesy Fred Espanek - both from eclipses in 1994. Annular Solar Eclipse Animation. Total Solar Eclipse animation. 3) Widefield Camera ViewThis technique involves a digital camera with a wife field of view or short focal length lens, and would give the most natural "eyeball view" of the Eclipse. Simply sit the camera on a tripod and take an image of the Sun in it's natural environment. The challenge is to present it with beautiful foreground interest - so put some thought into where you're going to photography from. A view of the eclipsed Sun above some houses and trees might not be as spectacular as the Eclipsed Sun rising above the ocean or interesting architecture or structure. Be creative. Visit the location beforehand and take some test landscape shots so you can be sure the image will look aesthetically pleasing. Landscape photography is an art in itself, so practising will help! Use a slow focal ratio (stop down the lens), for example f/9 or higher, to ensure that both the foreground and the Sun are captured in sharp focus. Some examples of landscape shots including the Eclipse, courtesy Fred Espanek:
Another interesting and beautiful way to present widefield images of the Eclipse is to take a sequence of images over the duration of the Eclipse (every 5-10 minutes) and make a composite of the Sun images over the foreground. It's important to keep the camera steady and make sure the tripod doesn't move throughout the night so you can ensure accurate position of the Sun when making the composite. Fred Espanek has used this technique with great success by taking multiple exposures on the same piece of film. Some of his examples of this technique are here and here. You can see his full gallery on his website to get some more ideas. Planning, Preparation and Trial Runs!Planning and preparation is the key to capturing successful, and somewhat stress-free eclipse photography.
The day of the eclipse is not the right time to be trying new equipment or new techniques. Make sure you practise! Go out on any sunny day and do a couple of trial runs - set up all of your equipment and practise focusing, composing, trialling different exposure settings, etc. The time during an eclipse can be very hectic - so you need to be well prepared and practised. Final WordA Total Solar Eclipse can be a once in a lifetime event - so don't get so hung up on photography that you forget to actually observe the eclipse. However you choose to photograph the Eclipse, we'd love to see your results posted on IceInSpace so please register and post your images to the Solar System section. Upcoming Solar EclipsesAs mentioned earlier, eclipse chasers will travel around the world to be in the Path of Totality during a Total Solar Eclipse. However if you plan to stay at home and wait for a Solar Eclipse to be observable from your location, here's a quick listing of the upcoming Solar Eclipses visible from the Southern Hemisphere over the next 10 years.
References, Further Reading and Resources
Article by Mike Salway (iceman). Discuss this Article on the IceInSpace Forum.  |
|
|||||||||||||||||||||||||||||||||||||||||||||||||||||||||||||||||||||||||||||||||||||||||||||||||||||||||||||||||||||||||||||||||||||||||||||||||||||||||||||||||||||||||||||||||||||||||||||||||||||||||||||||||||||||||||||||||||||||||||||||||||||||||||||||||||||||||||||||||||||||||||||||||||||||||||||||||||||||||||||