ICEINSPACE
|
Moon Phase
CURRENT MOON
Waning Gibbous 89.6%
|

|
 |
Astrophotography with a Dob
Submitted: Thursday, 5th May 2005 by Mike Salway
Introduction
|  |
|
|
Click to Enlarge
Astrophotography with a dob is possible!!
|
Dobsonians are usually purchased for their cheap aperture, quick setup and ease of use for beginners. People don't buy dobsonians with a plan to doing astrophotography. In fact, i've read many times that astrophotography with a dob just can't be done and that you shouldn't bother trying.
Well i'm here to tell you that it can be done, and show you the ways you can do it! You can produce some quite good results with a dob, it just requires practise, patience and perseverance.. and it doesn't have to cost a lot of money.
I don't claim to be a great astrophotographer, and with practise anyone can easily produce results equal to and better than what I have produced. I'm merely wanting to spread the knowledge, to share what I have learned and reduce the (sometimes steep) learning curve for others with a dob who want to dabble in astrophotography and share photos of what they see with friends and family.
Because this is a long article, i'll provide links to some of the sections lower down so you can find them quickly.
Why Is It Hard?
 | |
|
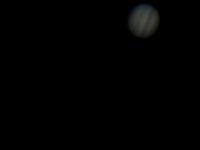
Click to Enlarge
A frame of Jupiter moving through the FOV. Click link on right for animation.
| |
By design, dobs don't track. Unlike RA driven equatorial mounts or computer driven fork mounts that track objects as they move across the sky, dobsonians just sit still until you push it and point it somewhere. Therefore when you're pointing at an object (eg: Saturn), it drifts through the field-of-view in a short amount of time, especially at high magnifications. This is the major reason why astrophotography with a dob can be hard. The constant need to nudge the dob to keep the object in the field-of-view, instead of the smooth tracking provided by driven EQ or fork mounts, is why some people say astrophotography with a dob can't be done.
Click here to see animation of Jupiter moving through the FOV (100k).
So the lack of tracking makes it difficult, but not impossible. And with practise it gets easier and you get better at it. In a moment I'll explain the various methods you can use to take photos of objects, but first you need to know what type of objects you'll be able to take photos of. What Objects You Can Image with a Dob
|  |
|
|
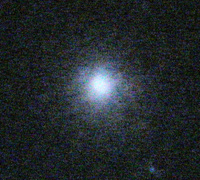
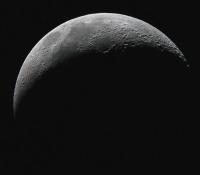
Click to Enlarge
Only bright DSOs are possible with a dob
|
Deep-space objects like nebulas and galaxies are sometimes very very dim, even impossible for the human eye to see through the eyepiece. Planets and the moon are bright, sometimes very bright. To image planets and the moon, you only require very short exposures (1/30s to 1/1000s) and so make ideal targets for dob-based astrophotography, as the image won't have moved through the field-of-view in that short exposure time.
To image deep-space objects, they can require very long exposures (from 15 seconds to 5+ minutes) in order to get enough light photons captured on the film (digital or otherwise) to form the image. This makes imaging deep-space objects with a dob virtually impossible, as any long exposure means the object has drifted through the field-of-view, and the result will be a blurry smudged object that most likely won't resemble anything. The only deep-space objects that can be imaged with a dob are the very bright ones that don't require long exposures, such as bright globular or open clusters. With those you'll need an exposure of at least 1/2s, and depending on the magnification you're using, you might be lucky to not have much trailing in your image.
So if you want to do astrophotography with a dob, remember that you'll mostly be limited to planets and the moon, bright stars or bright star clusters. Image Processing Primer
 | |
|
Click to Enlarge
Stack as many good frames as possible
| |
I'll get into the image processing later, but before I explain the methods for imaging with a dob, I need to briefly explain how the images will be processed as it will give an understanding of some of the important factors in capturing your images.
Image processing usually involves stacking a number of images of the same object, on top of one another. This increases the signal to noise ratio, enhancing the faint detail and reducing the noise. The other benefit in taking a large number of images, is to weed out the bad images that were distorted due to bad seeing so you pick and choose the clearest, sharpest images and stack those.
So in each of the methods described below, the aim is to take as many images of the same object as possible, in order to find the frames that are the clearest and sharpest, and stack those on top of one another to reduce the noise and bring out the most detail possible. Dobsonian Imaging Methods
|  |
|
|
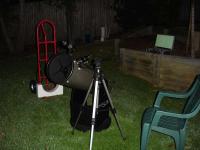
Click to Enlarge
An old picture of my afocal setup with a tripod holding the camera, pointing into the eyepiece. The camera is in my hands, rather than on the tripod in this shot :)
|
There are 2 methods you can use when doing astrophotography with a dob - afocal and prime focus. There is no "better" method, it simply depends on what equipment (cameras, eyepieces etc) you have to use, and what works best for you.
Afocal imaging is where you use an eyepiece in the focuser as with visual observing, and you point a camera into the eyepiece to take a picture of what you see. The lens remains on the camera and magnification is controlled by either changing the focal length of the eyepiece or using the optical zoom of the camera. Any type of camera can be used be afocal imaging, from a point-and-click 2 megapixel digicam, to a digital or film SLR.
 | |
|
Click to Enlarge
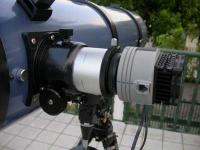
A camera attached at prime focus. It's not a dob, but you get the idea :) Image: TG Tan, Sarawak Skies
| |
Prime Focus imaging is where you remove the eyepiece from the focuser and remove the lens from the camera, and attach the camera directly to the focuser. The incoming light path is captured directly on the CCD chip (or film), and the telescope is acting like a huge telephoto lens. The magnification is controlled by changing the focal length of your telescope, usually by adding a barlow lens (2x - 5x). (D)SLR type cameras and webcams can be used for prime focus imaging, as they can have their lens removed.
So which method do you use? It depends what equipment you've got.. Afocal with a digicam is usually a quicker and easier way to start, as any digicam lying around at home can be pointed into the eyepiece and click away. The best target to start with is the moon as it's bright and easy to find! :) Ultimately prime focus, with less pieces of glass for the light to travel through, will produce the better results in the end. Afocal Imaging Techniques
|  |
|
|
Click to Enlarge
One of my first shots, hand-held afocal of the moon
|
Hand-Held
This is usually how most of us start.. We see something cool in the eyepiece and think "hey, I wonder if I can point my camera at this.. *click*". Most people already have a digicam at home, whether it's a 2 megapixel point-and-click, or a full-featured prosumer, the method is the same. Hold the camera up to the eyepiece and click away. It's important to try and be as steady as possible. If your images come out blurry, it'll either be because of focus, or because your hand moved as you were taking the image. Even at a fast shutter speed, it can be quite hard to hold your hand steady enough not to shake as you take the image.
It can get very hard to take multiple images hand-held, so you're usually just taking single pictures and choosing the best one to process. You need to position the camera to avoid vignetting and you need to work fairly quick as the image is drifting through the FOV all this time.
Here's a sample of one of my better hand-held images. I moved onto a fixed camera tripod fairly quickly, i've seen much better hand-held results than mine.
|  |
|
|
Click to Enlarge
One of my better afocal tripod shots
|
On a Fixed Camera Tripod
When you get sick of the wobble of holding the camera and you can't afford an adapter yet, you might have an old fixed camera tripod lying around the house. This is the next best method of taking afocal images. It can be very frustrating, but will usually result in crisper images than hand-held. Just attach the camera to the tripod and position it next to your dob. Adjust the tripod legs and head until the camera is pointing into the eyepiece. Again you need to work quick, as you will have to set the object on one edge of the FOV and let it drift through, you'll then have to move the tripod in and position it until you see the object in the LCD screen of the camera, and then take your pictures. Once the object drifts out of the view, you'll have to move the tripod out of the way, nudge the telescope to the right position again, move the tripod back in and repeat it all again.
Here's a sample of one of my better fixed tripod images. I moved onto a webcam after this, but if that's not an option for you, I imagine you'd want to get an adapter fairly quickly as this method can be quite frustrating.
|  |
|
|
Click to Enlarge
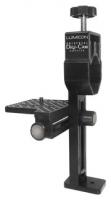
Lumicon Digicam Adapter
|
Using an Adapter
This is by far the best method for afocal imaging and will produce the best results, as it will hold the camera steady and in the correct position to avoid vignetting. Because the camera is connected to the eyepiece or focuser, it stays in position as you move the scope around. You will need to use the cameras LCD screen to find the object, so it's best to ensure your finderscope is well aligned and use it to position the scope so the object will drift through the FOV and you can start snapping away.
The best adapters for afocal imaging are the Lumicon Digicam Adapter, Orion SteadyPix Adapter and the ScopeTronix set of adapters. The Lumicon and Orion adapters are designed to suit every scope and camera combination, whereas the Scopetronix has a wizard to help you select the best combination of eyepiece and adapters to hook the camera up to the scope, based on the type of camera you have.
I don't have any sample images using an adapter, as I mentioned I moved onto a webcam before buying or making an adapter.
Those who are handy with the tools can save money and try to make their own adapters, as many others have done. You can find a few examples of that in this thread on the IceInSpace Forums. Hints & Tips for Afocal
|  |
|
|
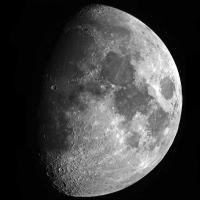
Click to Enlarge
One of my best afocal moon shots, using a tripod
|
When starting out, shoot the moon first. Use a 25mm or 32mm focal length eyepiece so the whole moon fits in the field-of-view and doesn't drift through too fast. Take a bunch of shots with different settings until you see one that looks the best without being washed out. The most common mistake is that the exposure length is too long, resulting in washed out bright areas. Change the shutter to a faster speed and try again until the brightest areas still show detail.
With the more advanced digital cameras you have control over the capture settings including the exposure, shutter speed and focal ratio. The settings you choose will depend on the object you're shooting, how bright it is, etc. but as a general guide try the following:
- Flash: Off
- Focus: Infinity
- ISO: 100 for the moon, 200 or 400 for the planets
- Shutter speed: 1/100 - 1/1000 for the moon (depending on the eyepiece you use and the phase of the moon), 1/30 - 1/60 for the planets
Some other hints:
- To get a bigger image scale, use the camera's optical zoom, never use the digital zoom. You may use the digital zoom to focus using a hartman mask. But zoom back out to optical only before taking the pics.
- Use 3s or 10s self-timer to avoid camera shake when pressing the shutter down
- Take lots! You never know when the sharpest one will pop out!
- Use highest resolution setting, it will allow you to crop out the image and maintain image size to allow for the best processing.
- If your camera has a movie mode, try it! Capture a movie as the planet drifts across the field of view. You can then follow the same steps for processing as if the shots were taken with a webcam (see below). Depending on your cameras movie mode resolution and frame rate, and the format it saves the movie in, you might get horrible compression but it's certainly worth trying.
Prime Focus Imaging Techniques
|  |
|
|
Click to Enlarge
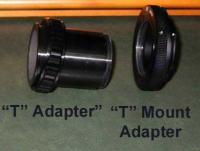
Some of the adapters you may require
|
DSLR
SLR cameras are usually used at prime focus on tracking mounts to do deep-space imaging because of their ability to do bulb-mode long exposures. However there's no reason they can't be used with short exposures to do planetary or lunar imaging on a dob mounted newtonian.
They can be connected at prime focus using the appropriate T-rings and T-adapters, with the lens off the camera and the eyepiece out of the focuser.
You may need to be careful with the counter balance of the dob, some of those DSLRs can be quite heavy, but it is achievable.
Your best bet will be single or multiple shots, like the afocal method, and trying to stack a few images to reduce noise.
It's possible that you may not have enough focus travel to bring a DSLR to focus at prime focus in a newtonian. I've heard that people have had to move their primary mirrors forwards in the OTA to allow the DSLR to come to focus. If all that sounds a bit too hard, then you might be better off with a webcam, which will most likely produce better results in the end.
|  |
|
|
Click to Enlarge
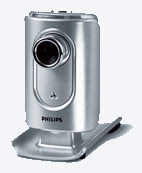
The ToUcam Pro 840k, one of the best webcams for astrophotography
|
Webcam
Last, but most certainly not least, is the webcam method for imaging with a dob. I believe webcam imaging will produce the best images with a dob, due to its ability to capture many frames in a short period of time - which is crucial for dob imaging because the object drifts through the field of view so fast. The more frames you capture, the better your chances of getting those sharp images in moments of great seeing as the atmospheric turbulance wobbles your image about.
Most any webcam will work to some degree, but some are better than others. The things you really need are a light-sensitive CCD chip (CMOS chips are inferior), and the ability to adjust capture settings so that you can set the shutter speed and exposure of the video. In the webcam astrophotography world, the are two that stand out from the crowd - the Philips ToUcam Pro 740 or 840k, and the Logitech Quickcam 4000 Pro. Both are similar, but the edge definitely goes to the ToUcam because it uses a better CCD chip. Both webcams are able to be modified internally to allow them to take long-exposures and be used for deep-space astrophotography, but this is impossible with a dob so we won't go into that aspect any further.
To use a webcam for astrophotography, the best way is to use it in prime focus mode, so you remove the lens from the webcam (with the two mentioned above, they simply unscrew from the housing) and don't use an eyepiece in the focuser. You attach a 1.25" adapter to the webcam in place of a lens and slot it into the focuser. A simple film canister with the bottom cut off can be used in place of a machined adapter. You increase the focal length (and therefore the magnification) by using a barlow lens in combination to get a bigger image scale.
Some people also use an IR blocking filter to cut out the IR light that can bleed in webcams. This simply screws into the adapter. There hasn't been any definitive comparison images showing how much (if any) difference it makes, so perhaps you can experiment yourself! :)
The hardest part when you first start, is finding the planet in the preview screen once you slot the ToUcam in the focuser. Here's a couple of hints & tips to make this as painless as possible:
- Set the gain to high, shutter to 1/25s
- Use an eyepiece to get the planet in the centre, and put the ToUcam in. With any luck, it'll be in the preview screen field-of-view but most likely out of focus.
- Try and find an eyepiece that is close to parfocal with the ToUcam, or make note of the height the ToUcam focuses at.
- Start at prime focus, without a barlow. The image will be smaller but it won't drift through so fast so you'll get time to play with the settings and align your finderscope.
- Once you see the planet in your preview screen, take note of where the planet is in your finder scope. The aim is so that when you position the planet at a certain position in the finderscope, the planet will drift through the ToUcam FOV.
- The idea of being out-of-focus, is that it will create a big airy disc (much bigger than the planet) which will help you find it in the preview screen when your finderscope is not aligned.
- Align the ToUcam chip so that the longest direction matches the direction the planet is moving. Do this by turning the ToUcam in the focuser until the image is going across the preview screen from right to left. At 640x480 resolution, this will give you more time to get the settings right, than if it the planet were moving upwards across a shorter distance.
Once you know where to position the planet in the finder to allow it to drift through the field-of-view, you're ready to set focus, settings and then capture.
Depending on the focal length you're imaging at, the planet could drift through the field-of-view in about 11-13 seconds (at ~2500mm FL). So you need to work quick sometimes, and sometimes you need to go over the process many times before you're ready to capture your first avi.
Capture Steps
- Focus the image. Use a hartmann mask on a nearby brightish star to get focus right. You'll need to slew to the star, get your focus right as it moves through the preview screen, and then slew back to the planet. This is why you need to know where to position the finder crosshairs in relation to the planet, so that the object will drift through the field-of-view. Otherwise it will be the most painful process to do a lucky dip search trying to see something flash through the preview screen as you scan about.
- Set the capture settings. Once focus is right, you need to adjust the capture settings. In fact, this and focusing go hand-in-hand, because you can't focus the image unless your capture settings are close to being right, and you can't set your capture settings unless the image is focused. It could take many passes through the field-of-view to get these two right, but it makes a world of difference to the final image so you have to ensure you've got it right.
- Capture the image. Align the planet in the finderscope so that it will drift through the preview screen. When the planet is fully within the preview screen, start capturing. Stop capturing just before it's about to go off the other side. In general, you need to stack as many frames as possible, so repeat this step 5-10 times so that you have enough frames to stack.
Once you've practised it enough, these 3 steps will get much quicker. Nowadays when i'm down to the capturing, I can be realigned within 5 seconds, have the object start drifting through and start capturing again. When I started though, this could be 30-60 seconds and it was VERY frustrating. Webcam Capture Settings
|  |
|
|
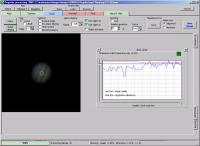
Click to Enlarge
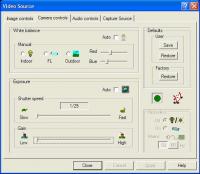
Example of capture settings from K3CCD Tools
|
I use K3CCDTools version 1 as my capture software. Version 1 is still free, but you need to update the key every few months.
The capture settings you use will differ depending on the object you're capturing and local seeing and transparency conditions. The following is a rough guide, but you will need to play around to find what works for you.
General
- Brightness: Leave this default at 50%
- Saturation: Generally set this high, around 80-95%
- Gamma: Generally leave this at 0 (maximum contrast)
- Gain: Leave this as low as possible (0 if possible), as higher gain will introduce more noise (grain in your image)
- Shutter: The combination of gain and shutter affects how bright your image is. Start off at 1/25s, and if the image is too bright try adjusting to 1/33s, 1/50s, 1/100s until the image isn't overexposed or too dark. If it's too dark, you can then try increasing gain.
- Frame Rate: The lower the better, if seeing is good. The ToUcam works on the USB1.1 interface, and at 640x480 resolution it has to compress the data to shove it down the pipe fast enough. If you're using 10 or 15 frames per second (fps), it will have to compress the data more than if you're using 5 fps. So the resulting image will lose detail. The trade off is, 5fps captures less frames in the same amount of time, and when seeing is bad you want to capture more frames to try and catch those moments of good seeing. So the general rule is, if the seeing is bad, try 10 or 15fps (never more). If the seeing is good or very good, use 5fps.
- Colour: Set to auto while the planet is drifting through the field-of-view, and uncheck it just as it's about to leave the field-of-view. Then leave it at that level.
Saturn
- 1/25s shutter
- Capture as many frames as you have time for.
Jupiter
- 1/33 or 1/50s shutter
- Capture for a maximum of 90-120 seconds combined (including re-aligning time), otherwise the features on jupiter will have rotated and you'll be blurring the image.
Moon
- 1/100 to 1/1000s shutter
- Capture in black and white
- Because the moon is bigger than your preview screen, you need to be looking at a specific feature or crater to know when to start and stop capturing. Later during image processing when you want to stack the frames, you need a feature to align on so you can't just let the whole moon drift through the view. You need to pick a feature and start capturing when it enters, and stop capturing before it leaves the view.
What is a Hartmann Mask?A Hartmann Mask is a focusing aid, to help you obtain crisp sharp focus for your imaging. See this article for instructions on how to make, and use, a hartmann mask as a focus aid.
Image Processing
|  |
|
|
Click to Enlarge
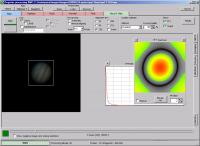
Registax Alignment page
|
So you've got a couple of avi's or images.. Good for you! Half the job is done.. Yep, that's right, only half. Image processing is just as important as the capture, and it usually takes me longer to post process the image than capture the frames.
Image processing is a huge skill in its own right, and I will never be able to cover in-depth the techniques and skills you need in this article (plus, I'm no expert!). So i'll outline some rough hints and tips but ultimately it will require lots of practise and trial and error. So don't be afraid to try different things!
|  |
|
|
Click to Enlarge
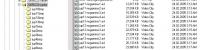
Naming convention I use
|
Name Your AVI's
If you're like me, you might have played around with different settings for different sets of captures. You need to name your avi's so that you don't mix them up while processing them. Feel free to come up with your own scheme, but I name them in a sequence for each capture.. eg: If I have 5 avi's of Jupiter, i'll name them "jupiter1-1.avi" through to "jupiter1-5.avi". The next "set" will be "jupiter2-1.avi" through to "jupiter2-4.avi". You get the idea. This will help in the next step (virtual dub) when you combine the avi's.
|  |
|
|
Click to Enlarge
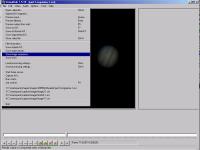
Virtual Dub, save as image sequence
|
Virtual Dub & ppmcentre
If you've used a webcam, you've got some avi's now. Registax can work off multiple avi's but it's easier if they're all combined into 1 avi, and if the planet is centered in the middle of each frame. If you captured the moon you can ignore this step.
In Virtual Dub, open the first avi (file->open) (eg: jupiter1-1.avi) and then append the rest (file->append avi segment) by appending the "next" avi (eg jupiter1-2.avi). This will append the entire sequence (1 to 5). You can then use your left/right arrow keys to scroll through the complete avi. Use the "delete" key to delete any obviously bad frames due to poor seeing or where it is not completely within the frame.
We then want to use a program called ppmcentre written by Anthony Wesley, which centres the planet in each frame. It works on bitmap files, so we want to save the entire avi sequence as a set of BMP files. To do this, go to file->save image sequence. Select "bmp" as the option, select the directory and filename, and hit go.
Now onto ppmcentre, it's a dos-based program so just put it in a directory somewhere, open up your dos prompt, and run it. I use the options "-width=400 -height=400 <dirname>" where <dirname> is the directory of the bmp files produced by virtualdub. It overwrites the same BMP files, and it may take a little while to run depending on the speed of your computer and how many frames you've got.
These BMP's can then be dragged into registax for aligning and stacking.
|  |
|
|
Click to Enlarge
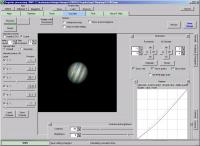
Registax Wavelets tab
|
Registax
Registax is used for aligning and stacking multiple images/frames, as well as wavelet processing to reduce noise and bring the most detail out of your image. No matter how you produced your frames (afocal or webcam), you will need to load them into registax, choose a feature to align on and align, stack and wavelet process your images. Registax processing is a skill in itself and so I won't go into it indepth here, but i'll provide a few hints and tips on some of the settings I use.
- Aligning: Choose "Gradient" method.
- Optimising: Create a reference frame before optimising. Lightly process wavelets and press continue, then optimise.
- Stacking: Use the stackgraph to adjust how many frames to stack. If the image is dull, try the "histo stretch" checkbox to brighten it up.
- Wavelets: Personal preference here, but I do the following:
- "Estimate" RGB shift
- Adjust wavelets 3-6, with 3 being the highest value and the rest dropping down. Sometimes I don't even touch 5 and 6.
- Use contrast, gamma and histogram to adjust colour and brightness of your image to your taste.
- Save
Photoshop
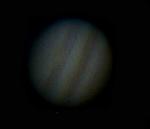
Once you've stacked and processed the image in Registax, some final touches can be applied in photoshop. Again, it depends on the image itself, whether it's lunar or planetary, etc. For lunar images, an unsharp mask works well. You can also put in some text, change the canvas size, etc. You'll need to play around here because there's no hard and fast rules. Image Processing ExamplesTo show how important stacking and image processing is to the final result, here's an example of a single frame, a stacked image (with histostretch on), and the final processed image. The processing included RGB shift, wavelets, contrast and gamma. The exact settings can be seen in the "registax wavelets page" image above.
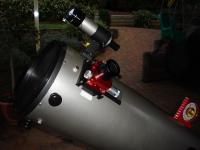
Taken with my 10" dob + ToUcam on the 24th Feb 2005, on a night of very good seeing.
 | |  | |  |
Click to Enlarge
Single Frame
|
|
Click to Enlarge
100 Frames Stacked
|
|
Click to Enlarge
Processed with Wavelets
|
|
General Hints & Tips
|  |
|
|
Click to Enlarge
Illuminated Finder and Moonlite CR2 focuser
|
Lastly, a few general hints and tips that are common to both afocal and prime focus imaging.
- Get a better focuser, or re-lube your existing one. I found that trying to focus with my old rack & pinion was very hard as the image drifted through the FOV in 13 seconds. Every time you moved the knob, the image wobbled around and it took a second or 2 to dampen down to actually check the focus. I've now got a moonlite CR2, and the slow-mo focus knob is perfect for getting crisp focus. The image doesn't wobble about when i'm focusing as it drifts through the FOV.
- Get or make an illuminated finder. After staring at a laptop screen, trying to re-align looking through your finder is very difficult, as the black crosshairs don't stand out against the sky. Now the red background stands out against the black crosshairs and it's very easy to re-align the planet in the finder so that it will drift through the FOV. Once I align the finder at the start of an imaging session (where I know where to position it so the planet will drift through), I only waste 5-10 seconds between captures realigning.
- Ensure your az motion is as smooth as you can get it. It makes realigning easier if it's not stopping and starting and jumping about when you're trying to move it short distances. Perhaps try one of the base mods i've done.
- Check your collimation. Newtonians will produce bad images if your collimation is not good. De-focus on a star and check that the shadow of the secondary is in the centre of the disc. Collimation needs to be good for visual observing too, you'll just get bad views all the time until you're comfortable and confident checking and setting your collimation. It's the must-know skill to learn if you own a newtonian.
- If the seeing is really bad, don't frustrate yourself by even trying to image. It's ok when you're learning, because any practise is good practise, but as you get better, you'll want to go forwards, not backwards. Most times it's not worth trying to image something low on the horizon either.
- It takes time, and practise, and patience. Imaging with a dob is not easy, and a lot of the time it's not fun, and a lot of the time you don't get results worth posting.
But persevere, and you will get there. I've been doing it for about 6 months now, and my images have slowly improved.. one day I'll get that magic night of seeing and my images will be crisp and sharp, like the tracked shots.
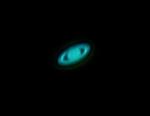
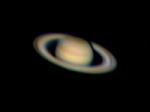
Here are 4 images showing my progress.. The Saturn on the left is the first shot I ever took with the ToUcam and my dob. It was taken on the 1st December 2004. The one on the right is one of my best Saturn shots taken with ToUcam + dob, it was taken just over 2 months later, on the 7th February 2005.
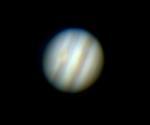
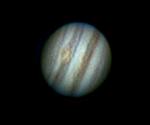
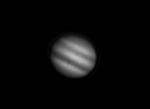
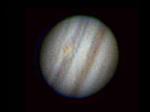
The Jupiter on the left is my first shot of Jupiter, taken on the 22nd December 2004, and the one on the right is one of my best, taken 2 months later on the 24th February 2005.
Hopefully with this article, you'll be able to make faster progress than I did, and you'll also show that astrophotography with a dob is possible!
 | |  |
Click to Enlarge
First Saturn with the ToUcam + dob
|
|
Click to Enlarge
One of my best Saturn with the ToUcam + dob
|
|
 | |  |
Click to Enlarge
First Jupiter with the ToUcam + dob
|
|
Click to Enlarge
One of my best Jupiter with the ToUcam + dob
|
|
References & Further Reading
References
Further Reading
Written by Mike Salway (iceman). Discuss this article on the IceInSpace Forums.
|
|
|


