ICEINSPACE

|
DSLRFocus, the essential DSLR companion
Submitted: Friday, 13th January 2006 by Paul Medcraft
Straight up version 3.3.14 of DSLRFOCUS loaded on my WinXP laptop smoothly. The camera was found and connected, the only tense moment was waiting with fingers crossed for the new USB device from Backyardastronomy to be found and connected. Green across the board! Any time a developer puts a “green for go” icon into software they are telling the world that the software is simple to use, hey, this one is simple enough to use in the dark! DSLRFOCUS is an essential tool when considering a Canon DSLR (some features can be used with non Canon DSLR’s although this review relates only to the software as it is used with the canon 300D). What happens after first use is where things get interesting, what appeared on paper to be essential rapidly became indispensable after using the software a few times. I genuinely don’t know how people do it without this software or something similar. I imagine most who buy the software initially do so to achieve quick focus, the original release of this software was not much more than a focusing tool. My how times change, after use you quickly forget how tough focusing can be (without the software) and treat the process of focusing as a minor part of the set up for the evening. The real benefit of the software is then available:
There is a very active Yahoo user group that has developed over time providing an enormous amount of support to newbies and experienced users alike, many of its members are easily recognised names from the gallery sections of the major Astronomy magazines around the World. You have a question regarding the software or frankly anything relating to imaging with a DSLR and you will get a response.
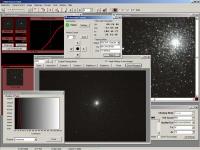
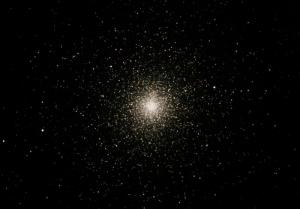
I have had several opportunities to use the software over recent weeks and have lain out below the softwares role in a recent imaging session. Having set up and Polar aligned the scope I GOTO a reasonably bright Star very near the object I intend to image. I connect the camera to the scope and fire up DSLRFocus. Before I use it I look through the camera window at the bright star and rough focus the star to a point. As many reading this will know this is still miles away from good focus and reinforces the need for a solution like DSLRFocus. At this point I connect the camera to the software and select the focus option. I then press the space bar and seconds later I have a full size image. The software has a neat grid feature that allows me to quickly find the centre of the image and I place my curser on a fairly bright star. Immediately the image is minimised and I have now have access to a series of graphs Including Full width half maximum and a sub frame of the selected star (Figure 1). If I have a digital focuser I can auto focus, in my case I am using a Meade electronic focuser and I am able to make minute adjustments whilst sitting at the laptop. After an adjustment I simply press the space bar again and another sub frame of the same star quickly downloads. Using a combination of the graph, the FWHM numbers and the image itself I can achieve good focus in a matter of a few minutes. Ok ready to go. I now slew the short distance to my object of choice for the evening, in this case 47 Tucanae (NGC104). The reason I focus nearby is to avoid mirror flop on my Cassegrain potentially requiring a refocus. My GOTO is good so I am confident that the object will be on the chip. I simply change the exposure time from around 4 seconds (for focusing) to 30 seconds and after this image has downloaded I can view the image in a frame and more importantly place a cross hair on it. Now I can move the scope or the camera to achieve the image I want. When the object is centred I can change to the long exposure mode that switches the 300D into bulb mode. I select 40 exposures and an exposure time of 30 seconds. As the camera is in bulb mode I can choose any imaging time I want. The 300D starts to show some noise after 3 to 4 minutes so for that reason and the fact that I am not auto guiding I tend to go with shorter time frames and stack my images. I choose where I want the images to be saved, in this case I have a large card in the camera so to speed up the process I save the images to the camera, lastly I select ISO800. I like to have an idea of how it is progressing so at the risk of annoying my neighbours I also switch on the voice countdown feature. The software gives me the ability to allow time between exposures and also if available on the camera mirror lock. For this session I allow 10 seconds between each image to stabilise the camera mirror. I press start and step back. After the first image I can select the review option and have a look at the image thumbnail, which will give me an idea of how I am going. There are also automating functions that would allow me to program a more detailed imaging session. The results (Figure 2) for the evening are great and would be very hard for me to achieve without the software.
I have a lot of Astronomy software; DSLRFocus is amongst the most vital. Review by Paul Medcraft. Discuss this review at the IceInSpace Forums.  |
|
|||||||||||||||||||||