QHY8 One Shot Colour Cooled Camera
Submitted: Wednesday, 11th June 2008 by Clive
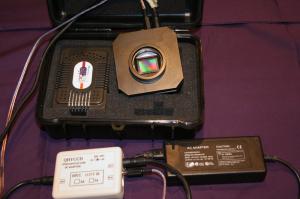
After quite some time using a Canon digital camera for prime focus imaging it was time to update, the choice I made was the QHY8 One shot Cooled Camera, It arrived End of April 2008.

Research


A number of considerations were taken prior to the purchase. I had been using a 6 megapixel modified Canon digital camera for a while, and liked the size of the image and didn’t want to go to a smaller size. Noise on warmer nights had been an issue, and just the ability to do a lengthy exposure. I had stuck with 360-second exposures for most imaging. There was also the SLOW download times for setting up the frame and testing focus, and finally I had to stand with a stopwatch to time each of my exposures. So was there a better alternative that wasn’t going to break the bank.

People who had recently purchased a QHY8 were PM’d with “ what do you think. Is it any good”, as it had only recently been used the answer was I’m still working on it. Further postings on IceInSpace saw a consensus of opinions that this was a camera to own…… So I bought one.

Arrival of Camera


End of April and a smallish cardboard box marked FRAGILE arrive at the Post Office, this is it.
Returning home the contents were placed upon the kitchen table, all items ordered had arrived good condition:
  • 1x QHY8 Camera and UV/IR filter neck
  • 2x 5m cables
  • 1x Airtight Box and Heater/Dryer
  • 1x 6 Amp power supply
  • 1x control box
  • 1x Disk containing drivers and some instructions
I had ordered the longer 5metre cables as its easier to place everything around the mount rather than short cables that can’t reach all points as the mount is re-arranged. Also included in the purchase was the small airtight carry case and the Silica Heating/drying unit, the little case is very strong and more than suitable for storage or transportation. An option of a 6 amp power supply was chosen over the 4 amp one as it was only a couple dollars more, and its nice to have a little space in the power department.

An optional filter/neck is a clear version which allows for InfraRed or Ultra Violet Imaging with appropriate filtration (didn’t order this).


image001.jpg

Click to Enlarge
QHY8 bits and pieces

Initial Testing


The first thing to do was open up the instruction disk and check the contents, as per the text file, the recommended drivers were installed. Following what was a clear and simple document (including pictures) the camera was put together with all the required cables, fairly straight-forward and well documented, on the computer its to be used with (running XP) it was recognized instantly and we are ready to go. It made a nice change not having to hunt all over the net trying to find a solution for a conflict.

The package came with a program for taking the image and drivers for other software, although the program recognized the camera, there was no documentation on how to use the program (apparently the drivers had been updated and the program manual had been omitted as it possibly needed updating). Some enquiries were made with the Australian supplier who provided basic information and a commitment to provide some documentation on his website. Now available online here.

Running the program and with a basic grip on some issues, I let the camera run, while I assessed the various functions of the imaging program.
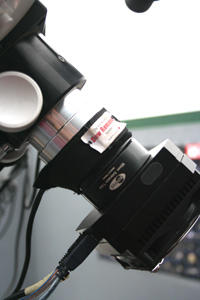
  • The camera is able to take images using Millisecond or seconds as its timing and a run could be done of Multiple images whilst one was doing other things (finally all my exposures would be exactly the same length). EXPO in sequence capture, the red star selects Seconds or Milliseconds.
  • There is a preview function much like a webcam where a short  preset time exposure would be refreshed every second or so, it could be adjusted to include longer exposures up to about 5000 milliseconds push the PREVIEW button.
  • There are 2 basic settings GAIN and OFFSET, gain is pretty much just amplifying the signal like ISO had on the digital camera, whilst offset was a different issue I had not experienced before. It also works with the strength of the signal but adjusts the bottom end where signal starts to be received (a bit like the idle of an engine). It needs to be adjusted so that at the quickest exposure possible (bias exposure) a signal would be received from all the pixels, It could be roughly assessed using the preview function setting the GAIN and sliding the OFFSET  until the signal line on the histogram was seen (see picture on the left below). In my case when I set the gain to 50% adjusting the offset saw the signal kick in at about 114,  NOTE : when shooting in preview mode the image is Binned 4x4 ….. now switch off the preview button (push once), change Binning to 1x1 (under RESOLUTION).  Set EXPO for 1 millisecond and push MAKE EXPOSURE button, the image will be a coloured image, and I found I had to increase offset to 117 to get a signal. What you are looking for when you expand the histogram is a bell shaped curve that is not clipped at the lower end (see picture on the right below). The stretched image should show a random distribution of signal…  any banding or similar indicates either an interference or a fault. The two images are not linked to the same test, but the smaller was supplied by an owner of another program, just to show what to look for.
image003.jpgimage005.jpg

Click to Enlarge
Adjust Gain and Offset until Signal is seen

Click to Enlarge
Sample histogram once ready
  • I had heard that the Dark frames on these cameras had to be seen to be believed, I did a couple at 10 minutes and thought I had a problem as no hot pixels could be seen, there was no problem they are just so smooth, it took an exposure adjustment of 7 stops to the 10 minute image to show up even a fraction of the noise that I had expected. I have done a quick comparison a 600-sec shot at the settings I would use for an image for the QHY8, and a Cannon 350D shot at ISO 800, which I normally used, for the same length of time. NOTE  temp was 22 deg c when I did this. But ive shot nights where its this for hours. The results are below as per captions. NOTE … The QHY8 has not been Debayered and is as is from camera.
image006.jpgimage007.jpg

Click to Enlarge
QHY8 600 second exposure, Gain 50 Offset 117

Click to Enlarge
Canon 350D (temp 22C) ISO 100, 600 sec exposure
image008.jpgimage009.jpg

Click to Enlarge
QHY8 7 stops exposure added

Click to Enlarge
Canon 350D 7 Stops added
image010.jpgimage011.jpg

Click to Enlarge
QHY8 1:1 crop from center of image (7 stops added)

Click to Enlarge
Canon 350D 1:1 crop from center of image (7 stops added)
  • The output of the camera can be a FITS file, Bitmap or an AVI. The camera images FITS in a 16-bit format. Make sure when imaging the Fast mode is not on as it produces a lower quality image….so I’m told.
  • As far as I can assess the program does not have a DeBayering function so you will need to get another program such as Maxim, Astro Art, Images Plus, Nebulosity, or similar, you can image but until its debayered you are looking at black and white, I downloaded a free plug in from NASA (FITS LIBERATOR) but I only ended up with a 16 bit grayscale image. (a new version is being made as this is being written)
  • The program has a script function for pre-programming exposure runs. I have not tried this, and not planning to in the near future.
  • There is a focus section built into this program, clicking on a star during preview will bring up a dialog that shows star intensity both in a graphic format or numerically push FOCUS to initiate.
  • The camera has Binning either 1x1 (normal) 2x2 or 4x4, the last two cannot be debayered so will be monochrome.

Cooling


The camera has cooling to its chip, reputed to be 45 degrees C below ambient. It was not measured so presume it to be correct. There is also a small high speed fan at the rear of the camera body which showed no evident vibration. One thing some are going to find a problem is that of condensation on the outside of the first filter, because it's co cold inside the camera it passes on some of that to the front filter, the inside has remained clear but when another attachment is applied the moisture in the trapped air condensed on the front of the supplied UV/IR filter, it also condensed when no further filters were applied. It is interesting to note that when a Baader MPCC was only used I noticed no condensation perhaps as glass was thicker it would be a longer time to cool or between lenses is dry or a vacuum? Can’t say for sure. 

There are a couple of solutions - You can either remove all the moisture from between filters Via a silica Gel moisture absorption, I put it all in a sealed plastic bag and watched the humidity drop and then reassemble in the bag….. It worked to a point but you have to pretty much get it ALL out. I did toy with the idea of assembling it in a large walk in freezer as once temp is low enough the moisture freezes out and the air is dry….. never tried it, maybe it works? In the end I just attached a 2 inch Dewheater strip around the tube and left it on, it worked well enough to become the way I will use it in the future (see picture below).
image012.jpg

Click to Enlarge
With dew strap

Specifications


Below are specifications provided at the distributors website :
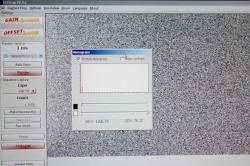
  • Total pixel: 3110 x 2030
  • Active pixels: 3032 x 2016 
  • Pixel Size: 7.8um x 7.8um square 
  • Color method: RGB BAYER film on CCD 
  • Effective sensor area: 28.4 mm diagonal 
  • Readout noise: 8 -12 e @600Kpixel/s 
  • QE: 60% at Green (Peak), 50% at Blue and H.a 
  • Microlensing on chip 
  • Progressive Scan 
  • NABG: -110dB
  • Cooling System: 2-Stage TEC: -45C below ambient Built in 12V low noise FAN Power consumption: 12V 3.3A
In addition the chip is a 6 Megapixel ICX413AQ super HAD chip….. The same used in the SXV M25 for less than half the price.

First Light


Time for a bit of real world testing. Plug in camera and associated equipment, open capture program and away we go.

  • SCOPE: 12 inch Newtonian reflector
  • MOUNT: G11 Losmandy
  • GUIDESCOPE: ED80
  • GUIDED BY: PHD 
  • CAMERA:  QHY8
  • OBJECT: Hydrogen Alpha Emission Nebula “Cats Paw” in Scorpius

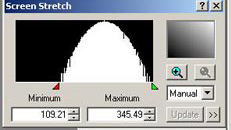
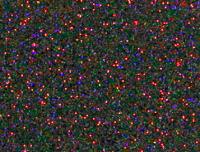
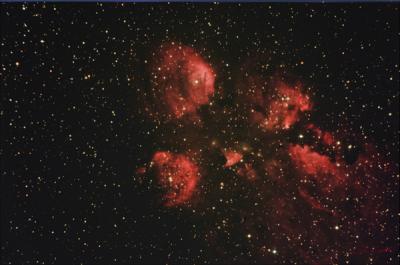
This was the first time I had done an image with the QHY8 so I set it for an initial run of 10 x 600 seconds, adjusted focus just using the preview function, I could have used the focus section but found I could adjust well enough as it was, and this was just a test run to see the cameras response. Auto guiding was set up, and away it went. It was a very dewy night and I decided to leave it all alone and go into a warm house.

A bit over an hour later, up to the observatory to check the results. At this point I got somewhat of a surprise/shock having done only DSLR exposures previously, I expected a similar image only cleaner. That’s not exactly how it happened.

When using a DSLR I typically exposed for 6 minutes at ISO 800, shooting at this would typically fill the pixel wells with a bright object such as Eta Carinae, so a bright image would be displayed. Using the QHY8 I estimate it would take about 5 times as long to fill the pixel wells to that same brightness on the display screen (note brightness does not equate to bit depth or detail), HOWEVER the QHY8 has a far greater Bit depth than the old camera I had been using, 16 times to be precise, so the long and short of it is although the image APPEARS dark it actually has more detail, and once a stretch is applied more can be done. An added benefit is that if you want to do really long exposures and collect a few more photons for that faint detail, you can.

I hope that makes sense.

The processing really lies outside of the parameters of this brief report, but a brief summary would be thus.

       1. Calibrate    2. Debayer    3.Stack    4.Stretch    5.Color Balance …… tinker as you will.

The image below has NO dark frames applied NO flat fields (could have used a flat field though). Total exposure time was only an hour as it was meant to be a test with settings: Gain 50 Offset 118 10 x 600 sec.

image013.jpg

Click to Enlarge
This image has been debayered and average stacked no further processing
image014.jpg

Click to Enlarge
After processing
The finished item, whilst not a masterpiece (needs better framing, longer exposure time, flat fields, coma corrector) it does show this is a capable camera with good H alpha response, and now knowing its capabilities and how to use it should be able to do better….. But its first light so will leave it alone as a benchmark to improve upon.


Conclusions

Pros
  • Price is way below similar CCD cameras
  • Smooth performance
  • Cooled to 45C below ambient
  • Well made, NOT PLASTIC !! All anodized.
  • Long exposure times
  • 16 Bit performance
  • Dedicated Astro camera
Cons
  • Other software to process needed
  • Documentation sparse

All in all at the price the software issue is easily covered and still remains a bargain, so would I buy it again?

Absolutely.

This camera would have to be what you would consider a bargain; finally the CCD market has come to a price available to many imagers. This is probably where I add the disclaimer that I have nothing to do with the retailer of these cameras, and well I guess that’s about it, hopefully this will give someone interested in the camera some ideas, and those who have purchased it some of the fundamentals of its working.


Review by Clive (Alchemy). Discuss this review on the IceInSpace Forum.


Advertisement
Bintel
Advertisement
Testar
Advertisement
ICEINSPACE
AUSTRALIAN AMATEUR ASTRONOMY
Copyright © 2004-2024 ICEINSPACE.
All rights reserved.