ICEINSPACE

|
Astrovid Voyager X - Planetary Imaging Camera
Submitted: Thursday, 8th November 2007 by Mike Salway
My main passion in astrophotography is lunar and planetary imaging which I’ve been doing for a couple of years. One of the major factors in the quality of images that you can produce comes down to the capture device you use, and planetary imagers are always on the look out for new imaging devices which can deliver us even better images by having, for example, lower noise, higher sensitivity and faster frame rates. For the past year I’d been using the DMK21AF04 from The Imaging Source. The DMK21AF04 is a monochrome camera, with a 640x480 resolution and capable of an uncompressed 30 frames per second (fps) through a firewire interface to the computer. My version is the older non-AS version – the current batch of DMK21AF04.AS cameras is capable of 60fps but all other specs are the same. It was with much interest when in June 2007 I learned of the new Astrovid Voyager X planetary camera. Like the DMK, it’s a monochrome camera but with a larger format chip (1024x768) and delivering fast framerates over an uncompressed USB2 interface.
I contacted John from Astrovid, who was kind enough to send me a Voyager X for the purposes of a trial. I was excited to find out if this camera could deliver better data, to help me produce better images. The larger format chip (over the DMK) was a big plus for me for a couple of reasons:
The Astrovid Voyager X retails at US$695 and comes standard with a USB2.0 cable, 1.25”-C adapter, Instructions and a 1-year warranty. The capture software (St-Cam) is freely available for download from the Astrovid site. Evaluation CriteriaSo what were my evaluation criteria? What was I looking for, to decide whether the Voyager X was a worthwhile upgrade over my DMK? Naturally I would be comparing the Voyager with the DMK, and would include criteria such as:
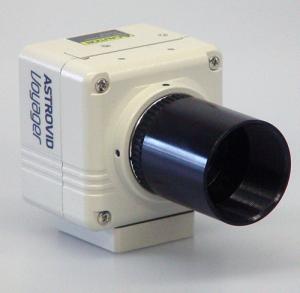
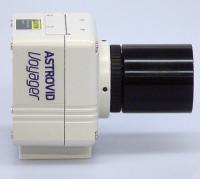
Physical AppearanceThe Voyager X camera is about the size of a small fist, measuring approximately 50mm in each dimension. It’s quite light, weighing only 145g meaning there are no additional balance issues when connecting it to a telescope.
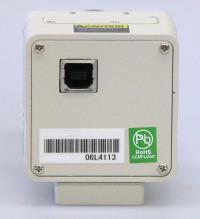
Connecting to a TelescopeThe Voyager X comes with a 1.25”-C adapter, making it immediately able to be inserted into any standard telescope focuser for monochrome imaging (for example of the Moon or the Sun). To produce colour images (of planets, for example), you need a filter wheel and a set of RGB filters. I already had this (an Atik manual filter wheel and Astronomik LRGB filter set) for use with my DMK, so it was a simple task to unscrew the DMK from the filter wheel, screw on the Voyager X and I was ready to go. Connecting to the LaptopThe Voyager X connects to the laptop via a standard USB2.0 cable, and it draws the power it requires direct from the USB port. This is a great plus, since it doesn’t require any additional interface cards or powered hubs to get the camera going unless you use an old laptop with no USB2 ports. Installation and SetupThis was about as easy as it can get – installed the software, plugged in the camera and followed the prompts. It was ready to go in less than a few minutes. I’ll talk about the capture software itself a bit later. Camera and Chip SpecificationsThe real advantages or disadvantages of any imaging device come down to the CCD it uses and the chipset of the camera. Here I’ll list the documented specs of the Voyager X, and compare it with the specs of the DMK21AF04. As an additional comparison, I’ll list the specs of the DMK31AF04 which as it turns out, uses exactly the same CCD as the Voyager X. I would’ve liked to have had a DMK31AF04 for a more direct comparison while taking images, but I had to compare the Voyager with what I had.
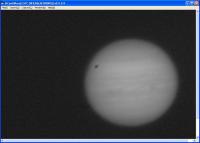
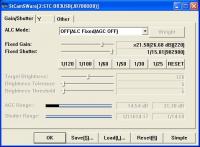
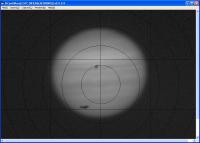
* You may find the DMK at a cheaper price if you shop around. For lunar and planetary imaging, we are most concerned with the following: Frame RateBoth cameras are capable of a frame rate of 30fps, which is about right for what we need it for. For some dimmer objects (eg: Saturn, Uranus) a longer exposure time (and slower frame rate) are required. For bright objects like the Moon, then a faster frame rate is desired because a shorter exposure can be used. Pixel SizeThe pixel size of the ICX204AL (in the Voyager and DMK31AF04) at 4.65 microns is smaller than the pixel size of the ICX098BL (in the DMK21AF04) at 5.6 microns. This means it’s collecting less light in the same amount of time. This translates to the DMK21AF04 being more sensitive than the Voyager X and DMK31AF04. The smaller pixel size in the ICX204AL also means a larger image scale. At the same focal length, the Voyager X and DMK31AF04 will produce a larger image than the DMK21AF04 – this is generally a good thing because we often resample smaller images (during processing) to make them appear larger. The trade off is that smaller pixels can mean an increase in noise levels. Dynamic RangeThe higher dynamic range the better, and some cameras such as the Lumenera SkyNyx 2-0 and the PtGrey Dragonfly Express are 12-bit meaning a broader range of intensity can be captured, to reveal more detail in the shadows and highlights. The 3 cameras listed above are all 8-bit. ResolutionThe larger chip (1/3”) ICX204AL (in the Voyager and DMK31AF04) has a resolution of 1024x768 pixels, while the ICX098BL (1/4”) in the DMK21AF04 has a resolution of 640x480 pixels. The larger resolution means you can capture more of the moon in a single run, or you can capture Jupiter and some of its Galilean moons in the same frame – whereas this is only possible with the DMK21AF04 if they are very close to the planet, or you if you make composites and mosaics. Capture SoftwareThe Voyager X comes with its own capture software, StCam. The instruction manual details each of the tabs and what they do, and following the instructions, it was easy enough to get to the point of adjusting the settings I needed to and start recording an AVI. The picture below is what you are presented with when the camera is running. The additional options are all available via the menu and none persist on the screen. The large black blobs are dust on the CCD (cleaned after this session).
The 3 pictures below show each of the 3 tabs and the settings available to be modified. The shutter speed and gain are the main interest in the first tab, the gamma is in the second tab, and in the third tab you can set the clock speed and output image format. The Clock Speed is where you adjust the frame-rate (fps) and has settings of NORMAL (30fps), ½ (15fps) and ¼ (7.5fps). The Still Image Pixel Format is where you can adjust the codec of the output AVI. GRAY8 is an 8-bit monochrome format, and the other setting available was RGB24/32 (full colour bitmap avi). The Mirror and Rotation settings can be useful for orienting the image, instead of rotating the camera in the focuser.
A nice feature is the ability to overlay a grid and/or concentric circles over your capture screen - potentially somewhat useful for drift aligning or watching for drift.
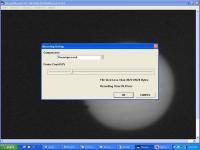
Once the settings were all adjusted to taste for the image in the preview screen, it was time to start recording an avi. A recording dialog appears (as shown below) where you can move the slider to the right for a longer recording time. The frame count, file size and recording time are all adjusted as a result, depending on your frame rate and codec. You also have to set the name of the file that you’re recording to.
Evaluation of Capture SoftwareI’ve used a few different programs for capturing planetary data, and they all usually have similar features but some set themselves apart with ease of use or some additional feature that others don’t have. The capture software supplied (StCam) will certainly do the job, however it’s lacking some key features that really let it down. Below I’ll list some of the good features, and some of the problems. Good
Not So Good
The problems above really restrict the ease of use as a piece of capture software and certainly had me frustrated at times. When comparing it with ICCapture (for the DMK), Virtual Dub or K3CCDTools, it’s missing key features that let you concentrate on the task at hand, instead of struggling with the software. Localised ProblemsI had the problem of not being able to record at the fastest (30fps) frame rate, due to the speed of my laptop. I guess it just couldn’t handle the amount of data trying to be transferred. This meant I was limited to capturing at 15fps. This is not a problem with the Astrovid Voyager X or the StCam software, and I also have intermittent problems with the DMK21AF04 recording at 30fps (with the lower 640x480 resolution), but I am able to work around it and still record at 30fps once it gets going. Unfortunately I was unable to work around the problem with the Voyager X, and all my test images were recorded at 15fps. Similarly, using StCam I had to use the GRAY8 codec – when I tried to use RGB24 or RGB32, the increased filesize pushed my laptop over the edge and I was losing/dropping over 50% of the frames while capturing. This wasn’t really a problem a problem for me though, as the camera is only 8-bit so no additional information is captured when using the RGB24/32 codecs - GRAY8 is all that’s required. Other Capture SoftwareDue to the capture software frustrations already described, I tried using alternative capture software with the Astrovid Voyager X. A summary of the tests is below:
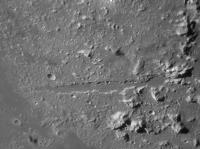
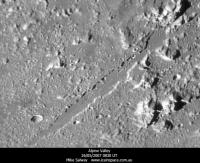
I tried using both VirtualDub and K3CCDTools v3 as capture software, and they both have excellent features, including automatic file naming, histograms, easy start/stop and more. However they were both unable to change the codec to GRAY8 and could only be used in RGB24 mode. This resulted in freezing while previewing and capturing, as well as dropped frames. As a result of these problems, I was not able to use any alternative capture software for my image tests. Image Test ResultsI was able to use the Astrovid Voyager on about 6 clear nights over the period of about a month, in some very average seeing, as well as some very good seeing. All images were taken with my 12” Newtonian on an EQ6 mount, with a 5x powermate and Atik manual filter wheel with Astronomik RGB filters. This setup gives a focal length of around 10.5m. The images below show the Alpine Valley (Vallis Alpes) on the Moon. The left image is from the Astrovid Voyager X, captured on the 8th June 2007 in good seeing. I did not use the DMK on this night, so I have added an image of the same area, captured with the DMK21AF04 under similar lighting and similar good seeing from a few weeks earlier. Immediately obvious is the larger image scale of the Voyager X compared to the DMK, as a result of the larger chip (1024x768 vs 640x480) as well as the smaller pixel size (4.65 microns vs 5.6 microns).
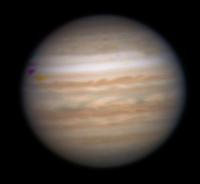
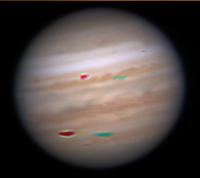
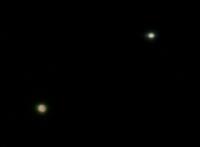
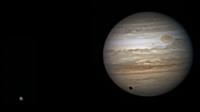
The images of Jupiter below were taken on the same night as the image above (8th June 2007) but the seeing had deteriorated to only average. Again I did not use the DMK on this night. The big coloured splotches are a result of huge dust motes on the chip. The chip was cleaned after this session. The first image is of Jupiter at the normal scale, and the second is when an extension tube was added to give a focal length of over 13m. Jupiter is just massive at this scale, but still fits nicely in the large format chip. The third image is of Ganymede and Io, which were in close proximity at the time.
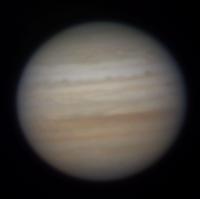
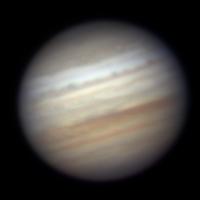
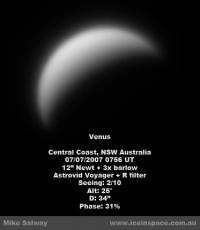
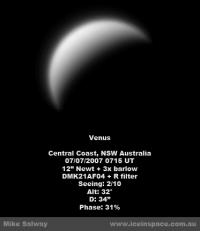
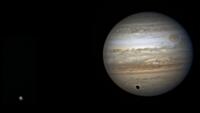
The images below were captured on the 6th (Jupiter) and 7th (Venus) of July, 2007 in poor seeing. This time, images were captured with the Voyager X and the DMK21AF04 on the same night in the same conditions so a more direct comparison can be made.
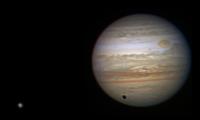
Finally some good seeing! The images below were captured on the 22nd July, 2007 in very good seeing. Again, images were captured with both the Voyager X and the DMK21AF04 one directly after the other. With the DMK, Ganymede had to be captured separately and a composite created, as the FOV could not fit both objects at the same time. The larger chip of the Voyager X allowed both Jupiter and Ganymede to be captured in the same run. In both cases however, separate processing was done on the moon to give the best result.
Summary and ConclusionsI’ll start the summary with a few pros and cons of the Astrovid Voyager X: Pros
Cons
Based on my evaluation and testing and the results described and shown above, I decided not to purchase the Astrovid Voyager X. For the increased cost, it just didn’t deliver increased results. The larger image format and larger image scale is certainly a huge bonus for the Voyager X, but was not a strong enough reason alone for me to change from the DMK21AF04. A more interesting comparison would’ve been to compare the Astrovid Voyager X to the DMK31AF04, because they use the same chips. I’m also not sure whether a direct comparison between the DMK21AF04 and DMK31AF04 would result in similar conclusions, but I do know that the DMK31AF04 would be able to be used with excellent capture software (ICCapture). I also can’t conclude whether I’d have similar problems with my hardware capturing the larger format at 30fps using the DMK31AF04 (the DMK cameras use the Y800 codec). This can only be proven through testing. Without being able to answer the above with any certainty, I can’t say that the DMK is better than the Astrovid Voyager X – but the results I achieved with the Voyager weren’t strong enough to warrant me moving from the DMK21AF04, especially given the extra cost involved. Thanks again to Adirondack Video Astronomy for allowing me to trial the Astrovid Voyager X.
 |
|
|||||||||||||||||||||||||||||||||||||||||||||||||||||||||||||||||||||||||||||||||||||||||||||||||||||||||||||||||||||||||||||||||||||||||||||||||||||||||||||||||||||||||||||||||||||