ICEINSPACE

|
Transit of Venus Across the Sun, 6th June 2012 - Observing/Imaging Guide
Submitted: Monday, 26th September 2011 by Mike Salway
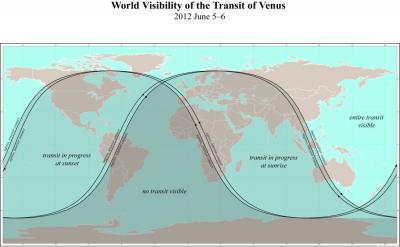
Looking for Eclipse Glasses? Protect your eyes while viewing the transit. Purchase IceInSpace Eclipse Glasses from the IceInSpace Shop for $4 each, or $3.50 each if you buy 4 or more. The Transit of Venus across the face of the Sun occurs on June 5th or June 6th, 2012 depending on your location. This is an extremely rare event, and will be the last time you'll have a chance to see this in your lifetimes! Observers in Eastern Australia and Eastern Europe will see the entire transit, starting from shortly after sunrise on the 6th June. If you live in Western Australia, Western Europe or East Africa, the transit will be in progress at sunrise on the 6th June. Observers in North America will see part of the transit on the 5th June, but the sun will set while it is in progress. The diagram below shows the locations where the transit is visible. Read on for more information including what is a transit of venus, local timings for your location, hints and tips for safe viewing and photographing the eclipse. Have questions? We'd love you to register at the IceInSpace Forums and don't be afraid to ask in this discussion thread. To see images and read reports after the event (and to post yours too!), check regularly in the Observational Astronomy and Solar System sections.
Use the links below to find the information you're after:
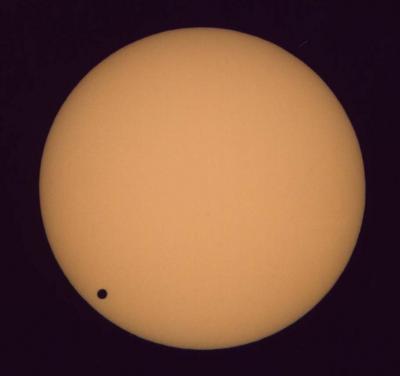
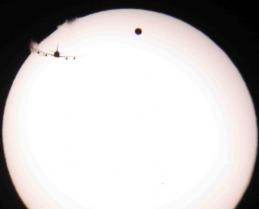
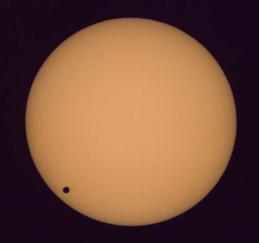
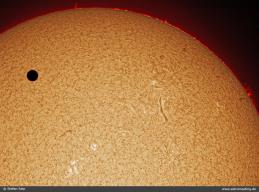
What is the Transit of Venus?A Transit of Venus across the Sun occurs when the orbit of Venus takes it directly between the Earth and the Sun, obscuring a small portion of the Sun's disc. During the transit, Venus appears as a small black disc moving across the sun, usually taking several hours. Transits of Venus across the Sun are extremely rare - one of the rarest of the predictable astronomical events, occuring in a repeating cycle of 243 years, with a pair of transits 8 years apart every 121.5 years and 105.5 years. The last transit in the current cycle was in June 2004, but before that the last transit was in December 1874 and December 1882. The next transit after this one will be in December 2117 and December 2125 - so this is the last chance to see a transit of Venus in our lifetimes! The image below is from the 2004 transit and shows what to expect. There are many more example images further below.
Historical Significance for Australians!The transit pair of 1761 and 1769 were used to try to determine the precise value of the astronomical unit (AU) using parallax - ie: to try and measure the size of our solar system. Following the proposition put forward by Edmond Halley (who had died almost twenty years earlier), numerous expeditions were made to various parts of the world in order to observe these transits; an early example of international scientific collaboration. Observing and timing the 1769 transit was the main reason that Captain Cook and Charles Green were appointed by the Royal Society to travel to Tahiti in 1769 (see sketch right). After the transit on the return voyage, Cook searched the South Seas for months looking for the great southern continental land mass, Terra Australis, that it was thought was necessary to balance the great continental masses in the northern hemisphere. There was no such continent but in the process, he stumbled upon Australia. Read more about Cook's voyage on the NASA page, James Cook and the Transit of Venus.
When and Where Can I See it?The entire transit will be seen from north-west Canada, Alaska, eastern and northern Asia, the eastern half of Australia, New Zealand and the islands of the Western Pacific Ocean. The Sun will set while the transit is in progress in the area encompassing eastern Canada, the United States, central America and the north-western part of South America. The Sun will rise while the transit is in progress in the area taking in south-west Asia, eastern Russia, the Middle East, north-eastern parts of Africa and most of Europe. For Australians on the East coast (including Sydney, Brisbane, Melbourne, Tasmania etc):
For West Australians (Perth),
For other cities around Australia or around the world, use the table below to find the city closest to you. If your location is not listed, try this interactive web form. Simply enter your nearest city in the search box and click 'Find Coordinates', or enter your latitude and longitude and timezone and click 'Compute'. Some defitions of the contact points:
If you're in a location where the transit is not visible, or you're clouded out, or you don't have the required safety glasses or filters, watch it as a live webcast from the comfort of your home using any of these online resources. The table below shows the timings for the points of contact during the Solar Eclipse. The times are given in local time for that city.
* Transit times generated from www.transitofvenus.nl The animation below will show you how the transit will appear and at what times of day from your location. It tries to automatically detect your location, so if it's incorrect, simply click the map to enter your latitude/longitude. Click Play to begin the animation again. Animation powered by SunAeon. Safe Viewing GuideWARNING! Never look directly at the Sun with the unaided or unfiltered eye, or permanent eye damage can result. You must take precautions - use properly filtered "eclipse glasses", or use special techniques to view the Venus Transit. Never view the Sun through a telescope or binoculars unless it is fitted with a specially designed Solar Filter. Read below for a number of techniques to view the transit of Venus. Pinhole Projection MethodThis is the easiest way to view the transit, and does not require any special equipment apart from one or two thin, stiff pieces of cardboard (white is best). Use a pin to poke a small, crisp hole in a piece of cardboard - this allows an inverted image of the Sun to be projected onto the second piece of cardboard below. Do not look through the pinhole at the Sun! Make sure the pinhole is as small and crisp as possible - the larger the hole, the fuzzier the image will be. Use this method with your back to the Sun, and the cardboard should be perpendicular (at 90° angle) to the direction of sunlight to give the least distorted image. While the resources below mention solar eclipses, the same technique can be used for the transit. Because the image is not magnified, it may be difficult to spot Venus as a small black dot but it should definitely be possible. Some resources for building Pinhole Projectors:
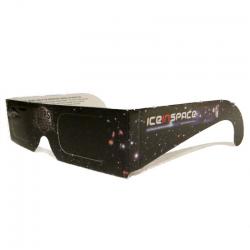
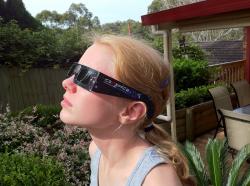
Eclipse GlassesSpecial "Eclipse Shades" or "Eclipse Glasses" are available to purchase from the IceInSpace Shop, which use a specially filtered film which you can directly view the Sun safely. The "frames" are made from light carboard and it's best to hold onto them securely while observing the Sun. The filters in the glasses are optical density 5 or greater and are “CE” certified which meets the transmission requirements of scale 12-16 of EN 169/1992 (Australian standard AS 1338.2 and 1338.3). The lenses are made of exclusive scratch resistant optical density 5, “Black Polymer” material. Eclipse Shades filter out 100% of harmful ultra-violet, 100% of harmful infrared, and 99.999% of intense visible light. These premium filters create a sharper ORANGE coloured image of the sun. The backside is printed with information for safe use and warnings about correct usage. Again this provides an unmagnified view of the Sun, so Venus may be difficult to spot, but it is definitely possible to see the transit with an unmagnified view. Buy in bulk for family and friends, teachers and work mates, classrooms and hobby groups, and look cool in IceInSpace branded Eclipse Glasses for safe viewing of the Sun. You can purchase IceInSpace Eclipse Glasses from the IceInSpace Shop for $4 each, or 4 for $14.
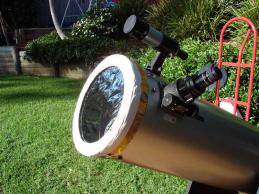
Solar Filters and Binocular and Telescope ObservingThe only safe way to view the Sun through Binoculars or a Telescope, is to fit a proper solar filter to the Sun-facing end of the optics. Never use "eyepiece" solar filters that screw into the eyepiece-end of a telescope. These are not safe and can crack under the intensified heat from the Sun. Solar Filters are usually white-light filters, cutting out harmful wavelengths and allowing only safe white-light through the filter. These will allow you to view the Sun through your binoculars or telescope. The Sun will appear as a white (or yellow, depending on the filter) disc, and you will see Venus as a black dot covering part of the Sun. You will also see any sunspots that are visible at the time. You can also get special Hydrogen-Alpha Solar telescopes or filters, which allow you to view the Sun in narrowband wavelengths so you can see surface details on the Sun such as flares and filaments, and prominences rising out from the limb. Again you will see Venus as a dark disc covering part of the Sun. Hydrogen-Alpha telescopes (such as the Coronado PST or SolarMax II 60mm Solar Telescope) and filters are much more expensive than white-light filters but the view is considerably better. Some resources for where you can buy, and how to make safe Solar filters:
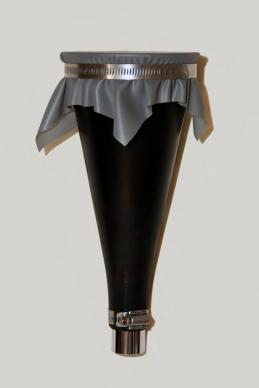
Build a Sun Funnel for Group Observing with a TelescopeI saw this nice idea on Transit of Venus.org, and looks like an effective way of viewing the transit using a refractor, when you don't have a filter to cover the end of the telesocpe. It will also be useful for group viewing, as observers don't need to look through an eyepiece, try to focus the telescope etc. Many people can view it at once. While these instructions and parts are for the US, you will be able to find similar products at your local hardware store no matter where you live.
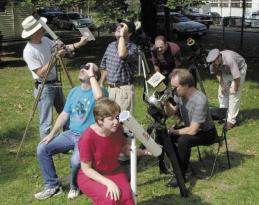
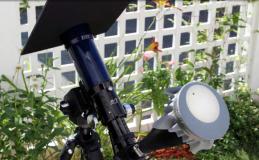
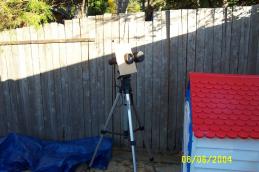
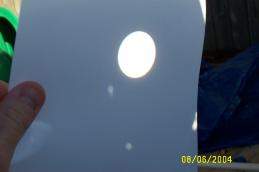
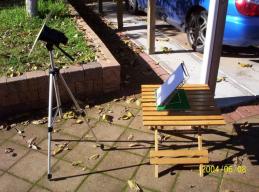
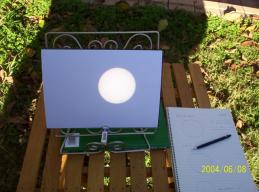
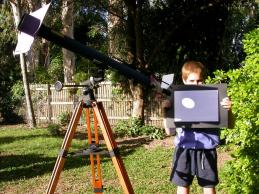
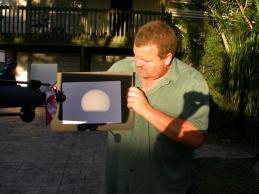
Project a Magnified ViewYou can use this method with unfiltered binoculars or a telescope, and allows a magnified view of the Sun as it is projected onto a white piece of cardboard behind the eyepiece or binoculars. You only need 2 pieces of cardboard to make this projector. The first fits over the objective end of the binoculars or telescope; cut out a hole to make it fit snuggly and use duct tape to hold it in place or cover any gaps. The second piece of cardboard is held at a distance behind the eyepiece, and a projected view of the Sun is cast on the cardboard allowing you to observe the transit. Remember to cover the second objective of the binoculars, and any finderscopes of the telescope. Special care must be taken though - never leave this setup unattended as looking through the eyepiece at the unfiltered Sun will cause permanent eye damage! Also, the concentrated suns' rays will be very hot and can burn if left for a long period of time. This setup is what I used during the 2004 transit (photos below), as I had nothing else ready at the time. I simply held a white sheet of paper or cardboard about 50cm-90cm behind the binoculars. This article has a few more pictures and instructions for this method:
Online WebcastsIf you're not in a location where the transit is visible at all, or you're not in a position to get outside and use any of the methods above, then you can watch from the comfort of your computer chair as a live webcast using any of these online resources:
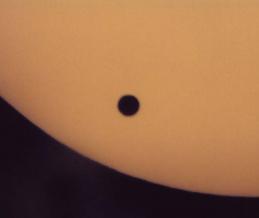
How Big Will Venus Appear?Venus is approximately 1 arcminute in diameter, while the sun is 32 arcminutes - so Venus will be a small black disc moving across the Sun. With an unmagnified view (eclipse shades, pinhole projector), it will be difficult to spot Venus near the edge but will definitely be visible to most people. A magnified view (projection method, filtered telescope) will give a much clearer picture of Venus as it transits the Sun. Have a look at the example image below from the 2004 transit, and other example images on this page to get an idea of the scale and what to expect.
Final Warning!Do not try to observe the transit with your naked eye, or with normal or cross-polarised sunglasses - these do not offer protection against blindness if you stare at the Sun. Never use "eyepiece" solar filters that screw into the eyepiece-end of a telescope. These are not safe and can crack under the intensified heat from the Sun. IceInSpace offers this information as a guide only and does not take responsibility for anyone using unsafe observing practises. By their very nature, transits across the Sun are viewed outside in the Sun. Ensure you have adequate skin protection including hat and sunscreen. We'd love to hear about your transit observing experiences! Please register and post your observing reports in the Observational Astronomy section. Photography / Imaging GuidePhotographing a Transit of Venus isn't extremely difficult, but does take some special planning and preparation if you want to do it well. It is vital that you have a clear idea of what you want to achieve, otherwise on the day, you will be in a flap, not knowing which camera to use on what ‘scope, and when in the sequence. Pre-PlanningVisualise what you want to record, and how you want the finished work to look, and that will help dictate your telescope/camera combination(s). Here are some possible imaging scenarios.
EquipmentWhich camera are you going to use? What telescope are you going to use?
Decide on what image you want to achieve. Select the appropriate camera and ‘scope combination to produce that image, whether full solar disc for a composite and possible animation, or hi-res close ups. Practice with the set up at least once before the transit, even if it means taking images of a blank solar disc. Field of view examplesHere are some typical sensor/scope combinations available to many, courtesy of the “Field Of View” indicator options in The Sky Professional, Version 6, from Software Bisque:
Environmental
Setup
CaptureShort Focal Length Telescope ViewEnsure your telescope is fitted with a properly designed solar filter before attempting to observe or photograph the transit through a telescope! For this method, you want to see the whole solar disc. So choose a focal length where you can fit the whole Sun in the Field Of View (FOV) of your telescope and imaging device. Some examples of this could include:
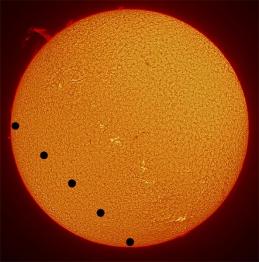
You can take images during various stages of the transit to present a final composite showing Venus as it moves across the disc of the Sun. Or you could simply use a single image with Venus at an interesting place on the disc - for example, near the limb or near a sunspot. Some examples, courtesy Fred Espanek: You could also take a sequence of images over the entire transit (for example, every 10 minutes), resize them down and present an animated gif showing a "movie" of Venus moving across the disc of the Sun. Two examples showing an animated gif like this, are courtesy Fred Espanek - both from eclipses in 1994. Annular Solar Eclipse Animation. Total Solar Eclipse animation. Long Focal Length Camera ViewYou will need to use a Solar filter fitted to the end of your lens. You will need to choose as long a focal length as you can to make the sun more magnified on your camera chip. Anything under 300mm and it will be very difficult to pick out Venus - it will just be too small. Using a normal digital camera sitting on a tripod or equatorial mount, choose your longest zoom setting or longest focal length lens (using a DSLR) and frame the Sun. Take test shots to check your composition and exposure. Make sure you use the histogram function on your camera to ensure that you're not clipping either end of the histogram (not overexposing or underexposing). Zoom in on the preview screen to check that your focus is sharp. Most cameras should be able to get an autofocus lock on a bright object like the Sun, so focus shouldn't be too much of an issue. If your camera is able, once you've got a focus lock, change the focus to Manual so that it doesn't change between shots. For a normal compact digital camera (not a SLR/DSLR) change the focus to the "infinity" setting and leave it there. The exposure won't need to change during the transit unless you get clouds moving in front of the Sun. Typical exposures will range between 1/250th second to 1/4 @ f8 ISO400. Exposures will need to be longer if you use a lower ISO. Keep your ISO setting low (eg: ISO100) to minimise the noise. It's also worth bracketing your shots or simply check the image afterwards and re-shoot if necessary. During haze, fog or high cloud you will need to increase the exposure. High Resolution Telescope ImagingEnsure your telescope is fitted with a properly designed solar filter before attempting to observe or photograph the transit through a telescope! This technique involves using a webcam or dedicated astronomy camera in conjunction with your telescope to get a more magnified view of the Sun. It may be the whole disc, or it may be just the part of the disc where Venus is transitting. It depends on your telescope and camera, and any barlow lenses you use. The techniques used are similar to any high resolution imaging with your telescope and webcam, whether it's the Moon, a planet, or the transit of Venus. You will capture a "movie" or sequence of images using the cameras recording software. Each sequence needs to last no more than a minute or so (you don't want Venus to visibly move during the sequence). Each individual movie/sequence will be processed using software like Registax to pick the sharp frames and stack them into a final image. You can take sequences during various stages of the transit to present a final composite showing Venus as it moves across the disc of the Sun. Or you could simply use a single image with Venus at an interesting place on the disc - for example, near the limb or near a sunspot. Planning, Preparation and Trial Runs!Planning and preparation is the key to capturing successful, and somewhat stress-free transit photography.
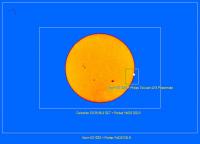
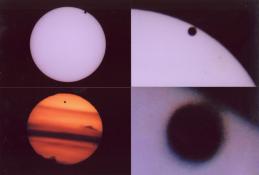
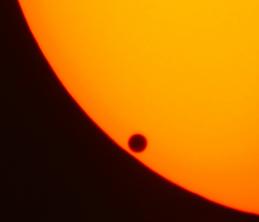
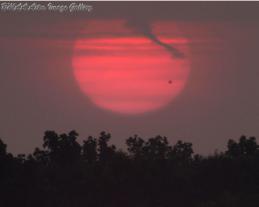
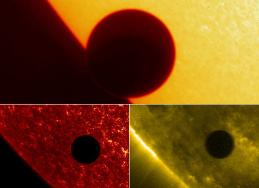
The day of the transit is not the right time to be trying new equipment or new techniques. Make sure you practise! Go out on any sunny day and do a couple of trial runs - set up all of your equipment and practise focusing, composing, trialling different exposure settings, etc. Be well prepared and practised. Example ImagesTo set the scene and whet your appetite, here are some images I hunted down through IceInSpace or elsewhere on the internet, showing what previous imagers have achieved. The main difference between 2004 and now, is the affordability and availability of hydrogen-alpha telescopes like the PST, as well as webcams and DSLR's. So after this transit we're going to see plenty of jaw-dropping, stunning images of the Sun with prominences, filaments and sunspots, with Venus transiting. It's going to be great!
Final WordThis is the last transit of Venus you'll see in your lifetime - so make sure you at least take the opportunity to observe it (safely) and enjoy the experience - don't get so hung up on photography that you forget to actually observe the transit. You have 4-6 hours so there's plenty of time to do both! Have questions? We'd love you to register at the IceInSpace Forums and don't be afraid to ask in this discussion thread. However you choose to photograph the transit, we'd love to see your results posted in the Solar System section.
Transit ToursWhile the Transit of Venus can be viewed from large parts of the world, there's still a lot of the world that won't get to see it, as the Sun will be below the horizon for them while it takes place. Being such a rare event, there's going to be people who will want to travel to see it - whether it's to another country, or even to a better part of the country where observing conditions and chance of clear skies are better! There's also the historical significance, and people will want to travel to take in the history of the event. Here's a few suggestions of tours that you might consider.
Please note: These were simply gathered from a web search and posted here for your convenience. They are not an endorsement or recommendation. If you have any tour suggestions, please get in touch with me. Upcoming Venus TransitsAs mentioned earlier, transits of Venus across the Sun are extremely rare. The table below highlights this! The next transit isn't until 2117 and then again in 2125. If you miss those, you have to wait another 121.5 years! And in the table below, covering 250 years, only the first one is visible from Australia. So make sure you do what you can to observe this June 2012 transit, and hope it's not cloudy!
References, Further Reading and Resources
Article by Mike Salway (iceman). Discuss this article on the IceInSpace Forums.  |
|
|||||||||||||||||||||||||||||||||||||||||||||||||||||||||||||||||||||||||||||||||||||||||||||||||||||||||||||||||||||||||||||||||||||||||||||||||||||||||||||||||||||||||||||||||||||||||||||||||||||||||||||||||||||||||||||||||||||||||||||||||||||||||||||||||||||||||||||||||||||||||||||||||||||||||||||||||||||||||||||||||||||||||||||||||||||||||||||||||||||||||||||