ICEINSPACE

|
Sketching DSO's using the Mellish Technique
Submitted: Monday, 24th January 2011 by Alexander Massey
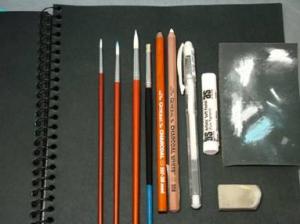
Astro sketching here on IceInSpace has had a bit of a renaissance. A few threads related to the subject have also been started on the topic. Yet one thing that most methods of sketching fall victim to is the texture of the paper. This is the bane of those trying to reproduce the soft glow of most DSOs. Smudging is one way of getting around this, but the level of control one has is limited. Yet, there is one method of illustration that has not been mentioned, and it is gold for interpreting DSO’s. This method was shown to me by the fantastic Australian astro sketcher Scott Mellish. His method is so effective, that it has earnt him dozens of features on the website “Astronomy Sketch of the Day”. To this I’ve named this method of illustration ‘The Mellish Technique’. MaterialsBelow is a list of the minimum items needed to illustrate an enormous range of DSO’s. These items are available at art supply stores. The following the items shown in the picture of the basic kit, left to right (fig.1):
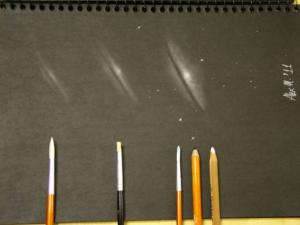
Core of the Mellish techniqueThe essence of this method is painting with a dry paint brush with the pastel. The pastel is rubbed on the sandpaper to provide a patch of powdered ‘colour’. Then, the paint brush of choice is dipped in this powder and applied to the black paper. The sketch is then built up through various layers. While most sketching techniques begin with setting the scale through first plotting the primary star pattern that dominates the DSO being depicted, it is the initial application of the first ‘layer’ that sets the scale of the sketch A small brush will do for fine details, through to the large one serving to provide bulk, faint ‘dusting’ of the paper. Further layer development – object based, The Holy TrinityGalaxiesMost of these faint fuzzies are ‘blobbish’ in description. They are first developed with a small brush, softly laying the pastel. The layer is slowly built up to increase details, such as the central core. More detailed galaxies require a more planned layering. Here control of the initial layer is important to provide the overall extension of the DSO. Layers are built up, and details added with either the brush, the white charcoal pencil, rubber or even the black charcoal pencil for particularly fine details that would prove too risky to develop with a rubber. The next picture (fig.2) shows a sequence for the development of the Sombrero galaxy. Using a charcoal pencil to define the dust lane allows for finer detail control, as a rubber would risk making the dust lane too large. The final details to be added are the visible stars. First applied with a sharp white charcoal pencil (greatest control of intensity). Brightest stars are added with the white ink pen. Particularly bright stars might be best represented with a diffraction spike rather than as a single large blob.
NebulaeThese require a little time to study before attempting to sketch, yet a similar approach to galaxies is used. Starting with very light, pale brush strokes of the pastel, determine the general shape and size of the subject. Then continue by adding more definition to brighter areas, extending softer zones, and noting those filaments of lace. Particular highlights can be added with the white charcoal pencil. Control of the degree of pressure that is applied is important. The white charcoal is a very soft pencil. Don’t be too concerned with dark details at this stage. The brush strokes that impinge on these darker zones can be easily corrected with the rubber, and fine dark details, such dust lanes and dark pillars, can be detailed using the black charcoal pencil. Once you are satisfied with the nebulous structure, stars can then be added in the same way as detailed above. The picture below (fig. 3) shows a sequence depicting the above method with M42 the subject. Note the soft white filigree highlights within the nebulous extensions, and the use of the black pencil to add definition to the dark pillar (the Fish Mouth) and the dark lanes between M42 & M43 where using a rubber could have risked to much damage to the soft white.
Globular clustersThe Mellish Method allows for an incredible level of ease in depicting GC’s. As many GC’s are close to impossible to resolve into pinpoint stars (depending on the aperture of your telescope), most appear as nebulous balls of light, with a spattering of resolved stars. And those GC’s that are ‘easily’ resolvable, any sketch will only be an impression of the object on paper. Again, the first step is to lay down a soft round patch to give the scale of the object. Now, take the ‘sawn off’ bristle brush, lightly dab it in the ground pastel and gently grind it into the original patch. This will begin to add body and depth to the GC, and give an amorphous degree of ‘resolution’. It is an incredibly effective tool. The next step is to begin to add whatever pinpoint stars that are desired. Start with the fainter ones by “machine gunning” the page with the white charcoal pencil. Accuracy of the placement of these stars is not important. We are attempting only an impression of the cluster. Brighter stars, and eye catching star trails and arcs can be given special attention. Again, the brightest stars can be highlighted with diffraction spikes, rather than as large white blobs. Below (fig. 4) is a representative sequence picture of M4, with its famous bright lane running through it.
Magic of averted visionHere is where the Mellish Method comes into its own. Scott said to me “if you need averted vision to see a detail, then you should use averted vision to see it on your sketch”!!! Yep, that’s right! This is a tricky technique, where you CANNOT look directly at what you are drawing! This is not as difficult as it sounds. If you are practiced at using averted vision, this sketching method is not difficult to master. A very soft brush & a light touch is the key. Giving a picture of this effect is not much good here as the ability of your monitor to show this level of soft detail is impossible to determine. Rather, it is a technique to practice once you’ve had a go at the first soft brush layering. It is then a matter of employing the averted vision technique to this layering method. It really isn’t difficult, but once you’ve achieved it for the first time, you WILL be amazed. Finishing OffYou will find that a sketch done at the eyepiece may in the cool light of a day it is a messy, untidy affair. It may have notes, errors, smears and smudges. These can be corrected for at a desk. As this sketching technique is gentle on the paper, rubbing out errors is very easy. Corrections to the sketch following your notes can be done following this technique. There is nothing to impede this. You may also like to spray your finished sketch with a matt fixative. These are like a cross between a varnish and a hairspray, which protects the sketch from accidental damage. A word on caution with these fixatives: Do one or two test sketches to both practice using this spray, and to see how it alters the appearance of your work. The change it does to it is small, but you may want to then alter your technique to accommodate this change. Note on scale in a sketchMany astro sketches are presented with a circular line that represents the limit of the field of view. Scott presents his work in this fashion. Me, I don’t. If I do, I tend to extend the sketch beyond that which is limited by the field of view. Scott’s experience at his technique allows him to control his sketch scale to fall within his pre-established field of view circle. My style is a little more liberal. What I’m getting at is that the way you determine scale, be it freestyle or pre-established, is up to you. The purpose of this article is only to demonstrate the illustrative technique. More advanced techniquesWhile the basic kit can provide all the necessary amount of gear you could need, there are some details that can be enhanced. Coloured stars can be first marked in white ink and then the coloured Texta™ of choice then used to tint the ink. White pastel alone can be too bright, so a grey pastel can provide a softer level of intensity. Some objects can have hues other than white, such as nebulae. Using pale blue, medium green, even soft pink, can help achieve an amount of colour. Care needs to be used with these as they can be easy to overdo. A special thank you to Mr Scott Mellish for reviewing this article prior to submission to IIS. AddendumSome of my sketchesArticle by Alexander Massey (mental4astro). Discuss this article on the IceInSpace Forum. |
|