ICEINSPACE
|
Moon Phase
CURRENT MOON
Waning Crescent 30.6%
|

|
 |
Setting Up and Using a Celestron CG5 Mount
Submitted: Wednesday, 11th June 2008 by Geoff Young
The steps below are a culmination of 12 month’s use of my CG5 GoTo mount. When I first started with it, I was convinced that it was not working properly. Now, after setting up as outlined below, I find that the mount is very good – it just has a few peculiarities.
Many thanks to those IceInSpace members who provided guidance in a number of areas. I would not have progressed to the point where I now am without their help.
These suggested set-up instructions apply specifically to the Celestron CG5 computerised mount running Celestron’s software. As such, most of the points apply to the whole GoTo range of Celestron telescopes, with the user allowing for hardware differences (eg, point 1 – the azimuth peg is not on a number of NexStar models.
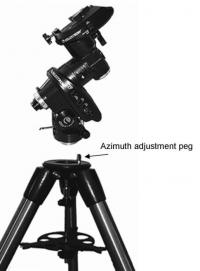
- On the top of the tripod there is a peg for adjusting your azimuth - it should be over one leg, not between two legs as often shipped - there is a spare hole to relocate the peg above one of the legs.
- When you set up, make sure this peg is pointing to polar south, not magnetic - adjust for magnetic declination.
- Get a little round bubble level (from Bunnings for example) and put this on top of the tripod to level the tripod - the bubble on the mount is often placed incorrectly.
- Have your correct latitude and longitude - use Google Earth if you don't have a GPS.
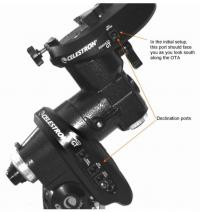
- The DEC alignment marks are often 180° out of place. The DEC port on the DEC axis should be facing you as you look south over the telescope. The motor unit should be on your right.
- After the mount and telescope are in position (RA and DEC marks aligned), enter your lat and long (ensuring you enter south and east respectively), time, non-DST, date (month, day, year) and select a quick alignment.
- Select Menu, Tracking and make sure you have south entered. Select Tracking Rate and make sure it is on sidereal.
- While at this stage, select a named star from the list (kepypad 8) near celestial south (eg, Rigil Kentaurus). Send the scope to this - use the azimuth and altitude knobs to do a rough polar alignment until the selected star is in the viewfinder cross-hairs - a mounted laser is excellent for this step. This will orient the software’s idea of the night sky with the actual night sky, as well as a reasonable polar alignment.
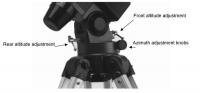
- It is a good idea to remove the front altitude adjustment (the one below the counterweight). It can stop accurate adjustment at lower latitudes (just plain gets in the road – poor design)
- Turn off (use power supply to do this - the switch on the mount is not that strong and will break after repeated use). Speaking of power supply, the mount needs 12v (or slightly more) at 2 amps to work correctly - an emergency starting unit will suffice, but for repeated use, a deep-cycle battery is more economical (costs more initially, but is designed for repeated charge and discharge).
- Re-align RA and DEC marks on the mount.
- Turn back on. When prompted for the setup, press “Undo” and enter correct time again - lat and long will still be there from the first time. Select a 2 star alignment - follow this with at least 3 calibration stars - by the time you get to the third, the mount will be pretty well spot on. The mount will remember the last location entered and, while turned on, will keep time. However, once turned off and then back on again, it does not display the time when turned off, but usually the last time entered (plus or minus a few minutes).
|
 | |  |
Click to Enlarge
CG5 mount
|
|
Click to Enlarge
CG5 mount
|
|
 | | |
Click to Enlarge
CG5 mount
|
| |
After these steps, selected objects will be in the eyepiece when you send the mount to them. Step 10, with calibration, allows the software to compensate for mechanical errors in the mount.
For improved accuracy, drift alignment helps.
The hand controller is very susceptible to problems when the temperature is low or the unit gets wet (eg, dew).
Be wary of wild slews - an inbuilt problem with the CG5 mount - press any direction key to stop one of these and reselect a target - the mount will still know where it is and respond accordingly. If you turn the mount off, restart at step 10. If you move the mount, start at step 1.
Article by Geoff Young (asterisk). Discuss this article on the IceInSpace Forum.
|
|
|


