ICEINSPACE

|
Revealing Star Colours using the Defocusing Technique
Submitted: Wednesday, 11th June 2008 by Al Sheehan
When we look at stars, we often have difficulty seeing their true colours, and the colour of the star is directly related to its temperature so there is a scientific interest in star colour as well as an aesthetic one. In bright stars, we see the colours but they are subtle. Many non-astronomers don’t realise that stars have colours! With the fainter stars, we can’t see their colour as they are too dim to stimulate the cones (colour sensors) in our eyes so they just look white (or grey). We have similar problems with cameras because the range of brightness of the stars in the sky, far exceeds the dynamic range of any photographic film, or camera sensor. So we could take a photo of the brightest stars to expose their colours properly, but we wouldn’t see the dim stars, or we could expose the dim stars properly but the brighter ones would be overexposed, or “clipped”, making them appear white. The process David Malin used in his images of star colours, was to take a single long exposure, and adjust the focus on the camera lens at regular intervals. Hence the star images start out sharp, with the dim stars showing true colours, while the bright stars are over exposed. By defocusing, the light from the stars is spread out over more area of the film or sensor, so the dim stars fade away but more importantly, the light from the brighter stars to each pixel (or grain) is reduced, so the colour of the brighter stars is revealed. Quite clever really! To capture an image this way you need a particularly sturdy, steady tripod, otherwise movement of the camera while the focus is adjusted will introduce unsightly artefacts and distortion in the final image. But there is another way! In these days of digital photography the same sort of image can be produced using multiple images, and then stacking them, to avoid the focus adjustment movement problem. To do this you will need:
In a nut shell, the procedure is to keep the camera still and take a series of photos as the stars move across the sky. Each image is progressively more out of focus than the previous photo. The colours of dim stars will gradually fade to black as the light from the star is spread over progressively larger areas of the image. The colours of bright stars fade from the clipped white (over exposed) to a correctly exposed representation of the star colour and finally to black if the sequence goes long enough. Choosing a lensTo start with, try a standard length lens – about equivalent to a 50mm lens on a 35mm camera. Good success can be had with 35mm equivalent lenses from 25mm up to about 100mm. Extremely short lenses, like fisheye lenses, require extended time between images to stretch out the stacked image of the stars, otherwise the result just makes the bright stars look fuzzy and out of focus. Long lenses require greatly reduced times between exposures otherwise the successive images appear disjointed when stacked, and it may be difficult to capture a satisfactory sequence before the stars move out of the field of view. ExposureTo start off, generally, go for as much light gathering power as you can:
Noise ReductionIf your camera has Noise Reduction, turn it on. It will simplify the capture and processing of your images, and In Camera Noise Reduction (ICNR) often reduces noise better than subtracting dark frames. You may think that since we will be stacking the images, the noise will cancel out. This is true of random noise in the image, but hot pixels occur in the same place in every image, so they will be added together and reinforced, so best to remove them before stacking. If you find the time between images is too long because of the time your camera takes for noise reduction, you will have to consider taking dark frames and subtracting these. FramingBe aware of the direction the stars will move as you collect your sequence of photos. Looking south, stars will move to the right; east they will move up, and vice versa for north and west. If you can find some good foreground interest features then so much the better! Typically a sequence of twelve 15 second exposures will take of the order of 12 to 15 minutes to capture, so the stars will move about 3° to 4° across the sky. FocussingA DSLR camera with live view is ideal for this technique. If you don’t have live view, but have a Canon DSLR and a laptop computer, you can use software like DSLRFocus to achieve a sharp focus for your first image. If you don’t have that then there is always the trial and error method – take a photo, and use the preview screen to check focus, make a focus adjustment and take another photo and check again. Once you are happy with your initial focus (and framing, etc), you are ready to start your capture run. Triggering the ShutterA cable release or remote control is ideal for triggering your shutter to minimise camera vibration. Failing that, try your camera’s shutter timer, but this could result in a longer time, and more star movement, between images. The Capture RunTake your first image with the stars in sharp focus. Defocus the camera by a small amount and take the next image. Keep defocusing by the same amount each time, and try to take each image the same time apart for an attractive image. Some experimentation may be required to get a feel for how much time between photos is right, and how much to move the focus ring by each time. ProcessingPhotoshop CS3 has some nice features to do this job very easily. To put the procedure simply, we want to:
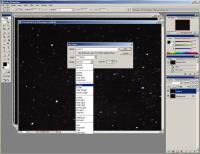
Building the StackPhotoshop CS3Load the images into a stack as follows:
Photoshop CS2 and earlier versionsLoading the images into a stack is a little more work than CS3. Load the images into a stack as follows:
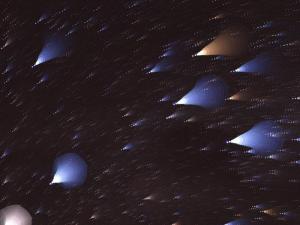
Blending the StackNow if you used the Layer, New, Layer… method to build the stack and you set the blending mode to lighten as you went, skip the next step…If not, you need to right click on each layer in the Layer palette, and choose Blending Options… from the popup menu. Change the blending mode to Lighten for each layer. Save the file as a .PSD file to maintain all the layer info, so if you want to reprocess this image in the future you don’t have to stack and blend the raw images again. Now you can do your final processing, such as flattening the stack to a single image (Layer, Flatten Image), levels, curves, and saving for the web, etc. Figure 2 below shows an image created via this method. It was captured using an Olympus E-510 camera with a Zuiko 50mm (OM series) lens (100mm 35mm equivalent), 1600ASA, 15 seconds, f/2.8, ICNR on, IS off. It was stacked, blended and saved for the web on Photoshop CS3.
  |
|