ICEINSPACE

|
Checking the Optics on your GSO Dob
Submitted: Wednesday, 25th May 2005 by Starkler
So you have bought yourself a GSO dobsonian telescope. Congratulations on purchasing what is in the opinion of many the best value scope on the Australian market today. Being cheap in price, the GSO dob has been designed and built with some compromises to keep the price down. A common problem is a lack of care in assembly, with optical components being clamped down too tightly causing distortion of the optics, with less than optimal images at the eyepiece as a result. A large percentage of GSO newtonians are shipped with these issues and following this howto will give much better and sharper images for those with affected scopes. How do we check for and correct this? Read on and find out.. Star Testing
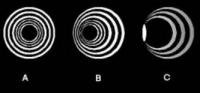
We can check for correct collimation and detect astigmatism in our scopes optics by performing a basic star test. Make sure you put your scope outdoors with covers off for at least 30 minutes before starting as to successfully star test requires a properly cooled scope and also steady atmospheric conditions. Take your highest power eyepiece (shortest focal length) eyepiece, find a nice medium bright star and focus in the center of the field of view. Now the adjust the focuser outwards slowly until the star defocuses and you see a series of rings like in the image to the right.If you see nice concentric round rings like in A. your scope is well collimated (assuming your secondary mirror is correctly placed). Possibly it will look more like B, indicating some tweaking is required. If it looks like C, your scope is way out of alignment! If you are getting nice round circles all is well. But what if the rings are not perfect round circles? Often the outermost ring will appear a bit hairy and waver about a bit. This is due to either unsteady atmospheric conditions, or a scope that hasnt fully cooled down to ambient temperature. If the image is reasonably steady, take note of the general shape and rack the focuser in and out on both sides of focus paying careful attention to the shape close to the point of focus Does the image look a bit like a three/four leaf clover or triangular/squarish? This often indicates astigmatism in the primary mirror caused by the rubber holding clips being clamped down too hard. Does the image appear oval or some other shape and shift plane by 90 degrees either side of focus? This could indicate a pinched secondary mirror caused by its plastic holder being too tight. Try moving your head to rotate your eye relative to the eyepiece. Does the plane of the image follow the movement of your eye or does it stay fixed in relation to the scope? If it moves with your eye Im sorry to inform you thats where the astigmatism lies. If its in the scope theres still hope ! :) Curing Common Causes of AstigmatismTo fix the two common causes of astigmatism you will have to disassemble your scope and go through the collimation process to realign the optics after reassembling. Sorry there is no way around this! If you arent familiar with collimation, read up on this topic, buy a Cheshire collimating tool, practice basic collimation and come back later. :) Primary Mirror Astigmatism
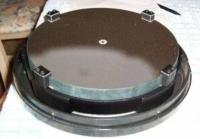
Lay the scope tube on the floor and after removing the finder scope loosen then remove the screws that go through the side of the tube an inch or so up from the primary mirror end. These screws hold the mirror cell to the main tube. Be careful not to let the mirror cell fall out uncontrolled. Now carefully ease the mirror cell out of the tube and take it somewhere safe and clean to do your work. Its very important that you dont touch or allow anything to touch the surface of your primary mirror as it is very delicate and the reflective coating is soft and easily damaged.Those four rubber blocks are the likely culprits! They are there only to prevent the mirror from falling out of its cell, and not to clamp the mirror down hard ! First step is to use a pencil or a marker pen and make a mark on the mirrors side and on the cell so that the mirror can be realigned to this mark for reassembly. The rubber blocks will have left a mark on the mirrors surface and we want to re cover those marks later. Remove the two screws on each mirror clip and lift off the rubber clips and aluminium plates on top of them. We are now going to remove the mirror from its cell to release any remaining tension. Lay out some paper and very carefully invert the mirror and cell holding it by the mirrors side and laying the assembly down on the paper, mirror side down. You should now be able to remove the cell from the mirror with one hand easing it off, while firmly holding the mirror back down with the other. If there is a metal back plate on your cell, you will have to completely disassemble the cell to remove it first. Its best left off afterwards to aid air circulation, which will improve mirror cooling time. How tight was it? You may be able to loosen it up a bit by putting the mirror back in and out of its cell a few times. If you havent already center spotted your mirror now is a good opportunity to do so. Time to reassemble. Place the mirror back in its cell and carefully invert again and replace the mirror clips. You dont want any tension whatsoever on the primary mirror from these rubber clips. Best to do them up so that they barely touch the mirror at the edge, and even to leave a small gap of a millimeter is also ok. You can now place the mirror and cell assembly back into the scopes tube, taking note of the notch in the mirror cells side which matches up with the seam of the tube. Replace the six screws, collimate and your done :) Secondary Mirror Astigmatism
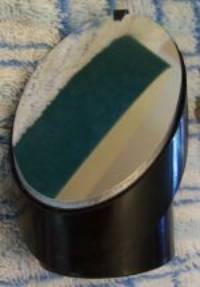
If your scope has astigmatism caused by the secondary mirror, we must remove the secondary holder from the main tube and then the mirror from its holder. Looking into the open end of your scope, youll see in the center of the spider a large screw, and three smaller ones forming a triangular pattern around the center. The center screw pulls on the secondary holder, and the other three are push screws for adjusting height and angle of the secondary. Laying the scope down on the floor, hold the secondary holder with one hand whilst unscrewing the center screw and remove the holder/mirror assembly. Dont loose the tension spring on the center bolt!The secondary mirror is much thicker than a casual glance would indicate. Most of its thickness is buried inside the plastic of the holder and if the holder is too tight, deformation of the mirrors near perfect flatness is the result. To remove the mirror from the holder, first step is the remove the small metal clip you can see at the top of the image above. The mirror will not come out of the holder in any direction except that of the plane of the holders center bolt. i.e. standing the holder up on its round plastic surface, the mirror must move in a direction straight up to be released. Removing the mirror from its holder can be a tricky process so take your time. I used a very small flat blade screwdriver to ease it out a little at a time, starting from the top. If it refuses to budge, some gentle heating from a hair dryer should help. Others have had success using the secondary holders center mounting screw pushing the mirror out from behind. Whichever method you use be very careful ! How tight was it? We want it so that the mirror can be easily slipped in and out of the holder in the right plane of motion without excess tension on the side of the mirror from the holder. This is where sandpaper comes in handy. I had to sand mine quite a bit to make it a nice fit. Also check that the foam packed inside the holder hasnt crept out of the center part of the secondary housing. Trim away any excess foam that has. When satisfied, replace the mirror in its holder and refit the holding clip. This clip does need to touch the mirror surface to prevent the mirror from moving, but without tension. Now you can refit the holder to the spider, making sure the center bolt spring is fitted. Be careful not to over tighten as the plastic of the holder is quite soft. Re-collimate and repeat the star test. Hopefully all traces of astigmatism are gone and your scope can now perform to its full potential. Happy stargazing !Article submitted by Geoff (starkler). Discuss this article on the IceInSpace Forums. |
|
|||||||||||||||||||||||||||||