ICEINSPACE

|
Making a Denver Observers Chair
Submitted: Wednesday, 29th June 2005 by Mike Salway
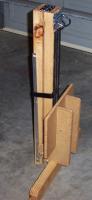
While waiting for my telescope to arrive, I got busy and started working on the Denver Observers Chair. From all the sites I'd read, being comfortable while observing was almost worth an extra inch of aperature! Keep reading to find out my thoughts on the chair, the construction of the chair and any lessons I learned. The ChairThe chair cost me roughly AU$80-$90 in parts, the most expensive bit was the damn non-slip stair tread that goes down the front leg, ~$30 (ripoff!). There was also a fair bit of waste of some of the parts (stair tread, particle board for the seat and seat supports) so that kept the cost higher than expected, had I been able to buy just the quantity I needed. The instructions are also very american, with all the measurements in inches, so sometimes a conversion was needed, other times I was able to buy the specified size in screws etc, and had to find my drill bits (in metric) that matched. It took me about 2 weeks on and off to finish it, working on it for only 2-3 hours a week in-between crying babies, work, TV, etc.
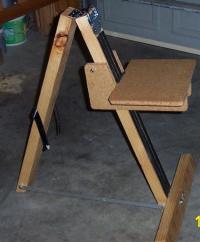
I'm pretty happy with the result, learnt a few things along the way which would hopefully churn out a better result if I was to do it all again, but it does work and it's ready for action. The seat is kept in place by friction, and is adjustable up and down with a tilt of the support. When locked in place in the open position, it's easily transportable using the handle, and is even easier to transport (again using the handle) when folded up and kept closed using the velcro straps. It's not light, but it's not that heavy either. I can easily lift it with the handle and shift it around using 1-hand, and it folds up quite flat for laying in the boot of the car when going out to a dark-sky site or just storing it away until its next use.
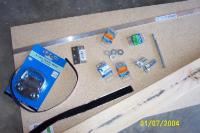
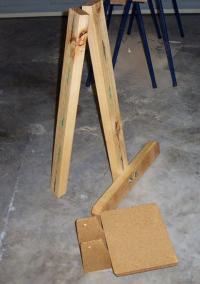
The ConstructionWent to the hardware store and got all the bits on the list.. Cost was around AU$80-90, but could've been cheaper if I was able to buy just the quanitities I needed.. The seat construction (seat and seat supports) were probably the fiddliest part of the project, and going by the instructions, also the most critical to get right.. If it's not right, the seat would probably slide down the leg when you sit on it!
Once the hinge, aluminium brace and chest-handle were put in place, the seat was ready to be attached to the front leg. But first, the non-slip stair tread had to be stuck down the front leg, and the rubber fuel tube nailed onto the back of the seat. I peeled off the backing of the stair tread, but found it wasn't even close to being able to be stuck to the front leg, so I used some liquid nails smeared on the front leg, and placed the stair tread on top. It stuck quite nicely, but I ended up being a bit messy with the liquid nails, making the end result look a bit shabby. Once that was dry, I attached the seat support to the front leg and gave it the first test run.. It worked! The seat didn't drop straight to the floor with me on it! Finally, some lessons I learned along the way..
Lessons LearnedIf I had to make the chair again, I'd do a few things differently - hopefully to achieve a better result next time. I'll share my experiences with you so that if you decide to construct a chair, you won't fall in the same traps I did. So there you have it.. Good luck making your own chair!Article by Mike Salway (iceman). Discuss this article on the IceInSpace Forum.  |
|