ICEINSPACE
|
Moon Phase
CURRENT MOON
Waning Crescent 30.3%
|

|
 |
Rigel Systems 'N' Step Motor Focuser
Submitted: Monday, 25th July 2011 by Rich Bowden
 |
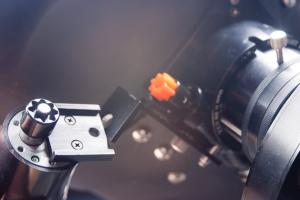
Click to Enlarge
Rigel Systems 'N' Step Motor Focuser - USB Stepper motor controller and stepper motor
|
|
Please let me state, I have no affiliation with Rigel Systems, other than being a potential customer at the time of searching for an auto focuser.
Some History - Past
I have been down this road before; this was 4-5 years ago. Back then the cost of motorizing your focuser was very expensive. The focuser manufacturers had their own motors and controllers but for what they really were, the price tag in my opinion was way too expensive.
I ended up using a little DC motor with an inexpensive control box from Shoestring which did the job for me then.
Present
This time around, I wanted to have absolute focuser positioning with the use of offsets for my individual filters plus use the advantage of temperature compensation.
Again, I found to my dismay, most of the main focuser manufacturers and their units were still too expensive, nothing had changed. And to my surprise, they were still using the rather dated DB9 serial bus connection to a computer.
With future computer upgrades, you’d be lucky to find a serial port. In my case, my existing observatory computer already had its serial port used by another more critical device.
More searching on the net for USB stepper controlled motor focusers and I found the Rigel Systems website.
To my excitement, they actually had a USB stepper controller system, called "'N' step" (they also have DC motors and controllers). Looking further on the site I noticed there were complete motor focuser setups for nearly all the major brand focusers on the market. These included the USB ‘N’ step controller, stepper motor/ gearbox, temperature probe, all the cables need to get up and running, plus a bracket made to suit these specific focuser.
This was great. Looking at the bracket design I was happy to see that the motor could be easily taken off with a single knurled knob/ screw, this would then let you operate the focuser manually.
This system being ASCOM compliant meant that I could use most of the common acquisition programs like, Maxim DL, AstroArt and also my favourite free program specifically for auto focusing, Focus Max….. perfect!
I immediately emailed Rigel Systems. Within a day, Leon from Rigel Systems returned my email answering the small query I had. I ordered the system basically that day.
Hardware
The package arrived in good time with all the things stated in the purchase, plus allen screws and wrenches to suit. I immediately attached the bracket to the 2" FeatherTouch focuser of my F4 10” Newtonian, then it was a matter of attaching the coupling to the focuser shaft, insert the star adaptor and the motor coupling fitted into this and screwed on to the bracket.
|
 | | 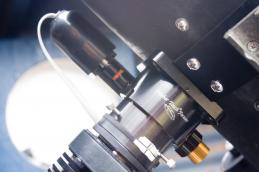 |
Click to Enlarge
The underside of my focuser showing the bracket and motor attached. I left out one screw as the knurled friction screw seemed to keep things where they needed to be.
|
|
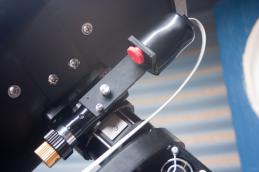
Click to Enlarge
Looking at the top of the focuser showing the way the motor neatly fits into the focuser.
|
Software
The downloadable instructions in PDF format (found on their site) are easy to follow. ASCOM is a prerequisite and already having this loaded on my machine, I went ahead and installed the GCUSB_N step ASCOM driver/ program. After installation, and before I plugged the USB controller in, a ‘.cat’ and ‘.ini’ file needed to be copied to where the program resided (programs/ common/ ascom/ focusers), then plugged in the usb controller.
The new hardware was found instantly. Checked in my ‘Device manager’/ ports(com) folder (as per instructions), found it created a new com port, for me this was com port 3, but I later assigned com port 9 to it. I opened the GCUSB program, selected the correct com port in the setup, hit ‘connect’ and I was up and away.
Using Focus Max – by Larry Weber and Steve Brady
I have been using Focus Max (FM) for quite a while in conjunction with MaximDL with my old DC motor focuser. It’s free and is by far the most intelligent program for focusing I’ve tried. It really is well put together and the control within the software program is quite in depth. As I’ve found on a few occasions though, without the right procedure to set it up, it can be frustrating.
So here are some steps I used to get the ‘GCUSB_N step’V5.0.10 up and running within FM V 3.4.30. I run XP Pro/ SP2 and still using ASCOM V 5.5.1 as I write this, but the new N step’V5.0.10 driver is updated to run with the latest ASCOM v6.
NOTE: I’ve found, if you have already been using FM with another motor focuser, it will be worth the trouble to totally remove the program off your system. This will ensure all components and stings have been removed, do a registry check, deleting any reference.
- Before proceeding with anything, you will need to find a star around 4-5 mag that is reasonably close to the meridian. You should be pretty well focused before getting things to work well in FM. You can either focus manually or use GCUSB and jog the in and out buttons till you are focused.
- If you haven’t already, open the GCUSB program and go to the setup window. Under ‘focus type’ for true positioning, select ‘Absolute’/ ‘Full torque’/ ‘Coils off’, set ‘Phase select’ to ‘0’. I haven’t worried with the other advance functions to do with temperature compensation as yet. My aim was to get things working well. All things other than I describe here have been left default.
- If like me, when you’re focused, the focuser draw tube is approximately half way out, I thought the best position for the GCUSB program to be set at would be exactly half way. As it has a maximum positioning count of 36000, I set the focus point to 18000. To do this use the top slider in the main window, move it to the centre. When you begin to slide it left to right towards the centre, you will notice numbers begin to scroll up. Maximum (all the way to the right) is 999, so 500 is the position you want (in the centre). Now go to the setup window and hit the ‘reset’ button. Hit ok and you will return to the main window. You will notice that the ‘position’ read out showing in red will be 18000. Ok, now you’re ready to tackle FM.
- Open FM and ensure you have GCUSB selected in the drop down box for focuser selection. You will notice that the program asks you start the ‘first light wizard’, forget this for the moment. Decided whether you wish the focuser to go ‘in’ or ‘out’, but for me, I left it at default of ‘out’ as I have no backlash and the focuser has no slip at all when the focus motor coils are not energized.
- Go into the ‘V curve’ tab. Here you will see three columns. Select the centre column ‘End points’. You will notice that there is an ‘initial’ and ‘final’ setup box. These are the start and end points of where the ‘V’ curve will begin and end; going from inside focus to outside of focus. Logically you have to work out how far either side of 18000 you need to go. (18000 being the preset focus position entered in the GCUSB software) I started out with 400- 500 either side. IE. ‘Initial’ 17500 and ‘Final’ 18500. You will notice on the right ‘Half Width’ column, that the ‘centre’ box has been set now to 18000.
- Now we can go with the ‘first light wizard’. After it has determined your setup and done the first curve, it will ask you if you wish to do another. Do so and keep repeating for about 5- 6 runs.
- After this has been done, do a ‘focus’ on the star that you are on. It should be quite reasonable.
- To refine, your curve so that the convergent point at the bottom of the ‘V’ is more refined with smaller increments, as sharp as possible and the same on both sides (PID), you’ll need to play around with the ‘half width’ column. IE, increase the half width size from say 400 to 600 and reduce the step size from 50 to say 30. (these figures are only an example) Do around 10- 14 ‘V’ curves. You can remove the first initial curves which will be a little inaccurate now that the system has refined itself.
NOTE: The above is only a ball park snap shot of how to get you to achieving good auto focus. The more you use the program, the better you will understand it in conjunction with the Rigel Systems ‘Nstep’ motor/ controller and GCUSB software. But I was achieving very good results with only 10 or so ‘V’ curves
|
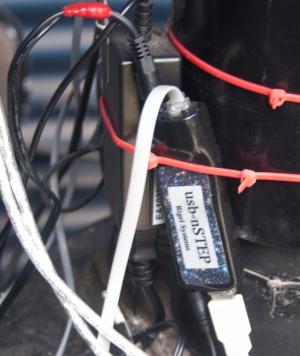 |
Click to Enlarge
This is the compact 'Nstep' USB stepper motor controller. (Top going clockwise) temperature probe: rj12 cable to motor: usb to computer: 12v power in
|
Conclusion
I am extremely happy with how well this system has been put together; the hardware, software, an excellent warranty (conditional 5 years), and, the price. Not to forget Leon’s attention to detail, ease to deal and talk with. Also, he will prefab a bracket if yours is not mentioned on the Rigel Systems site, if you provide measurements.
This is a very painless upgrade, and if you’re into astro photography, thinking of remote controlling your observatory, a must for precision focusing.
For another opinion, Art Morton also has a very good review on this focuser found on Cloudy Nights.
Review by Rich Bowden - Baytop Observatory (richardo). Discuss this review on the IceInSpace Forum.
|
|
|