ICEINSPACE

|
Baader 2 Cool Ceramic Safety Herschel Wedge
Submitted: Monday, 25th March 2013 by John Wilkinson
IntroductionA Herschel Wedge is an instrument used to observe the Sun in white light. It is used to study sunspots and granulation but it cannot be used to observe prominences or flares. For prominences and flares I normally use a Coronado Solar H-alpha telescope to observe/photograph the Sun with, but I recently brought a Baader 2” Cool Ceramic Herschel wedge to observe other aspects of the Sun not suited to H-alpha observing.
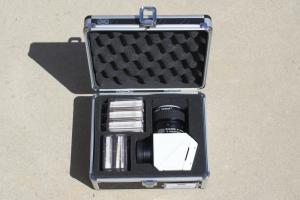
The WedgeThe wedge is extremely well engineered and designed for use with refractor telescopes with a 2” eyepiece holder. It is stressed that the wedge cannot be used with Newtonian, Schmidt-Cassegrain, or Maksutov telescopes, since the optical set-up of these scopes use optical or mechanical parts near the focal plane, which will be damaged by the concentrated heat of solar radiation. The Baader Herschel wedge comes in two versions – one for visual use (V), the other for photographic use (P). Both versions contain a 2” neutral density (ND) filter of optical density 3.0 (OD =3.0), and a 2” solar continuum filter (SC), but the photographic version also contains three more neutral density filters (OD = 0.6, 0.9 and 1.8). In Australia the version V wedge costs about $650 while the P version costs about $750-800 depending on where you buy it. The extra cost of the P version is for the additional ND filters - but photos can be taken through the V version. The solar continuum filter and 3.0 neutral density filter are pre-mounted into the body of the wedge just below the eyepiece holder of the wedge. The wedge may seem more expensive than other brands but these brands do not contain the solar continuum filter that can cost $220+ if brought separately. Each extra ND filter costs around $65 and buying them in the P version saves money. Specifications
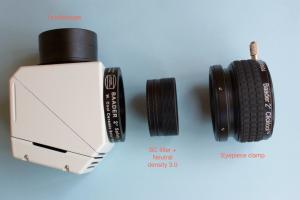
How the wedge worksThe wedge is inserted into the 2” eyepiece end of the telescope (in place of a diagonal) and an eyepiece is inserted into the wedge’s eyepiece holder. Solar light enters the body of the wedge and falls onto its 45° inclined prism surface. Approximately 4.6% of the light is reflected through the filters and into the eyepiece. The rest of the solar light (95.6%) exists the rear face of the prism and would form a focal point outside the prism body. The existing beam passes through a ‘heat cage’ that is sealed with a special ceramic heat-absorbing tile. The tile traps radiant heat without overheating its surroundings. The body of the wedge is closed on all sides to prevent any light loss. A really good aspect of the translucent heat tile is that is also acts as a projection screen showing an unfocussed image of the Sun. Aiming the telescope at the Sun is made easy by this image (see photo 2).
At the top of the wedge a 2” clicklock clamp securely clamps any 2” eyepiece or 2”/1 1/4” reduce with only a small rotation of a lever. Inside the wedge are two 2” filters mounted above the exiting side of the Herschel prism. Closest to the prism is the solar continuum filter with its strongly reflecting surface facing the prism. Above the SC filter is the neutral density filter OD 3.0 serving as energy reducer. This orientation of filters ensures a solar image free of unwanted reflections. See photo 3. Instructions provided with the wedge show how to replace the solar continuum filter with another neutral density one if you want to vary the amount of light entering the eyepiece or camera.
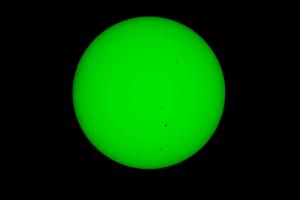
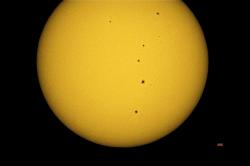
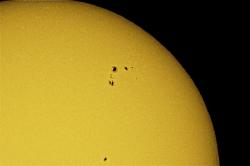
The solar continuum filterA feature of this wedge is the inclusion of a solar continuum (SC) filter. This is a narrowband filter featuring a 10 nm half-bandwidth at the passband of 540 nm. This produces a lime green image. Human eyes are most sensitive to this wavelength and solar granulation is most contrasty. When using the SC filter, you are observing at a narrowband wavelength and not white light (which is a combination of all visible wavelengths). The SC filter excludes the red and blue wavelengths and centres on the peak visual wavelength where the telescopes optics are sharpest and free of chromatic aberrations. The Baader wedge is the only one that comes with a SC filter but if you have another brand of Herschel wedge you can buy a Baader Solar Continuum filter to fit it. The SC filter can be removed if you want a white light image (but leave the ND filter in place or add another one). Note: Some wedges use a polarizing filter rather than a solar continuum filter (in conjunction with a neutral density filter) to vary the amount of light entering the eyepiece. According to Baader, polarizing filters are suited to visual use – they do not provide sufficient blocking by themselves nor are they able to block IR wavelengths as completely as a ND filter. Obtaining focusI have my Baader Herschel wedge mounted on a William Optics 81 mm GTF refractor scope and use a Baader Hyperion 17 mm eyepiece in 2” or 1 1/4” configuration. Both configurations came to focus. You have to experiment with different eyepieces to see which suits your scope (some do not provide enough back focus or in travel). But the Baader instruction sheet provides suggestions to try if having trouble. If you wish to observe with 1 1/4” eyepieces, use a reducer adaptor 2” to 1 1/4”. The 2” clicklock eyepiece clamp on the wedge can also be removed and replaced with a shorter one to bring the eyepiece closer to the focal plane. I found the image produced by the Baader wedge to be excellent – nice and sharp without any chromatic aberrations (right to the edge of the field of view). This is helped by having very good optics in the telescope I use. However, because of the narrow band of the SC filter, chromatic aberrations are not really a problem. The system delivered excellent detail in both the umbra, and penumbra regions of sunspots with granulation visible when seeing allowed. The sky was a deep black with no scattered light or unwanted reflections. Photographical imagesI take single exposure images through the wedge via a Canon 550d SLR camera at 1/320 sec and ISO 200 using manual focus (with SC and ND 3 filter). The camera screws onto the eyepiece. The raw image is lime green, but during processing I change the colour to a pale yellow to better match the Sun. Photo 4 to 6 show examples of the images formed. The images show really good sunspot detail and surface granulation. Faculae are often visible near the solar limb.
If the atmosphere of Earth is rough/turbulent you will see a rippling effect around the limb of the Sun. It is best to wait till the atmosphere settles down. SummaryPros
Cons
Overall, I highly recommend the Baader 2” Cooler ceramic Herschel wedge as a useful tool to observe and photograph the Sun through esp. at white light or 540 nm wavelength. I have found the wedge to be optically better than Baader AstroSolar Safety film filters and much superior to glass solar filters. A reminder – DO NOT ever use glass solar filters that fit inside the eyepiece (they will break with solar heat and damage your eye). Notes
Review by Dr John Wilkinson (John W). Discuss this Review on the IceInSpace Forum.  |
|
|||||||||||||||||||||||||||||||