ICEINSPACE

|
The Imaging Source - DMK21AU04.AS
Submitted: Tuesday, 18th March 2008 by Matt Patafta
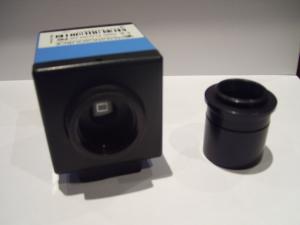
After starting astronomy only a few years ago, I have slowly ventured into an entire new world that is astrophotography. My main interests in this field are Lunar and Planetary Imaging. Over the course of a couple of years many revolutionary products have now become available. The results that an amateur astronomer can now produce would have been impossible 10 years ago. So now the amateur astronomer has the benefit of highly advanced imaging equipment at a fraction of the cost. Which Camera to get?I was now left with a very difficult decision to make. What camera to get? After doing a large amount of research, I decided I wanted a camera that will give me the best results for a reasonable price. The Imaging Source Company provides a range of very high quality cameras with low noise, high sensitivity and very fast frame rates. I have been using The Imaging Source DMK 21AU04.AS camera for around 5 months. The DMK 21AU04.AS is a monochrome camera with a resolution of 640x480 and is capable of 60 frames per second. The DMK 21AU04.AS has a USB 2.0 interface and is capable of a 60 minute exposure. The DMK is also available in a Firewire interface. Camera Specifications
Why Monochrome?I was once again left with another tough decision to make. Colour or Monochrome? Each have there own advantages and disadvantages. If I decided I wanted the Colour version (DBK) I would save money, time and effort to create a colour image. However, if I decided I wanted the Monochrome version, I would need to spend more money on RGB filters and a filter wheel. Although, the end result will be somewhat superior because you have the full resolution in every colour channel. I decided to go with the Monochrome version for its higher sensitivity and better overall resolution. USB or Firewire?For me, simplicity rules. That is why I went with the High Speed USB 2.0 version of the camera. Currently most of the modern computers and laptops come with both USB ports and a Firewire port. The only problem with most laptops at the moment is that they come with a 4-pin Firewire port that is non-powered.. This requires you to buy a powered hub and additional cables. First ImpressionsFrom the second I opened the box, I was extremely pleased with the camera. The camera was made entirely of metal and I found not one bit of plastic on it. The camera came with a C-mount to 1.25” nosepiece and a 1.5 metre USB cable even though there are not usually included. I had very high expectations and the camera had already exceeded them without even taking a single image. First Light |
||||||||||||||||||||||||||||||||||||||||||||||||||||||||||||||||||||
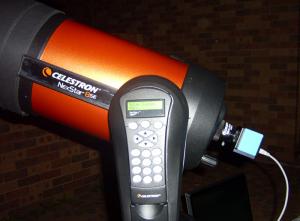 |
Click to Enlarge The DMK21AU04.AS on my Celestron 8SE SCT |
I was able to test the DMK on several different objects during different nights. The seeing differed from average to good. The set up was very simple and I was shooting my first AVI in no time.
All images were taken with my Celestron 8SE SCT with a 2x Barlow in Alt-AZ mode. All were stacked and processed with Registax 4.
The image of Saturn on the left below was taken in good seeing. The camera was shooting at 30 frames per second for around 1 minute. The gain was set to almost maximum showing hardly any noise.
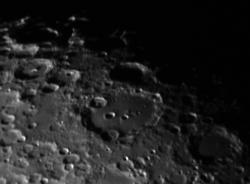
The image of the Moon on the right below shows the Crater Clavius and was taken in average seeing. The camera was shooting at 60 frames per second with the gain set very low.
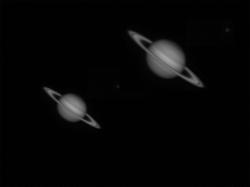 |  | |
Click to Enlarge Saturn |
Click to Enlarge Moon |
|
With the ability of an exposure time of up to 1 hour, I attempted to image a few bright Deep Sky Objects with the DMK.
All DSO images were taken with my Celestron 8SE in Alt-AZ mode. All were stacked and processed with Registax 4.
The image of 47 Tuc - NGC 104 on the left below was taken with the DMK with a 4 second exposure. This is a stack of two frames.
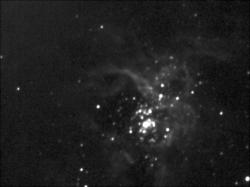
The image of the Tarantula Nebula – NGC 2070 on the right below was taken with the DMK with a 6 second exposure. This is a stack of three frames.
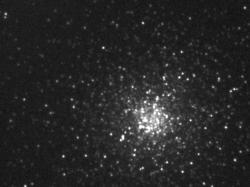 |  | |
Click to Enlarge 47Tuc globular cluster |
Click to Enlarge Tarantula nebula |
|
All of the Imaging Source cameras ship with the camera control software IC Capture.AS. The software is very easy to install and only took me a few minutes. Once installed, all you need to do is connect the camera via the USB port and you should be shooting you first AVI in no time. The software allows you to;
You are able to move the toolbars around the screen allowing you to customise it to however you like. It also has a very ingenious feature letting you to set a ROI (region of interest). This feature lets you to set an output to a specific width and height e.g. 400 by 400 pixels. This saves you from recording excess data around an object saving you disk space. There is another great feature for when shooting an AVI, the software will automatically name every AVI in sequential order and give you an option of YY-MM-DD or YY-MM-DD HH-MM-SS.
IC Capture.AS is not the only software which can be used with The Imaging Source astronomy camera range. The following 3rd party software packages are also compatible:
Overall, the software is remarkably easy to use and comes with everything you need to get started.
http://www.astronomycameras.com/en/products/software/
I will summarise this review with the pros and cons of the camera.
Pros
Cons
The Imaging Source cameras are a huge breakthrough for amateur astrophotographers who wish to image the planets and the Moon or maybe even a few bright DSO’s. For the price, The DMK21AU04.AS is a pleasure to work with and produces results that surpass all expectations. Based on the very short time I have been using the camera and that I am still a total beginner, I would definitely say that this is best planetary camera out there for the price. So if you currently are searching for a new planetary camera, don’t forget to have a look The Imaging Source camera range.
Review by Matt Patafta (Matty P). Discuss this Review on the IceInSpace Forum.

Advertisement  |
Advertisement |