ICEINSPACE

|
How to Take Photographs of Space
Submitted: Thursday, 12th January 2012 by Barry Armstead
This is for you so listen good!I hope you are switched on because there is no way I can teach you how to do this stuff without boring the poop out of you. So sit down, strap in, shut up and let's learn stuff. Pleasantries done. Moving on. Astrophotography is way different than daytime terrestrial photography. Just like assassinating a road-runner, there are many ways to do it. It will depend on how far away the subject is, it's angular distance and how bright it is. Different types of astrophotography will require different telescopes, cameras, lenses and focal lengths. If you think you can stick your camera on the end of a telescope, turn the dial to the green square, (complete idiot mode) and press the button to get a good photo, then give yourself an uppercut and come back here when you are prepared to step up to the next level. You will need to know all the ins and outs of how your camera works, how to take creative control of it so you make the decisions, not the camera. You will also need to learn how to use image editing software like Photoshop, Gimp, Registax, Deep Sky Stacker and Star-trail software. That's right, you will have to become a nerd. Oh, and make sure you know which way is up so you point your telescope in the right direction. Get some binoculars and star charts and LEARN YOUR SKY. Just to annoy you, many things in the sky move throughout the year. If you're scared of the dark, you are a sook and this is possibly not for you. The main types of astrophotography are:
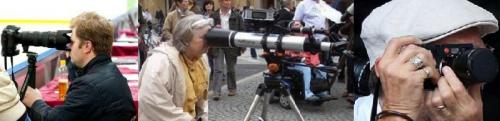
*I was reminded by a friend, (thanks Perry mate) about afocal photography, which is where you hold your camera and lens, (or iPhone) up to the eyepiece of a telescope to take a picture. In other words, you are too cheap to buy an adapter and do it properly.Give yourself an uppercut and go buy one ya bum. So, lets look at each style in turn and rough out a quick set-up and method. Before we do that, you need to understand the concept of... Image STACKING.Image stacking is the method used to get crystal-clear and silky-smooth images of dark space with extremely faint light in them. This is done by taking lots and lots of identical photos (sub-exposures or subs) and stacking them on top of each other in a stacking program. The real light in a photograph from a star, nebula or distant galaxy is called, "signal". The horrible graininess in the photo generated by electrical signal, heat and other things is false light and is called, "noise". The signal in each sub will be the same. The noise in each sub will be different. Stacking images improves the signal to noise ratio. A stacking program aligns each sub based on the real light like the stars, building the signal with each additional sub. The noise is never in the same place, (or at least not constant) so it gets subdued with each additional sub. A stacking program aligns each sub based on the real light like the stars, building the signal with each additional sub. The noise is never in the same place, (or at least not constant) so it gets subdued with each additional sub. You can also take, "Darks" of the same shutter duration with the lens cap on and stack these with the subs. Darks identify the false light on the sensor (noise) and remove it. Darks will recognise the false light (noise) in each sub and remove it. If that's not enough to confuse you, then you can throw in some, "flats". Take a heap of very short exposures with a white t-shirt stretched across the front of your telescope, lit by an even light-source. You may have little blobs on your picture caused by dust, "motes" (AKA dust bunnies). You will also have darkened corners, (vignetting) because your sensor is rectangular and your lens (telescope) is round, causing uneven lighting across the sensor. Stacking in a few flats with your subs and darks should take care of all that. Keeping your gear covered and your glass and sensor clean will also help a lot ya grub. Finally, there is a faint kind of noise called signal readout noise. Don't ask me what it is, it's just some techo electronic thing. Take some photos with the lens cap on like you do with darks, except this time instead of using the same shutter duration of your subs, set the shutter for the very fastest the camera can go. Stack those in as well and Bob's yer uncle. How hard can it be? Still awake? Well I'll be stuffed! Let's keep going then.
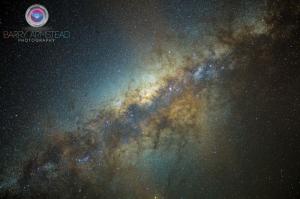
Widefield AstrophotographyYou'll need a tripod, a camera that has a full-manual control option with the ability to do a 30 second exposure, (A DSLR is best) and a wide-angle lens. I can highly recommend the Canon 16-35mm f2.8L lens. You can also use a 10-22mm, 18-55mm in any brands. The point is, you need to use the wide end of the scale, around 16mm. Full-frame cameras are more expensive, but they get more image in and their chips are inherently less noisy. You can still do it with a crop-frame sensor though. If you have live view, that's awesome, we'll use it! Here's how. Go for a drive out of the city and away from the light. Pick a night when there is no moon, no clouds, no family or work commitments, no party invites, no responsibilities or obligations. Good luck with that. Set your uber expensive and solid tripod down on the ground and make sure it is stable. If you went cheap and bought a $20 Aldi tripod because you are not as serious as you think you are, you can hang a heavy camera bag from the hook under the bottom of it to make it more stable. Alternatively knock a tent-peg into the ground and use an elastic strap to pull it down firm. Don't stretch it too tight or you might find yourself with a dirty tent peg up your nose. Put your camera on top and point it at a bright star. Yes the sun is a star and no it doesn't count. If you use the sun you are an air-head and you are also out at the wrong time of day. Use the switch on the side of your lens and turn it to manual focus. (MF). Leave it there and never touch it again. Looking through the viewfinder and using the lens zoom ring, zoom in on any bright star and centre it using your tripod head adjustments. (For a 16-35mm lens, zoom to 35). Using the manual focus ring on your lens, focus the star as best you can. For most lenses focus will be all the way to infinity and back just a poofteenth to find the sweet-spot. Switch your camera on now and turn on live view. Using the digital zoom buttons, (+-) zoom in as far as it will go, still keeping the star centred. Now very carefully, use the manual focus ring on the lens and fine-tune the focus. Go back and forward a few times to get it right. Once it is focused, do not play with it again! Turn off live view and zoom all the way back out again to 16mm. Now you can re-frame to an area of sky you want to photograph. I find it easier to frame what I want with the camera switched off, that way the LED screen on the back isn't playing havoc with my super owl-like night vision. The milkiest part of the Milky Way is a great place to start so try that. It's the area with the greatest concentration of stars, but remember it's not always visible as the Earth rotates. Turn your camera on, switch the top dial to M for manual. Make sure you are shooting in RAW, not JPEG. Set your shutter speed for 30 seconds. Set your ISO for 800 or 1600. Remember the higher the ISO, the more sensitive to light your sensor is. The downside is the image will be grainier, (noisier). You decide on the trade-off. Open your aperture to fully open. (F2.8 for my 16-35mm) Turn on your timer delay. I use ten second delay so the vibrations from me pushing the button (camera shake) have time to settle before it goes off. If you have your flash prepared to go off, self-administer another uppercut because you are a twit and put your flash away in the car. Press your shutter button and ten seconds later the shutter will open, thirty seconds after that you have taken your first successful wide-field astrophoto. Run your photo through Photoshop to adjust curves and levels as well as colour balancing, resizing and finally sharpening. If you want to make it even better, take ten identical photos and stack them. Post it up on astrophotography forums, tell them how awesome you are and then get ready for life-shattering humiliation, ridicule, mockery and torment when they tell you how to fix all your mistakes. Let's face it..you deserve it. If you want to do long-exposure widefield work, then you will need to take your camera off the tripod and put it on a mount that tracks the motion of the stars, other wise you will get long star trails after 30 seconds. This is where the second mortgage on your house or selling your child for medical experiments comes in handy.
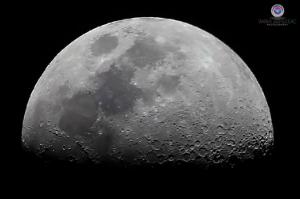
Lunar AstrophotographyFor stills - You know that cheap aluminium lightweight tripod you got at a bargain price? Do yourself a favor, give yourself yet another uppercut and throw it in the bin. Better yet, take it to a camera shop and ask the salesman to beat you over the head with it, then get him do the same with a decent Manfrotto tripod. You will learn very quickly the difference between a flimsy tripod and a solid one. (*In case you missed it...that was a joke... Please don't actually do it.) Manfrotto's don't kill people....people kill people... When you have finished bleeding, Grab your new tripod you bought with the money you got from suing the salesman, a camera that has a full-manual control option and a timer delay (or shutter-release cable) and a long lens or small telescope. Whether you are using a camera with a lens on a tripod, or on the end of a telescope on a mount, use the same method for focus as above in the widefield technique. This time your shutter speed will have to be faster, say around 1/250 (experiment by bracketing). Set your ISO to 100 and your aperture will depend on the lens/scope you are using. For my 100-400L lens I use anywhere from f5.6 to f/11 and adjust the shutter speed accordingly. Again, use the timer delay or a shutter release cable to stop camera shake. For video image stacking - You'll need a mount that tracks the motion of the stars and a telescope with an appropriate webcam or dedicated planetary imaging camera. Don't ask me for links. Give your precious manicured little fingers some exercise and Google them. You will also need a laptop computer beside your mount to run the camera and view what it sees. As the view is live, then you will have to use the telescope's focus knob to get the image on the screen as sharp as you can. I find it easier to use a small star, then re-frame on the moon. Your cute neighbour's open window is too close to achieve this. Take 2 to three minutes worth of video. (the moon, not the window). This should yield a few thousand frames. To process and stack these frames you will need Registax software on your computer. The way it works is that it will ask you to select an image out of those few thousand that looks sharp. I just scroll through until I find one that looks sharp to me. I might scroll a few times and find a sharper one. Once selected, the program will compare all the frames to the one you picked. It will put all the ones worse to one side, and all the ones better to the other side. you then select a percentage of what you will allow in terms of quality. It will then stack that selection together and out of a couple of thousand to a few hundred frames will be combined and averaged to produce one single image. It's like magic. in fact, I think it is magic because I'm stuffed if I know how it works. Too many uppercuts means other the people who make this stuff are smarter than me. Once you have the final image, you can then run it through Photoshop and tweak it to bring out it's best. Be gentle and don't overcook it. You spent all that time capturing it, you better make it look good.
Planetary AstrophotographyThis is done much the same way as the above lunar technique with an astro video camera. You will need a telescope with a long focal length and large aperture. Reflector telescopes are best suited for this, from medium sized Newtonians to large Schmidt Cassegrains and their variants. An accurate equatorial mount is needed to track the motion of the planets. The reason you need such long focal lengths is because the angular distance of a planet is a very accurate measurement of a poofteenth of stuff-all. You need a big aperture to let in as much light as possible. Then you need a long focal length to blow that tiny dot up to something you can see on an otherwise black photo. Try doing that with cheap gear and I have no sympathy for the pathetic cries of frustration when you sob, "Why is it so blurry?"
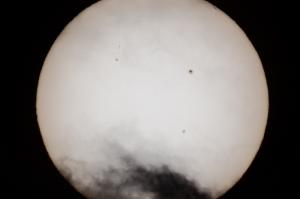
Solar AstrophotographyThis is done much the same way as lunar with an astro video camera, except that because of the dangers of the sun's heat and light, it is done with special filters. Commonly a Hydrogen Alpha (Ha) filter is used or something like a Coronado Personal Solar Telescope, (PST). You can also place Baader film over the front of your lens or telescope to take photographs of sunspots. (Like my feeble attempt here on the left) WARNING: Make sure that if you have finder scopes and other optics piggybacking on your main scope, that you shield their front apertures as well or your blonde hair might catch fire while you are looking through the main scope.
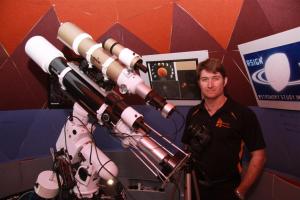
Deep Space Object Astrophotography (DSO's)You will need a medium to large telescope on an accurate equatorial mount that can track the motion of the stars. You can do a couple of the larger galaxies and most of the nebula in our galaxy with a small to medium sized telescope, either a refractor or reflector. If you want to get those tiny distant other galaxies, you will need a large-aperture telescope. The idea here is to get in as much light as possible at the front end so you can do something good with it at the back end. Focus and accurate tracking are CRITICAL. DSO's can be captured very effectively with a DSLR attached to the telescope with an adaptor called a T-Ring. Take the lens off your camera, put the T-Ring adaptor on and slip it into the telescope where the eyepiece would normally go. Easy. There are also dedicated astro-cameras around called CCD cameras. These are very expensive and complex, along with the accessories and programs that come with them. There are so many variants and styles I won't get into them here. Speak to your suppliers about them and they will address your needs.
Typically, you would have one telescope on the equatorial mount, taking a long exposure while the mount is tracking. Piggybacking on top of that, would be a second, less powerful telescope, with a guiding camera in it. This guiding camera sends corrections to the mount, based on a star that you have designated it to lock on to. All mounts have some degree of mechanical error in them, but a guiding camera and guiding program like PHD, takes the pain out of it and keeps it all on track. My sub-exposures range from five to twenty minutes. Light pollution from your city may affect this time factor. I may shoot fifty exposures of the same object over a few nights to stack at the end of the week, to produce my final image. I have been known to fall asleep standing up in church the following day. Once that's done I save it as a lossless .tiff and export to Photoshop for final tweaking. The idea is to tease out all that faint light data that your camera has captured. No sense capturing all those hard-earned light photons and displaying them as black now is there? Be gentle with your image and don't overcook it. If it looks fake, painted, animated or cartoony, just back it off on the sliders a bit. Google search other images of the same object and see what the general concensus is with colour. If you learn about what's out there, (eg, what white light does when it passes through hydrogen or oxygen) then you will produce more natural looking photos as a result.
P.S. If you found this article useful, send me money and shower me with gifts. C'mon now, don't be shy. oh...and,
 |
|
|||||||||||||||||||||||||||||||||||||||||||||||||||