ICEINSPACE

|
Finderscope Mount for Cheap Telescopes
Submitted: Thursday, 10th April 2008 by Michael Viset
The ProblemI’m a real beginner at this astronomy caper, and admit, possibly to the chagrin of the experts, I have started out with a cheap telescope I bought on eBay. Hey, I can see Saturn and Jupiters moons, I’m stoked! However, the cheap plastic finder scope remained a source of frustration. It would go out of alignment if I just breathed on it. And those little thumb screws, I just could not get them right. Another problem not being able to see the cross hairs in the dark. Further again the angles I would have to twist my body, leaning over the telescope, coupled with the time it took, were painful and frustrating. ResearchI searched the net to find out how you experts do it. Well, I learned about clever things like red dot finders, which would make a spot appear in the sky. Also right angled 50 x 8 finder scopes, where the eyepiece could come out parallel to the eyepiece. That would fix the twisting, problem and give me more light if I needed it, but would still have trouble with seeing the cross hairs. But the price of any of these attachments from proper telescope suppliers was more than I paid for the telescope itself! Also, to attach any of these things to the telescope I was going to need a "dovetail" mount. I didn’t have that on my telescope. Cheap telescopes all seem to have two screws that stick out from the telescope, and the plastic finder scope is “secured” with thumb screws. Does your “Cheap” telescope finder look like this? You may be having the same frustrations.
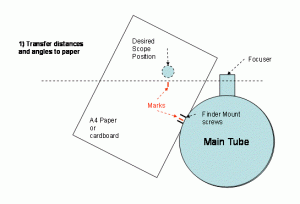
That dovetail mount alone was going to cost half what I paid for my telescope. And then, I don’t think cheap “Made in China” telescopes are designed to have something like that attached, they are made from one step up from tinfoil. I could potentially do more harm than good. So back to eBay. I searched for "red dot" and "finder scope". To my surprise there were a number of sites selling a range of scopes for rifles, in the "sport" section. Hmm, this looked interesting. The rifle red dot finders were almost identical to the proper telescope ones, but with different mounts. Also, apparently the rifle market is so big that there is quite a range of these things. They go up to 56mm apertures, with zooms and illuminated reticules - that could be handy further down the track. The way they attach the scopes to the rifles is with a 20mm dovetail mount called a Weaver rail, or a Picatinny rail (true). They look similar to a proper telescope mount but longer, they can be different lengths depending on the rifle they are supposed to go on. Both the red dot finder and the 20mm Weaver rail would be half the price, delivered to my door, than similar items from an astronomy supplier. From Hong Kong of course, but I am only “shooting” stars, not kangaroos. OK - the brain ticking now. ObjectiveThe challenge was how to use the existing mounting screws, and make an adapter that would take it to a more conveniently located Weaver rail. Then I could ultimately put any eBay rifle scope on it. Rifles are not fired at 90 degrees, so there no right angle sights, but I figured with enough space I could accommodate a mirror at 45 degrees. Then the “viewing” optical path would be parallel with the eyepiece. This would be much more comfortable than all the bending and twisting. DesignThe first step is making the template. This will be different for each cheapie telescope. I made the template by holding up a piece of paper in the front of the telescope. The one pictured is a 114mm x 500. With the eyepiece vertical, the paper edge was perpendicular to the finder scope mounting point screws. I then drew a horizontal line at eye piece level. An assistant with a spirit level would be of great help here. On the paper I marked the mount point, and on the horizontal I ma rked the point where I wanted the weaver rail to go.
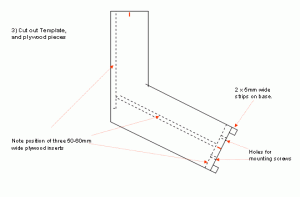
I made the width of the base slightly larger than the base of the cheap finder scope, about 40mm, and drew perpendicular lines from there. I also drew perpendicular lines down from the "horizontal". This gave me the basic shape.
Sorry about the resolution in the sketches, it is the best I could do with Powerpoint. Then I just rounded off the curves, cut it out with scissors, fine tuned it and that was the template I cut the plywood from.
ConstructionConstruction was from 3mm marine ply I had left over from another project. Ordinary 3mm or 4mm construction ply would also be suitable. The two curved sides must be identical, so that the base and the top are parallel and aligned. The three rectangular sections (50mm to 60mm wide) in between give it structural strength. I used rapid set epoxy for the joins, because I had it, and this is really strong. However, there is enough surface contact area that any good woodworking glue should do the job. It has to be glued in stages.
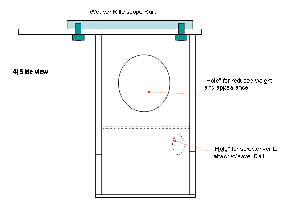
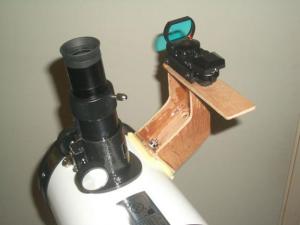
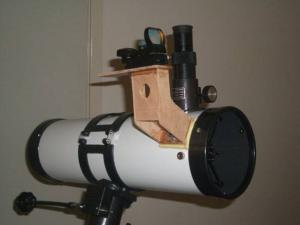
If you take care that the side shapes are identical, and the three internal sections are “square”, then the base mount will be precisely parallel with the top mount, and the Weaver rail will be parallel with the telescope tube. A piece of foam rubber camping mat under the mount stops it from slipping, and when the thumbscrews are tensioned it stays put. A kitchen sponge or piece of tyre tube would work as well. Even though it may look chunky in the photo the all up weight of the mount is less than 50g. It is very light weight. The dovetail Weaver rail is as heavy as the mount, and the red dot finder scope is about 130g, much heavier still. The extra length of plywood extending from the back of the finder is to accommodate a 45 degree mirror of some sort, but can be left off if you don't mind using the scope at that angle, or cut off later. Or, a short piece of 32mm or 50mm PVC drain tubing or plywood square could be mounted there to help find the red dot. The "T "shape on the top allows a green laser pointer to be rigidly secured with an elastic band in the corner. A round file and duct tape strips enable perfect alignment of the pointer as well.
ResultThe result is very rigid, certainly much more rigid than the cheapie finder scope. It stays aligned when you bump it. I can see why the red dot finder scopes are all the rage, they are really easy to use, and fast. Using the alignment screws and Allen key the red dot finder scope can be aligned to levels that are impossible with the cheapie finder scope. I aligned it on a distant object in daylight. At night I was able to hit straight on Saturn, at 75X magnification, in seconds. Much better than the cheapie finder scope, which took minutes, a lot of adjustment and a lot of backache. The result is very pleasing from a "seeing" point of view. It is satisfying to have made something so useful, which will get me more use out of my miniscule investment in the telescope. So, if there are others out there with the same problem, and admit to having a cheap eBay telescope, then this is a great solution. (Next project – Parallel alignment – without leaving the back yard, even better still) Project Cost
Options:
Satisfaction – priceless! Article by Michael Viset (Michael V). Discuss this article on the IceInSpace Forum.  |
|
||||||||||||||||||||||||||||||||||||||||||||||


![image003_[800x600].jpg](content/images/373a11b3a5a25e00b67431d734103667.jpg)