ICEINSPACE

|
Creating Cheap Azimuth Circles
Submitted: Wednesday, 10th October 2007 by Denis
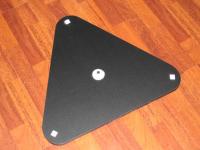
After spending long nights looking at the skies with my new 12" Bintel Dobsonian and even longer reading just about every post on the IceInSpace Forums, I decided that I would buy some Digital Setting Circles (DSC) to make finding things just a little easier. Just about everyone suggested I get Argo Navis but when I found out how much they cost I decided there had to be another way. (The missus would kill me if I even mentioned that sort of money) There were numerous posts about making your own DSC but my electronics experience is limited to making my red LED night vision light and managing to successfully build a Cockroft-Walton voltage doubling circuit that heated the resistors up so much that when I touched one of them I got a neat little resistor shaped blister on my thumb. So I resigned my self to the fact that DSC's weren't for me. It looked like I was going to have to go lo-tech and build my own. There were many projects on the web showing how people had made some really neat setting circles but they all had one thing in common that I didn't have... The bases of their dobs (the part touching the ground) were round and mine was triangular. Damn you Bintel! Just kidding. I love my dob! Here's what the bottom part of the base looks like.
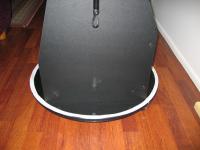
I made myself some paper setting circles using Photoshop and some sticky tape as you can see here.
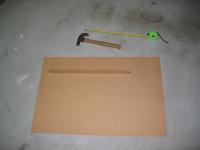
It worked surprisingly well except for the fact that I had the degrees going in the reverse order. What a noob. I am now an expert at subtracting any number from 360 :) I spent the next day at work thinking about how I could modify the Azimuth ring to work in my situation and I came up with what follows. I know it's not the best but it's a solution that works for me and saved me having to fork out $1,000 for some DSC's. Which by the way I would still love to have, but my Azimuth Circle is fine for now. I made my Azimuth circle out of some 5mm mdf I found in the garage. It's a bit flimsy and if I'd had anything thicker I would have used it. Unfortunately, Bunnings aren't open at 10:00pm.
The mdf wasn't large enough to make a full circle that would fit on the base of my dob so I had to make two semi-circles and then join them together (more on that later). I don't have a router so I made myself some scribers using some junk wood I had lying around and a couple of nails.
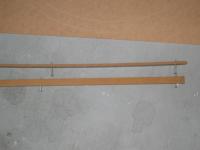
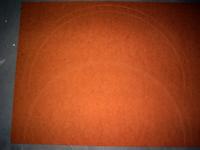
Notice that the bottom scriber in the picture has the nails separated further apart than the top one. I used the top one for the inside arc of my Azimuth Circle and the bottom one for the outside arc. I simply measured the radius of my dob base and added a little bit to it to get the oustside arc size. I hammered the nail on the right hand side into the board and then scratched an arc using the other nail as you can see in the image below.
I kept scratching the surface with the nail until I had a fairly deep groove, then I turned the mdf over and using the same nail hole did the same on the opposite side. The final part (and most time consuming) was the cutting out of the arcs. I used a chisel with a 5mm head on it. It took a long time and made a fair amount of noise but after some sand paper and some elbow grease I think they turned out okay. Note: If you look closely, you can see two lines drawn in pencil on each arc. I did this before I cut out the arcs by drawing a line from one side to the other making sure I went through the hole made by the nail. That way I was assured of having a semi-circle when I trimmed the arcs on the lines.
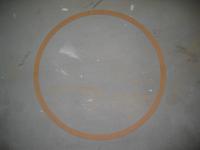
Here they are laid out as they will be when joined together.
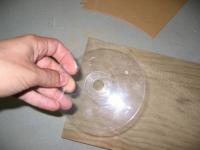
The next stage was the trickiest. Remember I was improvising and I had to join the two semi-circles together. I came up with the brain wave of using one of those useless clear cd's that you get on the top and bottom of a spindle of blank cd's or dvd's.
I cut out two strips from the cd (careful here as the plastic is very brittle) and laid them on top of the semi-circles, using PVA glue and some clamps.
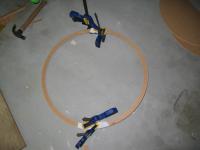
You can't see the plastic in the photo as I wrapped the glue in tissue just in case it stuck to my Irwin clamps. Oh how I love my Irwin clamps. Here's the circle after an hour of drying. (Just pretend that the tissue isn't stuck to the glue and is impossible to get off unless sanded) This is the under-side anyway so looks aren't too important at this stage.
Here's the circle on my dob base (the part that turns with the telescope).
Now for the degree markings. During my lunch break at work I created a Photoshop image of my Azimuth Circle. I made the image 1 Metre in diameter so it would fit any size dob base that I have seen. And if this is too small for your dob base then I can make you a larger one if I can come and have a look through your telescope. :) I also made the degrees go both ways around the circle. I'm in the Southern Hemisphere and I'm not sure if the Northern hemisphere goes the opposite direction. Anyone? The image can be shrunk to fit smaller bases if needed as well. You can download the zipped Photoshop file (careful, it's 6 mb even when zipped) or you can just download a JPeg version which is much smaller in size (758kb) Photoshop Azimuth Circle (6mb) The diameter of my Azimuth Circle is 68cm so I resized the jpg to 68cm in width and height then printed it out. Actually, I made it a tiny bit smaller. About a centimetre smaller. Then I cut it up and stuck it to my Azimuth Circle. By splitting the ring into multiple strips I was able to print the entire thing out on two A4 pieces of paper.
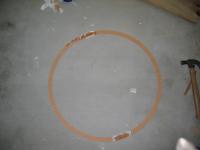
Here you can see the circle on my kitchen table after it has been glued to the circle.
How do I use it? It's really easy. I use a spare Allen key that I found in the garage and I stick it in the ground so the small end is over the top of my Azimuth Circle without actually touching it. See the image below.
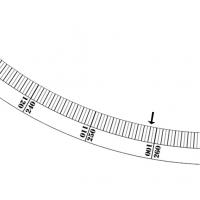
Next I find Jupiter with my telescope and put it in the centre of the eyepiece. Then, using Stellarium on my laptop, I get the Azimuth reading for Jupiter (tonight it was 259) and I turn my Azimuth circle until the 259 is under the Allen key. (I don't move the telescope at all, just the Azimuth ring. If you look at the image below you will see that each 10 degree line has two numbers on it. I use the numbers on the right hand side of the line. And where the arrow is pointing is 259 degrees.
Eventually I will use some screws and washers to clamp the circle down to the base once I have it aligned but for now it just sits there quite happily. Once you have the circle aligned it's as simple as looking at Stellarium and finding out the Azimuth reading of the object you want to find. Once you have the reading for the object, you simply turn the base until that number is sitting under the Allen key (I turn the telescope, not the Azimuth circle. The only time you turn the Azimuth circle is when you are aligning it.) To get the Altitude reading right I use a magnetic protractor that I bought from Bunnings. It was a bit expensive for what it is, $40, but it works well and it hasn't been wrong so far.
All up it's cost me $3.00 for the board and a bit of time (especially the Photoshop image) but it has definitely been worth it. As I mentioned, the Protractor was a little exe but it's a hell of a lot cheaper than buying Digital Setting Circles. I hope you like my Azimuth circle project and if you have any questions, post them to me (or in the forum) and I will try and answer them.
Article by Denis (mrsnipey). Discuss this article on the IceInSpace Forum.  |
|
|||||||||||||||||||||||||||||||||||||||||||||||||||||||||||||||||||||||||||||||||||


![Finished_1_[800x600].jpg](content/images/123cf4b44eee5fdce52b466b684d620b.jpg)

![PrintedOut_1_[800x600].jpg](content/images/c3ef4f975feee17eea14955f0951b4ae.jpg)
![CutUp_1_[800x600].jpg](content/images/e41e5b9eb09a6092c85f9a6171abbf63.jpg)
![Glued_1_[800x600].jpg](content/images/a14619e8087dcce05610825e92da027f.jpg)
![CircleInUse_1_[800x600].jpg](content/images/1f7873080451e020274a06099a529e36.jpg)
![Protractor_1_[800x600].jpg](content/images/afb5301f9d4f0c4497f5ada265f8cd29.jpg)

