ICEINSPACE

|
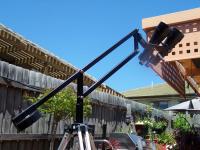
Parallelogram Binocular Mount
Submitted: Friday, 2nd March 2007 by Larry Brockman
Soon after I purchased my 6" Refractor with EQ-5 equatorial mounting , the Aluminium tripod it was supplied with was deemed too lightweight to do a reasonable job. After constructing a much improved tripod the old Aluminium tripod became surplus. The support arm is manufactured from RHS tubing which were spare off cuts. If off cuts are not available, local Robot Trading or any steel suppler should be able to supply. Fabrication is simple with mainly home handyman tools and some minor welding. Bill of Materials
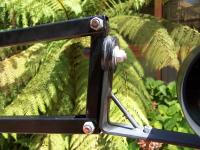
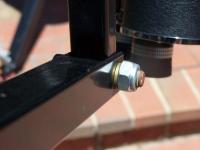
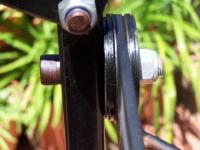
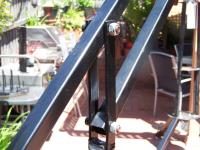
Support ArmThe top and bottom support arms are made up of items 1 & 2 and joined on to item 3. You will note the ends of the 30mm RHS is notched out to allow the 25mm end piece to slide Carefully line up the top and bottom arms at right angles to the end piece. Make sure they are central and square . Now drill 15mm holes through both RHS. This will allow you to push a brass bush from either side. The brass bush is long enough to pass through both wall thicknesses. Once the bushes are in line you can pass the 50mm SHCS x 12mm right through both fit and tighten the 12 mm nyloc lock nut. When all SHCS are in place you will adjust all of them to the point where you have just the right friction for smooth up and down operation of the arm. The central pivot point is made up of the pipe piece item 15. Ensure that the pipe piece is cut square on each end, weld a washer over one end item 13. The bottom washer will have a 12mm x 60 mm mild steel bolt welded through it prior to welding to the pipe piece. This will provide a stud on the bottom of the pipe piece. This stud passes through the centre of the tripod mount for anchoring the arm assembly to the tripod. The steel flat bars item 5 must be welded to the top of the pipe piece. They must be parallel, vertical and 90 degrees to the top of the pipe piece. Allow a gap of 33 mm between the vertical flat bars so the top and bottom support arms can pass between them. Measure the bolt centres on item 3. Using this same distance drill two sets of holes 13mm diameter through the vertical parallel flat steel pieces. Measure a distance of 622 mm from the Binocular end SHCS centre of the top and bottom support arms and drill a 15mm hole in the 30mm RHS. Push a brass bush in both sides of each arm. Now slide the arms between the vertical parallel flat steel pieces and match up the 13 mm holes with the bushing centres. You can now pass two 50mm x 12 mm SHCS through and secure with 12mm nyloc lock nuts. Binocular Mounting ArmTake the steel flat item 6 and drill a hole 13mm in the centre 30 mm from one end. Radius grind or file the sharp corners off. Measure down from end with hole 155 mm and bend at 90 degrees. You may be able to cold bend it in a vice. However, a better result can be had using some heat. Measure on item 3 , down from the top arm end 50 mm and drill a 13mm hole in the centre of the 25mm RHS. Pass a 50mm x 12 mm SHCS through the RHS and stack on the SHCS as follows, steel washer, poly washer, mounting arm bracket, poly washer, steel washer and 12mm nyloc locknut. This can be tightened to allow ease of rotating of the arm. The washers provide enough friction to hold , hands free , the Binoculars in the selected position. A couple of drops of oil won’t hurt either.
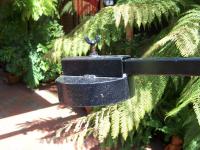
Handle, in my case I used an old screw driver. However, any kind of rod or bar welded or bolted under the bracket will work. It takes very little effort to rotate the Binoculars which weigh approximately 5 kilos. A small 45 degree gusset of 6mm steel rod was welded into place across the 90 degree angle to give the arm less flexibility. Counter WeightTake item 4, 40mm RHS tube and drill a 13mm hole 50mm from one end. Drill the hole through one sidewall thickness only. Weld a 12 mm steel nut centrally over the hole. Weld the 40mm RHS to the counter weight item 7. The counter weight can be an old weight off a dumbbell weight lifting set or suitable scrap. Note: You may be required to add more weight dependant on the weight of your Binoculars. The counter weight assembly can now slide over the long 30mm RHS arm. Thread a 12 bolt through the nut until it jambs on to the 30mm RHS arm. This weight can be moved along the arm to achieve the centre of balance once your Binoculars are in place.
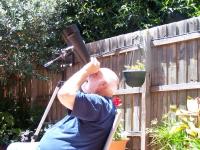
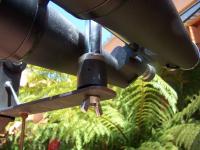
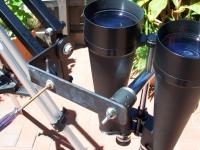
Mounting the BinocularsThe requirement for mounting will vary. It is a matter of assessing what will best suit the bracket arrangement of your Binoculars. In this instance I will show what I did with my 25 x 100 , which are Saxon that I believe are Badged Celestron like most of their equipment. I used a 45mm piece of 35mm bore pipe. After squaring both ends I welded a 10 mm bolt ( check your thread size) , in a 45mm washer ( mudguard washers) and welded that on one end to provide vertical stud to thread into the support arm of the Binoculars. I then went to local bearing supply and purchased two bearings that the outer race would push fit inside the pipe piece. The Bearings have a 15mm hole and you cannot buy a 15mm bolt. So the same brass bush we used on the arms will fit into the bearing holes and provide a 12mm centre hole. Stack the two bearings, 4 x brass bushes with a 60 mm SHCS through the centres and tighten the assembly with a 12 mm nut. Drill through the wall of the pipe piece and tap a 5 mm threaded hole at 120 degrees around the circumference of the pipe piece. The holes should be about 20mm up from what will be the bottom of the pipe piece. Press the bearing stack into the pipe piece and align the small gap between the two bearings to the centre of the three tapped holes. Now thread three x 5 mm allen head grub screws in each hole and lock them down on the bearing outer races. This will provide a swivel action and the bearing assembly is locked in place. This bearing arrangement was a result of not being able to find a proprietary item that would do this job. With the twin swivelling actions you can look to the Zenith with out a sore neck and enjoy a great deal of flexibility. The whole assembly is easy to dismantle and set up.
Finally, drill a 13 mm hole 45 mm from the end of the support bracket, pass the mounting stud through and tighten up with a 12 mm wing nut. Most of the parts I sent out to Powder Coat and cost was about $25.00 , it just finished it off nicely. Article by Larry Brockman (larry brockman). Discuss this article at the IceInSpace Forum.  |
|
|||||||||||||||||||||||||||||||||||||||||||||||||