ICEINSPACE

|
Binoculars - A Basic Guide for Astronomy
Submitted: Thursday, 1st March 2007 by Dennis Simmons
Binoculars are very useful instruments for astronomy. With them, we can easily see the larger craters on the Moon, bright comets; rich star fields, bright nebulae, star clusters, some of the brighter galaxies as well as study the orbital dynamics of the Galilean moons of Jupiter. They are portable, have a wide field of view and are easy to use. IntroductionYou are probably reading this because you are considering the purchase of binoculars and would like to make sure your hard earned cash is spent wisely, on binoculars best suited to your purpose. So, which is the right binocular for me? Well, that depends on the job you would like them to perform, which in this case we will assume is for astronomy. Let’s explore the world of binoculars to help us make an informed choice. ScopeThe vast landscape of binoculars is changing fast with the introduction of lower priced models from Asia, so it is difficult to simply recommend “Model A” from “Supplier B” offered at a “Price of C$”. Instead, we’ll first describe some of the key features of binoculars and the optimum characteristics that make them more suited for astronomy. Using this knowledge, you should be in a better position to narrow down the field before making a purchasing decision. We hope this approach will provide you with sufficient information to make an informed decision, in the face of an evolving market populated by the traditional manufacturers and their models, swollen by the introduction of new players and their models. This is what we will cover:
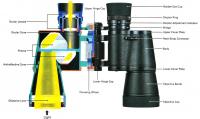
Plus, we’ll throw in a few additional specifications such as exit pupil, eye relief, field of view, Porro vs. Roof prisms and phase corrected coatings. Figure 1 illustrates nicely the general construction and features of a binocular (image from Vixen catalogue No 1006). Study it for a few minutes to become familiar with the various parts that make up a binocular, as we’ll be describing their function later on in the guide.
After the basics we’ll then go a little deeper, covering some intermediate concepts before finally moving onto more advanced topics, leaving you to decide where to stop along the way. We’ll also try to describe some simple tests you can perform in the shop, prior to parting with your money. However, the best advice is to join a local astronomy club, talk to real users, learn from their experience and even get to try out a range of binoculars. Let’s begin with the basics. What Are They?Binoculars are basically two small refractor telescopes joined together, precisely aligned, allowing the observer to use both eyes when viewing. This “twin telescope” design allows binoculars to provide a very relaxed and natural stereo vision effect. No awkward one eyed squinting here, as with a telescope. What are their Advantages?The most obvious advantage is that when viewing, we get to use both eyes as nature intended. Binoculars are also cool because of their simplicity, robustness, mobility, grab-and-go ease of use, wide fields and “point anywhere” flexibility. We often read that two eyes are better than one, which helps improve our power of resolution and enhances our ability to detect faint objects. In addition, colour perception and contrast are improved when we view with both eyes. On the next clear, moonless night, try these easy tests.
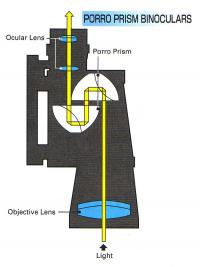
What is their Construction?Binoculars have basically three main optical components:
Each of these components has an important job. The objective lenses gather the light and focus an image of the object inside the binoculars. The size (diameter) of these lenses determines the brightness (how much light can be gathered) of a particular magnification binocular. The diameter of the objective is usually expressed in millimeters, such as 50mm, 70mm, etc. The eyepieces then enlarge the image and present it to the eye. The longer the focal length of the eyepiece, the greater the eye relief (see later). The third main components are the prisms, located in the body between the objective lenses and the eyepieces. The prisms turn the image the right way up and orient the view properly left to right. Without the prisms, objects would appear upside down and mirrored. The prisms also fold the light path so that the overall length of the binoculars is shortened. What do the numbers 10x50 mean?Every pair of binoculars is engraved with a formula, such as "7 x 50" or "10 x 42." These are the Magnification and Objective diameter (in mm) respectively. MagnificationThe first number (magnification) designates the power of the binoculars. If a particular binocular magnifies the image ten times (10x), see Figure 2, it makes objects look ten times closer. If you are looking at a bird 100m away, the view through the binoculars will be as if it was only 10m away; the image will be ten times larger compared to when seen with the naked eye.
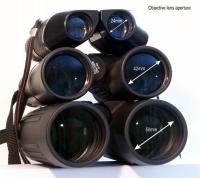
ApertureThe second number (Objective diameter or aperture) is the diameter of the front lenses in millimeters. It tells you the light-gathering ability of the binoculars. The bigger this second number, the larger and heavier the binoculars, but the better they will work in dim light, which is important for astronomy, as celestial objects glow very dimly making a large aperture important in low light conditions. Let’s look at the light gathering capability of a 7x35 and a 7x50 binocular. Both give a x7 magnification. The area of a 35mm diameter objective is obtained from the formula pr2 giving a value of 96 cm2 The 50mm objectives have a surface area of 196 cm2, over twice the area hence twice the light gathering capacity. Refer to Figure 3 for some comparisons of objective diameters.
By dividing the Magnification into the Objective diameter, you will derive the "exit pupil" (see later). Binoculars with lower magnifications (x7 to x9) will be less susceptible to shaking when hand held. Magnifications of greater than x10 usually require some kind of support or mount to prevent shaking and fatigue. A larger magnification also leads to a smaller field of view (see later). Other Important Features for AstronomyNow that we have grasped some of the basics about binoculars, such as magnification and light gathering ability, we’ll extend our knowledge with some intermediate concepts to help us move along the journey in deciding which is the best binocular for astronomy. To do this, we’ll discuss;
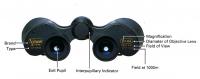
Figure 4 below (from Vixen catalogue No 1006) shows the general features of a binocular.
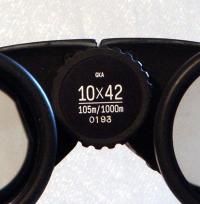
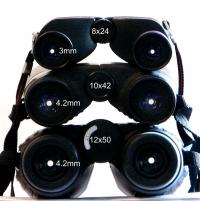
Exit pupilFor astronomy, we are usually on a quest for more light in order to better see faint celestial objects. Our eyes have an iris that expands in the dark and contracts in the light. In a healthy young person, the diameter of the iris when fully opened is approx 7mm. In a middle aged adult, it is only 4 or 5 mm due to the ageing process. Ideally we need to match our eye pupil (iris) to the exit pupil of the binocular, to make use of all the available light gathered by the binocular. The pupil in our eye contracts to around 2 to 3mm in diameter in bright daylight and expands up to 7mm at night when the eye is dark adapted. If you hold binoculars away from your eyes and up to the light, (NOT the Sun), you will see a bright circle floating in the center of the eyepiece. This is called the exit pupil and is the concentrated circle of light gathered by the objective, formed into a beam. The diameter of the exit pupil is calculated by taking the objective diameter and dividing it by the magnifying power. So, in the following examples; An 8x24 binocular has an exit pupil of 3mm (24÷8=3) Figure 5 shows the exit pupils of three binoculars, with specifications of 8x24, 10x42 and 12x50.
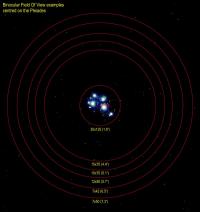
So, to obtain the brightest image for astronomy, the exit pupil should equal the diameter of the fully dilated iris of our eye - about 7 mm when dark adapted (remember, this reduces to 5mm with age). For daytime use an exit pupil of 3 mm - matching the eye's contracted pupil - is sufficient. However, a larger exit pupil makes alignment of the eye easier and avoids vignetting. Binoculars that have an exit pupil of above 5 mm are suitable for night-time astronomical use. Eye reliefEye relief is a measure of how far back your eye can be from the eyepiece and comfortably still see the whole image, avoiding the appearance of looking down a tunnel. It's measured in millimetres. Eye relief can be particularly important for eyeglass wearers, as the eye of an eyeglass wearer is typically further from the eye piece, which necessitates a longer eye relief in order to still see the entire field of view. Eyeglass wearers should test binoculars prior to purchasing, to make sure that the eye relief is long enough to accommodate their eyeglasses. Long eye relief is usually from 15 to 23 mm. Binoculars with short eye relief can be hard to use as you need to keep the binoculars very close to your eyeballs, hold them very still and keep the eyes centred in the eyepieces to avoid vignetting. Field of viewThe field of view (FOV) of a binocular is determined by the eyepiece design and refers to the horizontal width of the image. For astronomy, it is expressed as an angle, typically between 5 and 8 degrees. It is also usually expressed in a linear value, such as how many feet (meters) in width will be seen at 1,000 yards (or 1,000 meters). To convert from the angle to the linear form expressed in feet, multiply the angle by 52.5. So, 230 feet at 1,000 yards would give a FOV of 230÷52.5=4.4°. Figure 6 below displays the FOV from various binoculars as calculated and displayed in Starry Night Pro 6 when viewing the Pleiades (M45).
More magnification usually means a narrower field of view. Wide field of view eyepieces usually have shorter eye relief and may not work for eyeglass wearers. Though it is important, field of view is usually not the first concern in choosing binoculars for astronomy.
Coated and Multi-coated glassEach time light enters or leaves a piece of uncoated glass about 5% is reflected back. Binoculars may have up to 16 air-to-glass surfaces, with light lost at every surface. In uncoated binoculars, this “lost” light can also bounce around inside the binoculars, resulting in views that seem dim and hazy with low contrast. Ultra-thin coatings are deposited on lens surfaces of binocular lenses to reduce glare and reflections. Without these coatings, up to 40% of the light entering the binoculars could be lost to reflections from the many glass surfaces inside the binoculars. The presence of a coating is typically denoted on binoculars by the following terms:
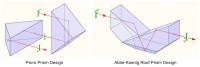
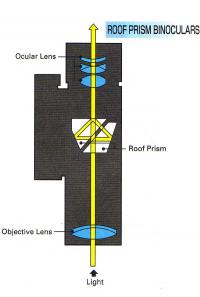
With today's best multi-layered coatings, 97% of the light gets transmitted to the eye and the images are bright, clear, and exhibit high contrast. These are usually the more expensive binoculars in the range. If you can afford it, fully multi-coated are the best. Which is the Best Design?Its time to look at some of the more advanced characteristics of binoculars, to add to the check list of desirable features in helping us choose the best binocular for use under our magnificent Southern skies. There are two main styles of binocular design, Porro Prism and Roof Prism. It's very easy to tell them apart. If the objective lenses and the eyepieces are offset from each other, like the capital letter “M” they are the Porro Prism design. If they are in line with each other, like the capital letter “H” they are the Roof Prism design. Roof Prism vs. Porro Prism binocularsLet's look at the advantages and disadvantages of Porro Prism vs. Roof Prism design. Figure 7 below (from Wiki) illustrates the designs of the different prism types.
Porro Prism DesignPorro Prism binoculars were first designed in the mid-1800s by an Italian inventor named Paolo Ignazio Pietro Porro. His concept of placing two right-angled prisms in each barrel of a set of binoculars is still used today. Porro-prism binoculars are the stereotypical angled-body binocular design. When standing on their barrels, or hanging from a strap around someone's neck, Porro-prism binoculars appear to form an “M” shape.
Porros focus by relying upon an external focus wheel which, when turned, causes the eyepieces for each side to slide forward or backward along an external tube. This type of focusing allows for sharp images of close objects, as well as precise focusing on objects as close as six feet. Advantages
Disadvantages
Prisms are made of two types of glass, BK-7 borosilicate flint glass and BaK-4 barium crown glass. For most designs, prisms made of BaK-4 are preferred over the standard BK-7 because they have a higher refractive index and give brighter, sharper images. To check the type of prisms in your binocular, hold it pointed towards a light source and take a look at the exit pupils. If the prisms are made of BaK-4 glass the exit pupils will be round and evenly illuminated. If the prisms are of BK-7 glass you will notice squarish, gray edges in the exit pupils. According to Wiki, the major European optical manufacturers (Leica, Zeiss and Swarovski) have discontinued their Porro lines. Roof Prism DesignRoof Prisms binoculars are more compact. However, to achieve the same optical quality as Porro Prism models, they usually cost more to manufacture. The Porro Prism design with its wider spaced objectives and can show slightly more "depth" in the image whereas the Roof Prism's image appears more compressed. Roof Prism binoculars were first developed by a German binocular manufacturer in the mid-1800s. This design features two straight barrels, giving it an H-shaped appearance.
The design reflects light through a series of five small prisms in each barrel. Roof Prism binoculars have grown in popularity in the last few decades, primarily because many leading optics manufacturers are producing excellent optics in this format. Because of the way roof-prisms are designed, most of the focusing hardware is enclosed inside the body of the binoculars. This hardware is adjusted with an external focusing knob or wheel. Advantages
Disadvantages
Build QualityThis is very important. To maintain collimation, the barrels need to remain aligned and be mechanically strong to stand up to the wear and tear of our usage. Quality internal mountings and accurate alignment of the optics are crucial to producing a binocular that's mechanically reliable, smooth functioning and long-lasting. Some Personal ExperienceBuy the best. Having excellent optics and mechanical design really pays off in terms of the quality of observing experience and comfort they provide. The best will stand up to heavy use and keep their resale value. It's a false economy to buy cheap binoculars as you will inevitably be forced to upgrade as you collide with the frustrating limitations of an inadequate binocular after a few nights out. If you would also like to use your binoculars for close up viewing in the day time, for say, bird watching, buy a binocular that can focus close to 3 metres. Most cheap to mid-range roof prism binoculars may only focus as close as 7 or 10 metres. With good binoculars, you should be able to see the following:
SummaryWhen selecting binoculars for astronomy, some of the key selection criteria are:
Recent DevelopmentsDuring my research, I came across references to a specific range of binoculars manufactured in Asia. From initial reports, they appear to offer a similar performance to the top quality Japanese brands, at approximately half the price. These reports suggest that these binoculars have excellent image sharpness across almost the entire field of view with very little field curvature. All surfaces are said to be fully multi coated with broadband coatings to provide maximum light transmission for the brightest possible images and excellent image contrast. We seem to be living in an interesting period on the evolutionary path of quality, affordable astronomy equipment for the amateur astronomer. As at February 2007, details of these 10.5x70 and 15x70 models can be found here: I have no experience of these binoculars but the information provided on the two websites listed above would compel me to seriously review these as part of my data gathering exercise, if I were in the market for some new astronomy binoculars. Local Suppliers (Australia)A list of local suppliers of astronomy equipment can be found here, on the IceInSpace Links page. Sources Used in Compiling this Guide
Some Simple Tests When Reviewing BinocularsYou can perform these simple (non-destructive!) tests before purchasing a binocular.
Binocular MountsBinoculars can be difficult to hold still for extended periods of time, especially when observing objects above 45 degrees altitude. There are several styles of binocular mounts available on the market. Check that your binocular has a ¼-20 UNC tripod mounting socket as some do not. You can also make your own parallelogram mount. Glossary of Binocular TermsApparent Distance The distance in which objects appear when looking through binoculars. To calculate the apparent distance, divide the actual distance by the power. For example, using an 8x40 binocular viewing an object 100 feet away, your apparent distance is 12.5 feet. 100 / 8x feet = 12.5 feet BaK-4 prisms The designation assigned to the type of glass used for making the highest quality prisms. Diopter Lock The ability to hold or completely lock in the diopter setting so your binoculars remain in the exact setting for your vision requirements. Exit Pupil The larger the exit pupil, the brighter the image will be under low-light conditions. This is the bright circle that is visible when the ocular lens is viewed at a distance of about 25 cm with the objective lens facing towards a bright background or light source. To calculate the exit pupil, divide the objective lens size by the magnification power. For example, using an 8x40 binocular, your exit pupil is 5. 40mm / 8x = 5 (exit pupil size) Eye Relief Eye relief refers to the maximum distance at which you can place your eye from the lens to receive the widest field of view for the style of binoculars you own. Some binoculars come with long eye relief, allowing you to see the complete field of view with or without eyeglasses. Field of View This shows how broad the viewing angle is in units of degrees (angle). The larger the angle, the wider the area you will be able to see. Focus Focusing moves the lenses inside the binocular so that magnified beams of light are focused on your eyes. Lenses Optical quality glass that has been carefully ground to magnify objects without distorting them. Magnification Power How close things appear will vary with the magnification power of the binocular. For example, with an 8x40 binocular, the 8x signifies that objects will appear eight times closer than images seen by the unaided eye. This is the same as seeing an object 80 meters away as if it were only 10 meters away. Ocular The eyepiece lens in an optical instrument. It focuses the image to make it visible to your eye. Objective Lens In an 8x40 binocular, the front objective lens is 40 millimeters in diameter. The larger the objective, the more light the binocular will gather. Porro Prism Design A system in which two separate prisms are positioned in an offset relationship so that there is greater separation between the objective lenses than the eyepiece lenses. Prisms Binoculars use convex lenses for both the objective lens and ocular lens, which results in an image that appears upside down and backwards. Prisms are used in binoculars to reverse the inverted image so it appears normal to the human eye. Roof Prism Design A system in which prisms are positioned in an in-line assembly, resulting in a straight-barreled, more compact binocular. Multi-Coating Nearly all manufacturers put some type of coating on at least one of the optical surfaces in their binoculars. Some manufacturers put a multi-layer coating on all optical surfaces. This means more available light is transmitted to your eye. Glare is reduced and image contrast is enhanced.
Good luck, clear skies and steady hands! Article by Dennis Simmons (Dennis). Discuss this article on the IceInSpace Forum.  |
|