ICEINSPACE

|
Cleaning the Mirrors of a Newtonian Telescope
Submitted: Wednesday, 15th November 2006 by Mike Salway
A Dirty SubjectCleaning the mirrors of a newtonian telescope is a very polarising subject! People are divided into two camps - those who will never clean their mirrors and those who aren't afraid to do it often, if required. The first group of people will probably tell you that it's better to have 3 inches of dust on your mirror than to risk cleaning it. They'll probably tell you a bit of dust won't affect the viewing at all. They'll tell you that they've only cleaned their mirror 3 times in the last 40 years! The fact that i'm writing this article puts me into the second group, and the fact that you're reading it, probably means you're thinking about cleaning your mirror and want to know a) Will it damage my mirror, b) What are the risks, c) What's the best way to do it. Your telescope optics are precious, no doubt about it - and they have to be handled with care. However I don't believe that cleaning a mirror is something that you should be afraid of. I can't see how a layer of dust cannot affect your viewing.. it's bound to reduce the contrast and light-gathering as the dust scatters the incoming light. I believe that most people recommend not to clean your mirror simply because the risk is too great that you'll drop it or scratch it during cleaning. However if done properly, with the appropriate precautions, mirror cleaning doesn't have to be such a scary prospect. Hopefully this article will answer your questions and show you how to do it with as little risk as possible that bad things will happen! This article and the pictures within it focus on cleaning the primary mirror of a newtonian telescope, however the same methods apply for cleaning the secondary mirror. Just always be sure to have your scope level when unscrewing the secondary so you don't accidently drop it on the primary! Disclaimer: Having said all that, there are always risks if you choose to handle your optics. This article sets out to explain how I clean my mirrors. You should make your own decision and weigh up the risks of whether you choose to do it to your own mirrors. I'll take no responsibility for any damage caused to your mirror.
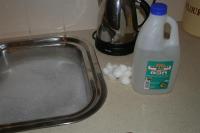
Tools and MaterialsHere's a list of what you'll need:
Distilled water is used to rinse the mirror as it doesn't leave any residue. You can get some from supermarkets (laundry aisle) or service stations. PreparationPreparation is key! Reduce the risks by ensuring:
If you're fumbling around trying to clear a space while balancing the mirror in 1 hand, bad things can happen! Make sure you plan what you're going to do and prepare your work area.
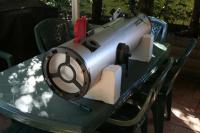
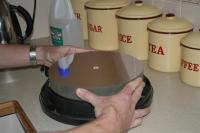
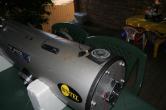
Taking the Mirror out of the OTAThe mirror cell (which holds the mirror) is usually held in the OTA by 6 screws at the bottom end of the tube. With your OTA laid down securely on a large enough work area, unscrew the 6 screws and with a slight upwards and backwards motion slowly slide the mirror cell back until it's free from the tube. Take care right at the point of release from the tube - make sure you're holding it securely as the mirror and cell is usually heavier than you expect. Don't let it drop onto the table or floor! Now take the mirror and cell to your sink area.
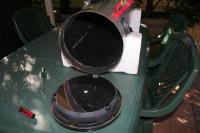
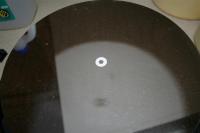
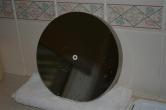
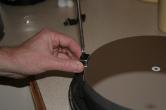
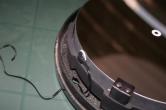
Taking the Mirror out of the Mirror CellOk now you need to take the mirror out of the mirror cell. Most mirror cells hold the mirror in place using three clamps, held in by two screws each. If you've never done this before, take note of how tight the clamps are holding the mirror. If they're too tight, they could be causing astigmatism due to pinched optics. More about that when it's time to re-assemble. Take this opportunity to blow any loose dust/particles off the mirror using a blower. Unscrew the mirror clamps and place them to one side. To re-iterate care and caution, don't drop the screwdriver, screws or clamps on the mirror! :) To take the mirror out of the cell, grasp the mirror firmly on either side and slide it up out of the cell. This part can be tricky, so be sure you have a firm grasp and don't drop it! You can also tilt the cell and push the mirror up from beneath, until you're able to get a good hold of it from the top. Keep your hands off the mirror surface. Now place the mirror gently in your (already prepared!) sink.
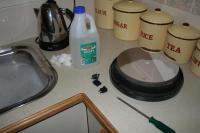
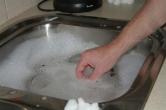
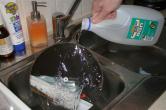
Cleaning, Rinsing and DryingOk now the fun part. CleaningAllow the mirror to soak in the tub for 5-10 minutes to help dislodge any stubborn particles, then follow the steps below:
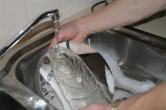
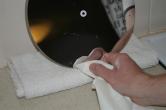
Don't rub, don't scratch. Work systematically across the mirror from one end to the other, repeating steps 1-4 until you've done the whole surface. Lift the mirror high enough to inspect it and make sure there's no stubborn particles still clinging on. If some dust or marks won't come off after a repeat on that area, it's probably best to ignore it and take comfort in knowing that you've done the best job you can. Don't rub or scratch! RinsingOnce you've finished cleaning, let the water out of the sink and start rinsing - first with tap water. Lift the mirror up and let cold water run over mirror for several minutes, ensuring all detergent is washed off the mirror. Then rinse again, this time using the distilled water. The distilled water won't leave any chemical residue. Run it all over the surface to ensure it's thoroughly rinsed. DryingStand your mirror up on the (already prepared!) towel, leaning against the wall. The towel will ensure the mirror doesn't slip forwards and crash down on the bench. The mirror will drip dry very well, thanks to the distilled water. Any remaining large water droplets can be soaked up using the tip of a folded piece of paper towel. Just touch it on the drop and hold it for a second, and the water will be soaked into the towel.
Re-AssemblyWhen the mirror is dry, it's time to put it back in the mirror cell, and then the mirror cell back in the OTA. As with taking the mirror out of the cell, this part can be tricky so ensure you have a firm grasp on the mirror and slowly lower it down into the cell. Screw the mirror clamps back on, but do not do them up tight. There should be a slight amount of wiggle left in the clamps so they're not clamping down on the mirror at all. If you tighten the clamps too much, you could pinch the optics and cause astigmatism. See Starkler's article Checking the Optics on your GSO Dob for more information about this. Take the mirror cell back out to the OTA, and slide it back into the tube. On most GSO dobs, it can only go in one way. There's a notch in the mirror cell which fits over the join of your OTA, so position the cell and slide it back in, ensuring the screw holes in the OTA line up with the screw holes in the mirror cell. Put the screws back in, and you're done!
Remember, you will need to collimate - so make sure you've learnt how to do this. If you're unsure, please ask on the IceInSpace Forum and you'll get some great advice. There's already a lot of threads discussing it, so do a search for more information. I hope this article has helped you decide whether to clean your mirror, and given you the advice and instructions you need to do it safely and see that it's not so scary after all :)
Article by Mike Salway (iceman). Discuss this article on the IceInSpace Forum.  |
|
||||||||||||||||||||||||||||||||||||||||||||||||||||||||||||||||||||||||||||||||||||||