ICEINSPACE

|
Transit of Mercury, 2006 - Observing/Imaging Guide
Submitted: Wednesday, 25th October 2006 by Dennis Simmons
Transit of Mercury, 9th November 2006This article is an extension of some scribbled notes I jotted down, to assist me with my preparations for imaging the Mercury transit of 9th November 2006 from Brisbane, Australia. I posted the rough notes on Australia’s premier astronomy forum, IceInSpace, and was subsequently asked by the owner/operator, Mike Salway, if I would like to convert the jottings into a more structured article for posting on the website. Here is the result, albeit with a focus on imaging: WARNING: Always use an approved, full aperture solar filter when viewing the Sun. You will be instantly blinded if you view the Sun without a filter. If in doubt – don’t do it – your eyesight is precious, worth infinitely more that a peek at the Sun; a lifetimes darkness is a big price to pay for a split second of carelessness. Pre-PlanningIt is vital that you have a clear idea of what you want to achieve, otherwise on the day, you will be in a flap, like I was during the June 2004 transit of Venus, which found me running around like a headless chuck, not knowing which camera to use on what ‘scope, and when in the sequence. Visualise what you want to record, and how you want the finished work to look, and that will help dictate your telescope/camera combination(s). Here are some possible imaging scenarios.
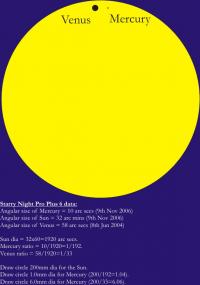
How Big Will Mercury Appear?Unfortunately, only 1/6 the size of Venus. Here is a scale figure comparing the apparent sizes of Venus in June 2004 and how Mercury will appear in Nov 2006. As you can see, there is a significant difference in apparent angular size.
Imaging IssuesWhich camera are you going to use?
Decide on what image you want to achieve. Select the appropriate camera and ‘scope combination to produce that image, whether full solar disc for a composite and possible animation, or hi-res close ups. Practice with the set up at least once before the transit, even if it means taking images of a blank solar disc. If you are going to attempt to image the whole transit, determine the best exposures for the Sun when only 3 degrees above the horizon (ingress) and as it gradually climbs to 68 degrees (egress). Field of view examplesHere are some typical sensor/scope combinations available to me, courtesy of the “Field Of View” indicator options in The Sky Professional, Version 6, from Software Bisque:
Environmental Issues
Set-up Issues
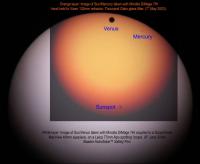
How Good Will It Be?According to Starry Night Pro Plus 6, Mercury will be 10.0 arc seconds in diameter on November 9, as compared to the Sun’s diameter of 32 arc minutes. By comparison, Venus’ diameter during the transit of June 8, 2004 was 58 arc seconds. Figure 2 is a composite photo of my efforts for the Mercury transit of May 2003 and the Venus transit of June 2004, showing the relative sizes of the two planets. Note the vignetting on both layers, due to afocal photography with the Minolta DiMage 7Hi.
Some Notes
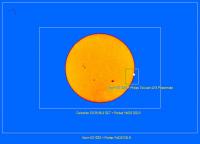
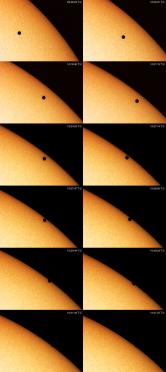
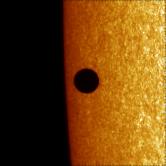
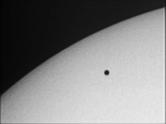
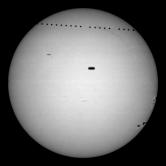
Some ExamplesTo set the scene and whet your appetite, here are some images I managed to hunt down on the internet, showing what previous imagers have achieved. D. Dierick from Ghent, Belgium.Figure 4 below shows a composite picture by D. Dierick from Ghent, Belgium. The images were taken with an Astro Physics 155 mm EDFS Starfire refractor and a Nikon D100 digital camera. Enrico Perissinotto from Talmassons, Friuli (North Italy).Figure 5 below shows a stunning mosaic made by Enrico Perissinotto from Talmassons, Friuli (North Italy). He used an Astro-Physics 130 EDFS at f12, prism of Hershel Baader and filter ND 4, Web Cam Philips ToUcam Pro. The Swedish 1metre Solar Telescope (SST)Figure 6 below shows a stunning picture of Mercury approaching the last contact phase, captured by the Swedish 1 metre Solar Telescope (SST) of the Royal Swedish Academy of Sciences on the Canary Islands. Henk Masselink and Henk BrilFigure 7 below is perhaps closest to our hearts, as it was captured with equipment typically used by IIS members for imaging the planets. This image was recorded by Henk Masselink and Henk Bril, with assistance of Marion Iris van der Linden, using a Philips ToUCam PRO that was attached with an adapter, constructed by Herman ten Haaf, at the prime focus of an 8” Celestron C8 Schmidt Cassegrain telescope. NSO/GONG Mercury Transit of 7 May 2003.Figure 8 below is an image from the NSO/GONG website; the http link can be found in Annex B. Note the smeared or trailed sun spots due to the technique used to create this composite image.
SummaryWell, that kind of exhausts what I wanted to say about the event. I have also included a couple of Annexes that may be of use. Annex A contains some general notes about high resolution imaging, seeing and instrument aperture. Annex B contains some http links to useful reference sites. Clear skies and good luck! Article by Dennis Simmons (Dennis). Discuss this article on the IceInSpace Forums.
Annex A - Some Notes on "High Resolution" imagingHaving arrived at ccd imaging through the now antiquated practice of 35mm film imaging, in my library I have the following books that I treasure:
Whilst these volumes are (historically) geared towards 35mm astrophotography, they do contain some useful information on seeing and optimal instrument size, excerpts of which I have included below. High Resolution Astrophotography by Jean DragescoThe sun is the most difficult object to photograph at high resolution because of the strong diurnal turbulence it causes in the Earth's atmosphere. In general the diurnal turbulence is 4 to 10 times higher in the day compared to the night. The best time of day for solar photography is 2 to 2½ hours after sunrise. Australian astronomers Bray and Loughead (1964) constructed a completely automatic heliograph, made from a 12.5 cm refractor, which photograph the Sun continuously, for 5-6 hours per day. Thanks to a “seeing monitor” (a photoelectric system that monitored the steadiness of the solar limb), the camera was only operated when the images were calm. The Australian astronomers were able to successfully reach the limiting resolution of their objective only on exceptional occasions: close on 10% of their negatives had this resolution, which is a very good result and better than one might have expected. Stix (1989) asserts that in the Canary Isles, most often telescopes in the 20 cm to 30 cm range were optimal for solar imaging. Most writers agree that the best images are obtained 1.5 – 2.5 hour's after sunrise as the Sun's rays have not yet had time to heat up the telescope. On the other hand, for those who successfully reduce solar heating by shielding the telescope tube from the Sun's rays, the best images will be found around the time of local noon. The diurnal turbulence varies, on average, from 4 – 8 arc seconds but there are also brief calm moments when the turbulence falls to 2 or 3 three arc seconds only. Really stable images last only for fractions of a second: hence the need to take plenty of photographs, with short exposure times. For high-resolution solar photography, it is essential to protect the telescope from director solar heating. At the Mount Teide observatory on Tenerife, the Spanish astronomers open the dome of the 40 cm vacuum solar telescope for only about 20 seconds, just long enough to take several photos, before closing it again. Then they wait for the telescope to cool before taking further images. It is best to use a refractor (being less susceptible to atmospheric turbulence), provided that the aperture is not too large. The standard instrument for solar photography would have an object glass between 100 mm and 130 mm across. Dragesco worked for more than two years with a 178 mm Apo refractor; and he has attained only slightly higher resolution with this instrument compared to using his Celestron C14 equipped with an offer centre 110 mm filter. One must do everything possible to avoid the telescope becoming heated before commencing photography. A plastic tarpaulin covering the telescope is the worst solution of all.
Noe that the Dragesco book was written in the era of 35mm film astrophotography. We have all seen the more modern, remarkable results that can be achieved by using webcams to freeze the fleeting moments of good seeing, where several 100 images can be stacked together. Hwever, Dragesco’s work is still probably of relevance to those using Digital SLR’s. Astrophotography for the Amateur by Michael CovingtonA telescope or of 10 or 15 cm aperture with a suitable full aperture solar filter in front is the ideal instrument; because the daytime air is inherently unsteady, larger apertures cannot be used except on mountain tops - which means at least, that the amateur's modest telescope is likely to be as good as any. The main challenge is to keep the Sun from heating the telescope and objects around it, causing severe air turbulence. Be sure to keep the telescope aimed straight at the Sun as much of the time as possible, to keep the sunlight from falling on the outside of the tube and causing irregular heating. A white tube is of course, less vulnerable than a dark coloured one.
Annex B - Useful ResourcesHere is a list of some of the resources that were used in compiling this article. Websites
Publications
 |
|
|||||||||||||||||||||||||||||||||||||||||||||||||