ICEINSPACE

|
16" Tri-Dob - Building an Ultralight Telescope
Submitted: Monday, 21st August 2006 by Tim Nott
IntroductionLet me first say that I do not profess to be an expert in telescope design and construction and that I am indebted to the fine expertise of many others who, through their books, websites, emails and conversations have allowed me, a complete novice, to design and construct a telescope that fits my needs and allows me to view the universe with my own eyes in a way that could not have previously imagined possible. The purpose of this article is to share some of my experiences in the design and construction of a large aperture but portable telescope, maybe even giving encouragement to fellow amateur astronomers to have a go at building their own. Choosing the DesignHaving decided to obtain a larger aperture telescope than my ETX 125, the first choice I had was: what sort of telescope? Well, actually, as I did not have much interest in imaging and I am not extraordinarily wealthy this part was easy – it had to be a dobsonian. Next decision – make or buy? This part was harder. Many people have been buying the cheaper Chinese dobs; modifying them to bring them up to scratch and for up to 12 inches of aperture they seemed to offer good value for money. Having bought a copy of “The Dobsonian Telescope” (Kriege & Berry, 2001) however, I began to think that making a larger aperture instrument might be possible for me to accomplish. The choice of primary was taken out of my hands when, after much searching on the internet, I discovered a 16 inch f4.9 BVC mirror with a tiny chip in it that I was able to get at a price that I could not resist. BVC is a black glass that apparently has better thermal characteristics than Pyrex and was purchased from ASM products in Canada (now A.J.’s Telescope Workshop http://www.ajstelescopeworkshop.ca/ ). 16 inches seemed to be a good compromise between aperture, portability and cost as the numbers below indicate:
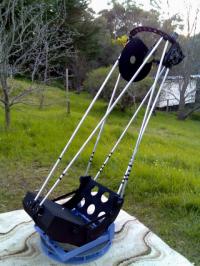
All I had to do now was wait 6 months for it to turn up via surface mail (it was going to cost $400 to send it by air!). I also had to build the telescope to put it in. Although the Kriege/Berry book details how to build a carbon copy of the well-known and celebrated Obsession design, it also – more importantly – explains the underlying principles behind building a premium dobsonian that produces fine images and moves like it’s on butter. I could have gone down the safe road and built an Obsession “clone” but I had noticed that many telescope makers had moved on to lighter, more minimal designs that were even more portable than the classic 8 truss tube setup. One telescope that seemed particularly intriguing to me was the Mel Bartel’s “Tri-Dob” scope that appeared in the August 2004 issue of Sky & Telescope. On further investigation I found that Mel had posted many construction details on his website (http://www.bbastrodesigns.com/tm/tm.html) as well as links to other similar “ultralight” telescopes. The design of my telescope was basically a modified version of Mel’s “Tri-Dob” and was finalised with a combination of theory and practical tips from Mel’s website, The Dobsonian Telescope, as well as help from the Amateur Telescope Makers Chat Group (http://astro.umsystem.edu/atm/search.html). Haven chosen the basic design for the telescope, I realised that it would contain many parts that needed to align exactly and would be difficult and time consuming to cut by hand. Because of my almost non-existent woodworking skills and to save time in the construction I elected to design all of the parts using a free Cad program (eMachineShop.com) and then get them laser cut. This allowed me to design, rotate, superimpose, duplicate and otherwise manipulate many parts virtually without wasting wood (the disadvantage, as I discovered, was that things never quite work out in the real world as they do on the screen). I also optimised the parameters for the 18 point mirror cell using the free PLOP software (http://www.davidlewistoronto.com/plop/) then also designed the parts for this on the Cad software. I could not seem to get the well-known software NEWT to work on my Windows XP system (I think it is designed for Windows 98) so I used an Excel spreadsheet by Andy Martyn to help me optimise the optical parameters, such as the secondary size, top ring diameter, and baffles. When all of the parts were designed, I ordered some high-quality 12 mm plywood, sent this and the design to the laser place and had all the wood and steel parts delivered to me about a week later like a giant prefabricated kit. I’ll never forget the delivery guy asking me: “What the hell is that?” Over the next few months I carefully sanded, glued, screwed, bolted, cursed, re-cut and painted the 200 or so pieces (and 100 odd nuts, bolts, knobs and screws) until eventually the scope took form. The whole project took me about 12 months from getting my initial case of aperture fever to having the completed monster assembled in my living room. I did have a hiatus of 6 months while I waited for the mirror to turn up and only constructed it in my spare time, so it would certainly be possible to build one much quicker if you didn’t have the inconvenience of eating, sleeping, working or spending time with other members of your family. Top End
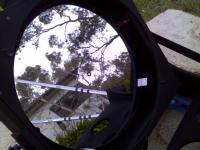
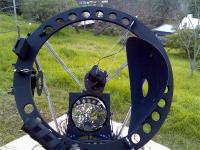
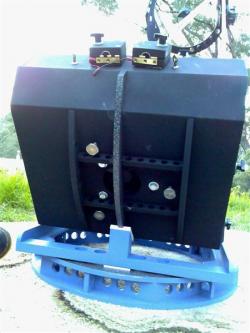
The top end consists of a single ring (instead of a cylindrical cage), truss clamps and focuser board, with holes cut out to reduce weight. Following Mel’s example I constructed a triangular wire spider that is 0.4 mm thick, cheap, light and wind resistant. The diffraction spikes from this spider are far less than that of a 4-vaned one and only appear on the brightest stars and planets. Also to save weight, the finderscope I use is a Rigel Quickfinder which is similar to a Telrad but is lighter and has a smaller “footprint”. At first glance the telescope would seem to let in lots of stray light, as it does not have a shroud, but the computer-designed baffles counteract this. There is a baffle in front of the focuser which blocks the light from the extreme edges of the field of view, and allows the detachable baffle opposite the secondary (which has a hole cut in it to reduce wind resistance) to be smaller. Both of these are made out of thin flexible plastic covered in Protostar self-adhesive flock. The primary also has a baffle in front of it and is totally enclosed in Krylon Ultra Flat Black paint. I may experiment with a shroud sometime in the future but any design would be hampered by the fact that there are only six poles, allowing the shroud to enter the light path (as well as increasing weight and wind resistance). Bottom EndThe traditional truss tube design bottom end consists of a ground board, rocker box, and mirror box – the flexible ground board being attached to the rocker box by a central pivot bolt. In this design however, the rocker box has been reduced to a thin square “flex-rocker”, which transfers its weight directly to a rigid ground ring and pivots by having three spring-loaded roller bearings running along the inside of the ring. Instead of the two side altitude bearings the mirror box has a central altitude bearing at the back, and two bearings at the front, making a total of three (this is where the nickname “Tri-Dob” comes from). These fold over the mirror box, greatly reducing its bulk and making it much more portable. The two side bearings share a common point of rotation with the back bearing, but have a smaller diameter. Balancing the telescope actually involves selecting just the right diameter bearings – too small a diameter and the telescope is top heavy and visa versa. Aligning these parts exactly is the main design element that makes this telescope harder to build than the “Obsession” type but using the Cad program meant that I was able to get the laser to burn guide holes in the relevant parts and attach them easily and precisely. All the bearings ride on Teflon (Dotmar Plastics) and Ebony Star laminate (Parbury Building Products), with extra keeper pieces to hold the bearing fins in place.
Inside the mirror box the mirror is supported by an 18 point mirror cell. Rather than a sling, the edge support is two blocks of Teflon at a 90 degree angle that create planes of folding that cancel each other out. Also built into the mirror box is a clamp that secures the mirror for transport safety. Two small gell-cell batteries power a fan underneath the mirror and two of the poles are used to run the current up to the Astrosystems secondary dew heater. This great device is siliconed onto the back of the secondary and senses the difference between the glass and air temperature, only switching on when necessary, avoiding heat distortion and saving battery power. Redundancy is built into the system, so that if the batteries go flat the telescope can be powered by my 12 volt Meade power cord, or a 9 volt battery can be connected to the secondary heater.
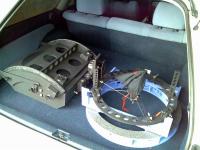
Using the TelescopeWhat can I say? The views are superb and the first time I looked at the Orion nebula through this thing I was jumping up and down and making the sorts of noises that Homer Simpson does when he gets his hands on a box of donuts (for more first light impressions see the April 2006 issue of the ASSA Bulletin). The total weight of the telescope is about 22 kilos and fits into a sedan or the back of a wagon without lying the seats down. It takes about 15 minutes to set up and collimate, mostly because I made sure that everything is fastened with knobs and doesn’t require any tools to put together. Despite its lightweight construction, the telescope seems plenty rigid enough for visual use, with vibrations from rapping it with my knuckles dampening out in less than one second. Motions are light and smooth, I only require a small step stool when viewing at zenith and the dew doesn’t touch the optics even after a long cold night. In short, the time and effort I spent carefully designing and building this telescope was well worth the effort and I find the experience of looking at the universe that much more satisfying and rewarding. Further Reading: Part 2 - 16" Tri-Dob Improvements, including Argo Navis and ServoCatArticle by Tim Nott (tnott). Discuss this article on the IceInSpace Forum.  |
|