ICEINSPACE
|
Moon Phase
CURRENT MOON
Waning Crescent 30.8%
|

|
 |
Centre Spotting a Newtonian Mirror
Submitted: Tuesday, 21st February 2006 by Steve H (janoskiss)
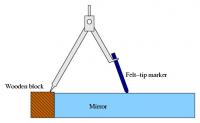
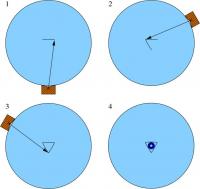
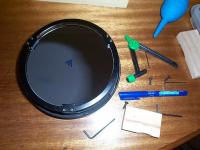
Centre Spotting - Quick, Easy and PreciseThis short article describes my preferred way of centre spotting. It is a method I have not seen anywhere else, but I believe it is one of the best. It is very easy to do and very precise, without the need for templates, or to risk anything touching the optically active areas of the mirror surface. The beauty of this method is that you do not need to be precise. In fact, you do not need to measure anything at all, either directly (e.g. with rulers) or indirectly (e.g., by making precise templates). You can be just about as sloppy as you like, and simple geometry will guarantee high precision. It takes a lot longer to describe than do, so especially for those who don't like to read instructions, Figures 1 and 2 show a self-explanatory graphical summary of the method. Figure 3 shows the actual end result for a 6-inch mirror.
 |
 |  |  |

Click to Enlarge
Figure 1 - Graphical Summary of this article
 |
 | 
Click to Enlarge
Figure 2 - Graphical Summary of this article
 |
Required Tools
- a wooden block that can rest firmly against the side of the mirror without wobbling. (Cut a "V" into the side of a small block or file a curve that has more curvature than the edge of the mirror.)
- compass (the kind for drawing circles, not for pointing north)
- felt-tipped permanent marker secured in the compass
- optional "spot" to stick on the mirror and tweezers to handle it
What to do with them
- Rest the wooden block firmly against the side of the mirror.
- Place the needle end of the compass into the wooden block and leave it in the same spot till everything is done.
- Open the compass so that the pen's tip is at or just past the centre of the mirror. Just estimate by eye. There is no need to be precise, just close enough to the centre to be sure that the tip of the pen is marking the primary mirror only in optically inactive areas (in the shadow of the secondary mirror).
- Draw a small arc with the compass near the centre of the mirror.
- Rotate the wooden block and compass combo about the centre of the mirror by approximately 120 degrees (one third of a full circle).
- Repeat steps 4 and 5 twice, then go to step 7.
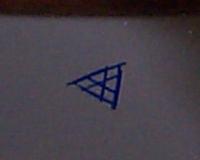
- You now have three arcs making a kind of bloated triangle, which gives a good indication of where the centre of the mirror is. If you want to be more precise, then readjust the compass opening so the pen tip points closer to the centre, and repeat steps 4-6 (I did, see Figures 3 and 4).
 |
 |  |  |

Click to Enlarge
Figure 3 - Centre spotted mirror
 |
 | 
Click to Enlarge
Figure 4 - Close up of the two sets of three circular arcs that indicate the precise geometric centre of the mirror
 |
Now you have a very precise indication of where the centre of the mirror is, and you can carefully place a sticky-backed paper/plastic marker around it if you want, using a pair of tweezers. I did not put a centre spot sticky on my mirror. If a good quality permanent marker is used, the markings will be as easy to see from the focuser as a stick on spot, and will last a long time.
Article by Steve H (janoskiss). Discuss this Article on the IceInSpace Forum.
|
 |
|