How to Build a Red LED Torch
Submitted: Tuesday, 21st February 2006 by Chris Marsh

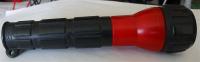
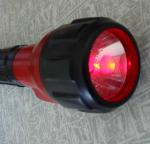
If you are anything like me you probably have a handful of torches lying around that you don’t use anymore.  I was going to buy a Red LED Torch, but I thought I would try and convert one of my existing torches first.  I managed to convert a flashlight that has been lying around for years.

This is a very simple project and only takes about 10 – 20 minutes if you have all the parts and know a little about soldering.

What You Will Need

  • A 2xAA torch like the one pictured below (Bought it for $5 from BigW a couple years ago)
  • 10mm Super Bright Red LED (Dick Smith part no Z4067 - $2)
  • Soldering iron and some solder
  • Solder Sucker
  • Pair of long-nose pliers
  • Small screwdriver

image001.jpg

Click to Enlarge
BigW Torch

Method

  1. Pull the flashlight apart and remove the light bulb.  Place the bulb in a plastic bag and smash it.  Carefully remove all the glass.  I used a small screwdriver to lever it all out.  There is some sort of glue holding the glass in, don’t remove all of this as it serves as an insulator so the LED doesn’t short out.
  2. Using both a soldering iron and a pair of long-nose pliers remove the filament from the light.  Use the solder sucker to remove the excess solder at the base of the light bulb.  You want to have a hole that the LED’s leg will fit through.  When you are finished, you should be left with the silver base of the light bulb(empty) with a small hole in the bottom.  See Figures 1 & 2.
  3. Get your Red LED.  Bend the shorter leg 90 degrees pointing away from the other leg (up the top where the leg meets the plastic of the LED) (Figure 3)
  4. Place the LED in the base you just emptied with the longer leg going through the hole in the bottom and the bent leg hanging out the top.  Bend the shorter leg down so it is parallel with the long one. Make sure it is centred and pushed all the way in and solder the legs in place. (Figure 4)
  5. Cut off the excess parts of the legs so it looks like a normal bulb again like shown in Figure 5.
  6. Put the torch back together and you are done (Figure 6).


image003.jpgimage005.jpgimage007.jpg

Click to Enlarge
Figure 1

Click to Enlarge
Figure 2

Click to Enlarge
Figure 3
image009.jpgimage011.jpgimage013.jpg

Click to Enlarge
Figure 4

Click to Enlarge
Figure 5

Click to Enlarge
Figure 6

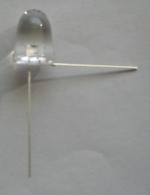
I use NIMH rechargeable batteries because they are a lower voltage ie 1.2V instead of 1.6V.  I do not recommend the use of alkaline batteries as you run the risk of popping the LED.

Article by Chris Marsh (cjmarh81). Discuss this article on the IceInSpace Forum.

Advertisement
Bintel
Advertisement
Testar
Advertisement
ICEINSPACE
AUSTRALIAN AMATEUR ASTRONOMY
Copyright © 2004-2024 ICEINSPACE.
All rights reserved.