ICEINSPACE

|
Avoid Histogram Clipping in ImagesPlus
Submitted: Tuesday, 21st February 2006 by Tony Hitchcock
IntroductionOne of the most common mistakes in processing astronomical images made by beginning imagers is clipping of the image’s histogram. This results in the loss of faint data in the image and hence, loss of detail. Histogram clipping produces a jet black background, which many people find attractive. However, a black background usually indicates that parts of the object your have imaged have been removed from the image. This article describes how to perform basic processing of astronomical images in ImagesPlus while avoiding this clipping.
Pre-processing in ImagesPlusConversion and Calibration: Keep it Linear! The following example is an image of M20 and M21. This image was taken with a Canon 300D through a Meade LXD55 SN10 telescope. It consists of 53x30 sec images. Sub images were captured in RAW format. ImagesPlus was used to convert the RAW frames to Pre Bayer Colour Filter Array (CFA) greyscale images and then they were calibrated with dark frames, flats and bias frames. This step ensures that the data is as close as possible to what the camera actually recorded. When converted in this way, the calibration of the frames using dark frames and flat frames is much more accurate. Calibration is an attempt to reduce the images to what was actually received by the sensor from the object and to remove the effect of defects in the optical system and the electronics of the camera. The details of calibration using this method is beyond the scope of this article, but the actual process is quite simple in ImagesPlus. Aligning and CombiningOnce calibrated, the images were Bayer Interpolated to produce colour images. The images were then aligned using ImagesPlus Translate and rotate function. These aligned images were then combined using a sigma clipped average.
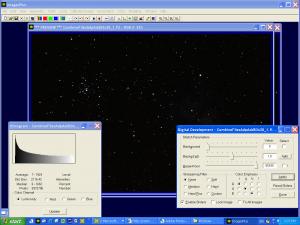
Digital DevelopmentDigital Development is a particular process designed to enhance the brightness of RAW digital images. It gives us a fair degree of control over how this brightness “stretching” occurs. This is particularly important for astronomical images, as the data we want to see is usually very dark. The digital development tool in ImagesPlus has a handy “Auto” feature that examines the image and decides the settings needed. Although the results of the Auto function often look good, as in figure 2 below, it also often results in a clipped histogram. This can be seen below by the abrupt high left edge of the histogram. If the image is saved at this point, the data that will be lost is no longer recoverable.
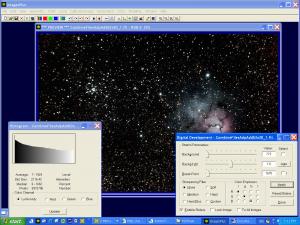
Getting It RightFigure 3 shows how the histogram should look. It should start at the zero point at the darkest pixel in the image. It should then rise fairly sharply (but not vertically) to a rounded peek somewhere in the left quarter of the histogram it should then slope back down to the right. To achieve this shape, reduce the background weight by moving the middle slider to the left. You can also increase the overall brightness by moving the break-point slider to the left if needed. Once you have a similar shape to that shown, and the images looks reasonable, you are done.
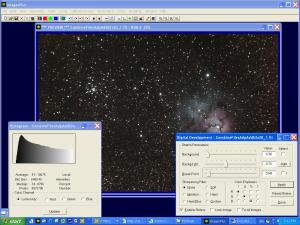
This image can be now be saved and then further enhanced using ImagesPlus Levels and Curves, or saved as a TIFF file and transferred to Photoshop for further processing. Whatever tools you use to process the image from this point, be sure to keep an eye on the histogram to ensure that clipping does not occur. Following the simple steps above will help ensure that you get the most from your images. Reference ImagesPlus is written by Mike Unsold and is available at http://www.mlunsold.com/
Article by Tony Hitchcock (Itchy). Discuss this article on the IceInSpace Forum.  |
|