ICEINSPACE

|
Meade 16" LX200 - the Best SCT Ever Made!
Submitted: Monday, 23rd November 2009 by James Edwards
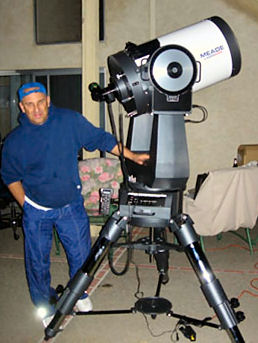
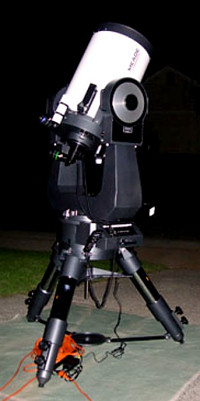
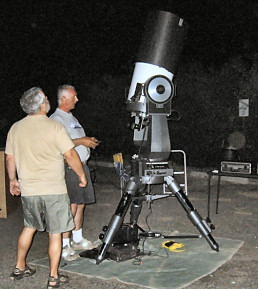
I have no doubt that this article will leave some of you truly wondering about this SCT, or possibly a few more of you dispelling the scope I am writing about standing behind your opinion there are equal if not better Cassegrain, well my friends I hate to disappoint you! After owning and using a number of “Schmidt’s” my findings are based on many experiences using and viewing through many different types, the vast majority being the Schmidt Cassegrain, 6 told and 1 Dall-Kirkham with many more views in other scopes. I started out at the bottom of this food chain some 5 years ago purchasing my first 10" Meade LX200, a classical version. This was a very good Cassegrain which I enjoyed on many nights and throughout a steep learning curve this being my first real telescope. Since those long nights of viewing and many more carved out of frustration learning to use it, my next move upward was to a the 12" version, another LX200 which was also a classical version w/UHC coatings and the newest innovation using GPS. After a very brief stint using the 12” I then made my move into another great scope a Celestron C14 this being one of the first of Celestron’s newer versions along with an EQ mount which I was not fully knowledgeable with this also being my first attempt using that mount. After another brief but enjoyable experience using the Celestron, it was soon shipped off paving the way for my pursuit into the refractors. One summer evening during my Astronomy clubs summer star parties, I had the pleasure of viewing through a refractor, via my interest and move to own one. Since I started off using more apertures, I soon found myself head back awaiting for the arrival of my new Meade 14" when the first became available, leaving my refractor sitting unused in its box. What I found in using this 14” version was a well made, super solid and much improved LX200 w/ the new UHTC coatings this also being a GPS version and with greatly enhanced optical performance. Well, by now I had run the full gambit using a number of wonderful scopes and viewing through a few more equal types but my heart was set on the Biggest out of the bunch, the Meade 16” LX200 w/SMT ( smart mount technology ), the new coatings (Ultra High Transmission Coatings) along with its GPS. I remember that day 5 years ago when I first walked into my local dealer needing accessories for my 10”. There she stood in the corner, a 16” SCT, dressed out in white and fully assembled ready for business. Man, I kept thinking to myself “one of these days I’m going to own that SCOPE, someday! The Meade 16” LX200 (UHTC & SMT, mounted on a giant Field Tri-pod).
From that day five years ago, I had finally made the plunge becoming the proud owner of a Brand new LX200, the 16! The first thing you notice when you un-crate this scope, is its sheer size and the noticeably larger assembled set-up, it dwarfed my previous 14’s, not just the OTA, but the fork mounting and the huge control base it sits upon. I do have to admit, I was pretty intimidated going over the assembly process, as every scope set up has its own particular way it’s put together, those inherent traits which take some getting used to. Each item that comes along in this package, starting with the massive tripod, made to support more then this scope, to the massive control base and huge fork arms, right up to the 16” OTA and the adjoining upper forks, What a Beast! Once the tripod is unpacked, I found the best way to set it up was to lay the top round portion on the ground (using a piece of carpet or a thick piece of cardboard) with the legs pointing upward. After you undo the threaded nut and washer, you then proceed to spread apart each tripod leg, careful as to not scrap the inner donut where the center support shaft sticks down through the bottom. You then take each spreader bar and equally spread the 3 tripod legs, once completed you place the tripod right-side up and proceed to balance it. (I always use a small bubble balance, even though these scopes are self-leveling). Once you have the tripod set, it’s time to mount the main control base which has handles on each end making it easier to carry and place upon the tripod. By now you have the control base sitting on top of the tripod, 3 bottom screws hold it in place which then comes next the main support fork arms for the OTA. When you place the main fork arms into the control base, Meade includes 4 pointed guide bolts which helps place the fork into place but I only needed it the first time, afterwards it can only be position 1 way. In the middle of the Fork arms, is a Plastic cover with 4 thumbs screws, I didn’t know what to make of this at first until I noticed in the user manual, that the main wiring harness was accessed through this opening. It’s pretty easy to attach, but the wiring harness is sort of a pain, as it protrudes out the bottom of the forks and you have to be careful not to bang it around while you carry it for assembly and mounting it onto the control base. This goes back to my point about “inherent traits”, one this scope has many of. Now comes the fun part, placing the main OTA with adjoining forks on top of the main Forks arms. I mean to tell you, placing a 130 lb. object at eye level doesn’t seem that difficult, but when you have this large Telescope tube and your trying to place the fork arms exactly into place, it can be a bear but not impossible. On top of the main fork arms, are 2 more guide bolts which you then use to set the OTA arms into place with, at the end of the OTA arms is a hole for each guide screw, where you then set the forks into place and slide the OTA forward on top of the main fork arms. It doesn’t quite set there evenly, so you jostle it back on either side until you have both forks firmly into place. There are 4 screws which hold the main OTA arms into the Main Fork arms, so there you have it, and it’s now time to attach your RA cables, power cord, exhaust fan power cord, Auto-Star controller and micro-focuser cord. Believe me, it sounds like a lot and it definitely takes up your time, and this was only for the set up, then you have another hour or so for cool down, then the fun begins, it’s TIME to View!
By now the scope is fully assembled and with a flick of the power button the 16 is on its way for us to get into our views for the night. As with the newer GPS version LX-200’s, Meade displays a sun warning (it isn’t unnecessary, but understandable), which is simply bypassed by pressing the #5 key on the Autostar controller. Once this is accomplished, the date, time and your location needs to be set to tell the scope where it’s positioned. The next function is your alignment, as there are a few options including the Smart Mount application, made for those who wish to use this scope for imaging, or for an easier way to keep it aligned, over consecutive nights without reacquiring another alignment. So here we are, the scope is fully assembled, it has gone through it’s leveling process and finding “home”, so for another hour or so, the tube needs a cool down period, before she really gets the optically performance, and it does make a very big difference. Along the process of alignment, you can pretty much get a handle on focus, as you set the mirror lock into place, the micro-focuser at about half it’s travel range (I call this a neutral point and the unit works more effectively to gain that last tweak when focusing on the fine points of different images) and lastly your primary focus to get your alignment stars finely placed. Another critical point when using SMT, is the use of a Illuminated reticule , the reason being that each star being used for alignment needs to be exactly placed and while the 12mm Meade eyepiece doesn’t offer great optical quality, it works effectively and is well worth the added investment to have 1 for this procedure.
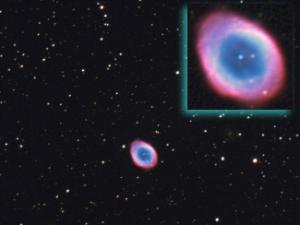
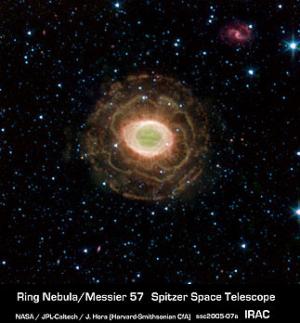
Viewing through the 16: Naturally, if anyone has ever used a larger telescope - an SCT or a DOB - your immediate design once owning a larger scope is to head to some of those deeper objects in space, the ones you’ve never quite resolved in other type scopes leaving you that lasting impression “WOW, that object is pretty deep”! Well, this is exactly where the 16 excels, those once faint images of various “fuzzy’s” no longer appear fuzzy or vaguely unapparent. What you see is marked detail where the object has more discernable features and optical resolution, enough for you to keep gaining power in order for you to increase the visual range of what these objects actually look like. I’m sure that some of you (and me), tend to resort to various CCD images taken of that exact object we are searching for, only to find that the image taken using a CCD camera far exceeds what we are actually seeing. Of course it looks vaguely similar, but in all fairness, the CCD images out distance what many of us are accustomed to looking at. But NOT so in the 16! I remember the first night I had this scope in dark skies up at my Astronomy Clubs Star party site, located in the Sierra Nevada mountains at 5300’. The conditions were on and off and fairly breezy, nothing great with 3 out of 5 transparency with the later portions of the evening resolving at a 4. With a few of my trusted friends, Bill, Michael and Cary we decided to head to a few objects we each wanted to boost the power on, starting with M51, which another person in the club already had his Celestron C14 pointed to. As I stepped over to look at M51 in his 14, the image looked great as I had viewed this object on many occasions with this scope and many other types also. When I walked back to the 16 we had M51 blazing through the eyepiece in no time, but with a lot more detail, the spiral arms being noticeably more prominent with the inner core displaying more detail and separation throughout the overall pattern of stars, I was very surprised thinking the 16 wouldn’t have been that much better, but it was, very much so. From 203x to 239x in the 16 compared to 196x to 230x in the 14, the image detail, brightness and overall optical performance was so much greater in the 16, it was as if you had just pierced that last increment of distance reaching father into deep space, to that final result looking at the object the way you always wanted to see it. No, that isn’t to say that M51 in the Celestron 14 didn’t look as good, it was exceptional, but that first glimpse viewing into deep space in the 16 made you understand why this scope is meant for research, it allows you that next step beyond. After everyone “ ewed & awed”, we decided to head to M57 the Ring nebula, this being a favorite of everyone and something we felt was positioned being along the Meridian as the conditions by now just weren’t that good. Starting off with a 26mm Nagler (and an OIII filter), we reached the Ring which looked very good with a lot of detail and very good star field surrounding it. pushing the 16 from 156x to 230x we could tell there was a lot more to go, as the image quality kept getting better, the Ring looked incredibly brighter and bigger, more aligned with CCD images. There was another member of the club viewing with us also, as I was tapped out with a Meade 8.8 UWA in my collection, he suggested we used his 3.5mm eyepiece (Orion) to boost the power a notch and talk about exciting we were heading for 1232 Power! The next view of M57 was only bettered by what I have seen looking at a NASA photo, beyond the detail of most CCD images I’ve seen, this was entirely different experience. Once we were able to get in that last bit of focus, the Ring didn’t look like the Ring, it now looked more like a fiery burst of energy with shredded outer portions and image depth that not only gave 57 more of a layered look but the inner stars were extremely brilliant as the Ring filled that entire eyepiece. It was as if it had just exploded and you were now looking at its remnants, we in awe, we had truly resolved the Ring. Using the 16 on a few more outings, in light polluted conditions, the vast majority of viewing I’ve had were pretty faint going back to that fuzzy look even though the 16 allows you to get past that “pastel” look to the sky.
The Last Outing: During the weekend of my last outing with the 16, I was fortunate enough to be at an extremely dark location (4070 ft.) under 5 transparent dark conditions with zero light pollution. It was here that I finally reached the level of performance I had originally purchased this scope for; it was to change my appreciation for this scope and most of what I had seen on other outings surpassing my views with what I had witnessed in the Sierra’s. Touring too many objects we had planned on viewing that evening, we located the Swan Nebula. The density of this Nebula was so detailed and 3-dimensional, you could only gasp at how real it looked, it was ablaze in the eyepiece, and the contrasting shapes were incredible! From the Swan, the Trifid was equally as detailed, the separation in each segment gave you views beyond, reaching deeper into additional star fields which shone brightly with tight pin point stars. As M31 reached closer to zenith, we elected to increase the focal length in the scope, using a 4000 series Meade 6.3 reducer, thus canceling out the micro-focuser, as the focuser unit had lost its “travel”, without it being able to gain in focus as the lens of the Reducer blocked its path. Using the coarse focus only, the long gated image of the Andromeda Galaxy was outlined in greater detail then I had seen in other scopes, as the core gave more of a “dome” appearance, more like the Sombrero with its massive glow enabling us to disseminate this galaxy in more detail. Throughout the evening, we had also seen more detail and spiral separation within the Triangulum galaxy and Bode’s, also. By now the scope was performing at it’s optical best, reaching to other DSO’s, The Saturn Nebula, with it’s bluish look and very detectable rings, to Dumb Bell which gave the same general appearance as the Ring, with the nebulosity more detailed brilliant across my eyepiece, the image was of spectacular quality, breath taking! To end our night, we elected to move to The Veil Nebula. As we settled on a 41 Panoptic, using a OIII filter attached within, The first image of the Veil, was so real looking and detailed, that is gave off a greenish “hue”, with its brightest neighboring star casting light upon the cloud strands. You could only gaze in wonder, as this was the pinnacle of everything we had viewed. We topped the scope off using a 17mm nagler, scanning throughout each length of the Veil reaching to what we all considered the greatest views we had ever seen!
Conclusion: I remembered the first person I had ever talked to regarding the Meade 16, earlier in the year in Sierra Vista Arizona at the Junk Bond Observatory, owned by Dave Healy. As we toured through his magnificent observatory with his Optical Guidance Systems 32-inch (0.81 meter) Ritchey-Chrétien, we were also taken to one of his outlying buildings, which stilled housed his 16” Meade, upon a permanent pier. I asked why he kept this scope, and his reply was simple, he still used it on occasion, as many of his discoveries were a result of this scope and it’s just a lot of fun! As I conclude my article about the 16, I would like to tell the many who read this, that to me any scope you use, can and should bring you enjoyment, whether it be this “Monster” or a simple “dob” you can set up and take anyplace you view, but for me this scope holds a special place, millions and millions of light years away, to all those incredible places I’ve witnessed and this is the scope made to get you there! Notes: To all my good buddies that made using this scope possible, I couldn’t have done THIS with out you! And lastly to the best amateur astronomer I know, Thank YOU Ralph, your knowledge, vision and friendship is what created my desire to own this scope, it was more then we imagined! Review by James Edwards (norcaltakguy). Discuss this Review on the IceInSpace Forum.  |
|