ICEINSPACE

|
Losmandy Titan
Submitted: Monday, 24th January 2011 by Matt Todman
Time for a new setupAfter a couple of years of owning fork mounted SCTs, I decided (after much procrastination) to bite the bullet and change my setup to one that's more conducive to Astro-Imaging since that's where my interests lie. I sold my 10” LX200GPS with various bits and pieces to help fund this new direction. One of the big questions however was “which mount to buy”? I've heard many times over that the single most important element in an imaging setup is the mount so I wanted to buy something that would last me well into the future and provide a good level of accuracy. My original plan was to go for a Losmandy G11 however I had some concerns about the load carrying capacity of this mount. At the time, I was planning to mount a 12" SCT OTA on it and use my ED80 as a guide / wide field scope, piggybacked on the SCT OTA. The problem here is that according to some people, this would be too much load of the G11, particularly for imaging at the long focal lengths associated with a 12" F/10 imaging train. I was considering my options when the Aussie dollar began its march north (and the $US was headed in the opposite direction). This had the effect of bringing Losmandy's heavy duty mount, the Titan into my budgetary range. I placed my order through "Telescopes & Astronomy" in Adelaide for the titan head unit, MAL & counterweights on 20th September 2009 and began my wait. I decided not to purchase the Losmandy HD Tripod as the cost was just too much. I had heard that people were using Meade Giant Field Tripods with the Titan and there were a couple of 2nd hand units for sale on Ice In Space (Australian based astronomy web forums) so I quickly placed my order for one of them. In order to mount the Losmandy Titan head on a Meade Tripod or on a permanent pier, a mounting adapter is required. Luckily, Losmandy already produce such an adapter (Losmandy Model MAL). I ordered one to arrive with the Titan.
It arrives!!!On 7th Jan, 2010 (after what seemed an eternity), the Titan mount arrived in 4 boxes.
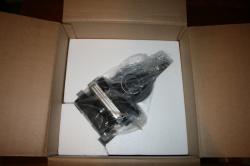
The RA & DEC Units were very well packaged in separate boxes with molded Styrofoam inserts and suffered no ill effects during the shipment from USA to Australia. One thing that caught my eye was that the boxes were labeled “Titan 50” which refers to the higher gear ratio now used by default (50:1) as opposed to earlier Titan mounts which I believe were geared 25:1. I was not aware that the 50:1 gears were now shipped at standard so it came as an unexpected surprise. The finish on both units was excellent with a black anodized finish on most external surfaces. They are machined out of premium grade aluminum pieces (big pieces) so they are quite heavy. Both the RA & the Dec units weigh in at 37.5 lbs each so they take quite a bit of lifting. The Gemini system and other miscellaneous bits & pieces (screws, hex wrench kit, cables, etc) were shipped in a separate box, as were the 2 x 11lb counterweights. What? Where was the Losmandy Tripod adapter (MAL) that I ordered? It turned out that Losmandy did not have these in stock at the time of shipping the mount and there was going to be a delay of several weeks before it arrived. After some quick shopping around, I found one in OPT which I promptly purchased. I cancelled my original order from T & A without any problems and 1 week later it had arrived and I was ready to go.
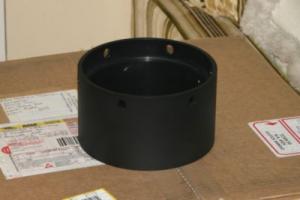
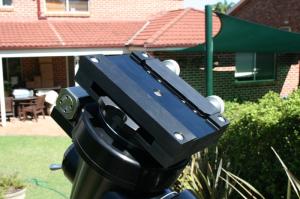
Putting it togetherThe first part of the construction was to fit the adapter unit (MAL) onto my Meade Giant Field Tripod. This was achieved by securing the centre threaded rod as shown below with a 1/2" BSW nut. This serves to form a very rigid & stable setup by forcing the tripod legs apart with a spreader assembly. The adapter can be further secured with 6 x 5/16" BSW bolts which thread directly into the tripod head. There were no problems at all here as everything aligned very well.
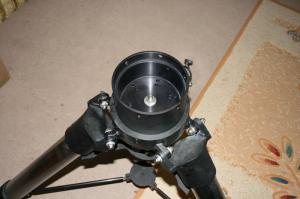
Once the Meade Tripod Adapter unit was securely fastened, I mounted the RA unit and secured it with the 6 hex bolts provided with the mount. This was a simple operation as all holes aligned perfectly. Note the large white plastic washer on the RA shaft which stays in place when the Dec unit is attached.
The next step was to install the Dec unit. I made sure that I lowered it carefully down the RA shaft to avoid any damage to the shaft. It's a good idea to have the RA clutch ready to screw in. I found that the clutch really had to be screwed down very tightly to prevent the Dec unit from slipping. I was initially concerned that this may be a problem with my mount but a quick search of the web forums showed that this is normal for a Titan mount.
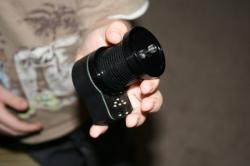
The next step was to fit the RA & Dec motors. Maxon motors are now used on all new Titan mounts (they are options for other Losmandy mounts). They apparently provide 30% more torque than the standard motors and are less prone to burnout, something which appears to have been an ailment on the earlier Titans with the original motors. Fitting the motors was once again a very simple task. After removing the orange protective cap, the motors fit snugly into their positions and were held in place with 2 long screws.
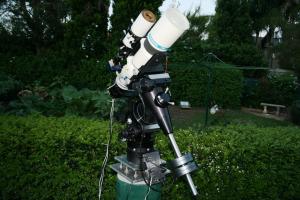
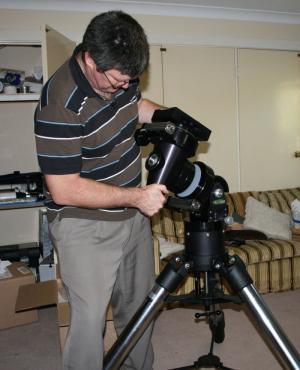
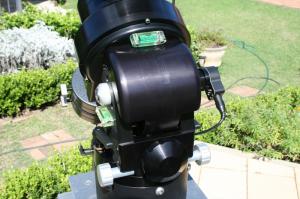
Setting it upAfter waiting for the mandatory 2 weeks for the weather to clear, I mounted the Titan on my backyard pier and set it up with my FSQ106 & QHY9 with a trusty old ST80 and DSI Pro II for guiding. The “D type” saddle that is fitted to the Titan is about 8 inches long and has decent sized tightening bolts at each end. It appears to be a very sturdy setup that could obviously accommodate loads far in excess of my current configuration.
I mounted the Gemini control system onto the MAL adapter using the supplied standoffs and mounting holes. The various plugs and ports on the Gemini are well labeled so it’s relatively straight forward to connect it all up. I first connected the RA & Dec motor cables and then connected the hand controller. Finally, I connected the “user supplied” power supply. Other connectors on the Gemini controller include:
As indicated above, Losmandy does not provide a power supply with the mount. According to the documentation, the Gemini system will operate on a DC supply of between 12V – 18VDC and will draw approx 3Amps. I have read on various forums that it’s temperamental when it comes to power supplies with strange behavior reported due to insufficient or dirty power. To avoid this, I purchased a 13.8 VDC, 20 Amp switch mode unit which should provide more than enough juice for the Titan. It’s certainly overkill but I figure “better safe than sorry”. At the time of writing this review, I have certainly had no problems that could be attributed to insufficient power. Finally, I performed a rough balance of the setup which was an interesting exercise as this was the first time I had balanced a GEM. After some fiddling I was reasonably happy that it was sufficiently balanced.
Titan comes to lifeIt was finally time to power the Titan up for the first time. I made sure the scope was pointing roughly due South and placed it in the CWD (Counter Weight Down) position. I flicked the switch. The light came on and the hand controller went through its “cold start” sequence which it automatically does if there is no user information configured in its database. I entered the date & time (UTC) as well as my location (Sydney, Australia) and the mount type (Titan 50). I was then instructed to align the scope to several “alignment stars”. I then aligned the scope to 6 stars (3 on either side of the Meridian) in order to establish a basic pointing model. The initial startup sequence was then complete. Even though I only aligned the mount on 6 stars, you can do follow up alignments on additional stars which will improve the Titan’s pointing model. I then used the keypad to position the mount in my desired “home position” and instructed the Gemini computer to remember this position as my preferred home position for parking purposes. After the initial “cold start”, whenever you re-power up the Titan, you are presented with an option to do a “warm restart” which utilises the data already in the Gemini’s non volatile memory. Gemini UsabilityI must admit that I was a little apprehensive when it came to the Gemini. How could the plethora of functions and features be easily controlled from essentially 5 buttons (4 directional buttons plus a menu button)? Having grown used to Meade’s Autostar controller over the past 2 years, I was used to its intuitive nature and simple menu navigation. The Gemini on the other hand requires quite a bit of learning and can be somewhat frustrating when it comes to things such as entering co-ordinates or object identifications. Having said this, I’ve been using the Gemini for a few months now and it’s starting to find it easier to navigate my way around. Help however is at hand with a couple of software packages. I now make extensive use of the new free Gemini.Net ASCOM driver which allows you to access many of the mount’s configurations and controls via a PC. I find this to be a very well designed piece of software which works flawlessly. Another software package (which I have not yet used) is GCC. A quick review of the GCC manual shows it to have similar functionality to the ADSCOM.Net driver with perhaps a few more features. GCC is a commercial package so you are required to pay for a license. I know of several people who use GCC and they all rate it very highly. PortabilityEven though I will have the mount setup on my permanent backyard pier, I purchased it with the intention of taking it to the odd star party and dark sky location a few times a year. The Titan head comprises of 3 main parts. The Dec unit, the RA unit and the counterweight bar (obviously with accompanying counterweights). The Dec and RA units each weigh 37.5 lbs. I’m a pretty big guy (6’2” tall and 125kg (~250 lbs)) and I don’t find lifting those weights to be a real burden. You will need to remove and refasten about a dozen screws and bolts and the motors may need to be removed to avoid potential damage. A rough construction guideline is:
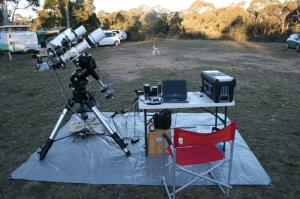
All up, it takes me about 60 – 90 minutes to have everything setup, plugged in and roughly polar aligned. Do I regard the Titan as a portable mount? I would say it’s semi portable. I have taken it on several outings to the Astro Society of NSW (ASNSW) dark sky site at Ilford, west of Sydney in the past year and will certainly be doing so again many times in the future. It does take some strength to assemble though (and a sizable car). Is this a grab & go mount or a mount that you keep in a cupboard and setup in your back yard each clear night? Definitely not (at least not for my impatient nature).
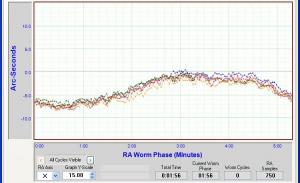
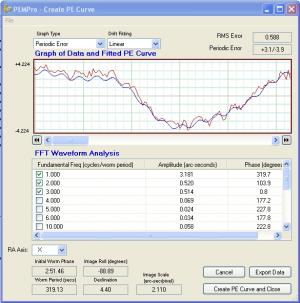
Periodic ErrorOne of the most defining characteristics of a mount is its RA Periodic Error. Losmandy’s website states that the PE of a Titan mount is within the range of +/- 5 arc secs (ie, 10 arc secs Peak 2 Peak). With this in mind, I was eager to measure the RA Periodic Error of my new baby.
Allowing for the seeing conditions which were relatively poor, the above capture example of several worm cycles shows a well defined & predictable curve which should be able to be trained out via Periodic Error Correction without too much fuss. Importantly, there appears to be no significant spikes which can adversely affect guiding or PEC.
7 arc secs peak to peak is certainly something that I’m happy with. The relatively smooth nature of the curve means that it should be able to be guided out relatively effectively. Alternatively, the PE should significantly reduced with PEC.
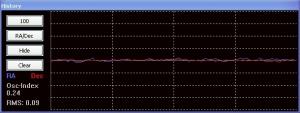
GOTO / PointingLosmandy highlights the goto accuracy of the Titan / Gemini as a major selling point and it’s easy to see why. After a couple of years of working with the goto accuracy of Meade’s LX90 & LX200 mounts where I would usually have to rely on the finder scope to locate my target after a slew, this new setup would place my desired target almost slap bang in the middle of my CCD FOV. OK, I do have a very wide FOV (~ 1 deg) but it’s still very impressive. The Gemini refines its pointing model each time you perform an additional alignment. After having performed 4 star alignments in addition to the original 6, objects were being placed within 100 arc secs of the centre of the FOV. TrackingIn order to test the guiding characteristics of the Titan, I polar aligned it as accurately as possible and found a star close to the celestial equator, about 45 degrees above the Eastern horizon. I guided using PHD through my old Orion ST80 using a Meade DSI Pro II mono CCD camera. This configuration gives me a ratio of ~4 arc secs per pixel (not ideal, I know). I made sure to balance the setup with an Eastern bias to ensure that the worm was lifting the worm wheel. As you can see from the below screen capture, the guiding is pretty good (sub-arc sec). The seeing conditions were far from ideal though and I have routinely achieved guiding with an error of less than 0.5 arc secs in both the RA & DEC axes.
Fine Adjustments (Alt / Az)Prior to adjusting the Altitude & Azimuth of the mount, I made sure that it was perfectly leveled on my pier. This is made easier by the inclusion of 2 spirit levels built in to the Titan. After some fine adjusting of the pier mounting plates I was happy that it was leveled. I double checked with another spirit level and confirmed that it was fine. The Titan’s Altitude can be adjusted by loosening 2 x ½” hex nuts (one located on either side of the Dec unit) with the provided hex wrench and turning a large black knob located on the rear of the mount. The Titan is factory configured to be adjustable from 20 deg to 47 deg in Altitude (ie, a range of 27 deg) however this range can be moved up or down to provide for latitudes between 12 deg to 70 deg. The Azimuth adjustment is performed by loosening 2 clamped bolts with sprung handles on either side of the Dec unit’s base and turning 2 silver coloured knobs located at the rear base of the Dec unit. Adjustment can be made 10 deg in either direction. On both the Alt and Az adjusting knobs there is noticeable play however you can easily tell where the play ends and the gears re-mesh. I have found these adjustments to be fine enough to be able to make the necessary adjustments to achieve good polar alignment. One thing I noticed is that when I loosened the 2 Azimuth locking bolts, the mount tilted forward very slightly, but enough to have a noticeable effect on the altitude of the mount. For this reason, I ensured that whenever I was measuring the star drift I tightened the Azimuth locking bolts and loosened them only to make fine adjustments in the Azimuth axis. In order to perform a fine polar alignment, I use a program called WCS (Web Cam Scheinern) which performs an analysis of the drift of stars on the Eastern or Western horizon and the Meridian at Zenith to determine the amount of Altitude and Azimuth polar misalignment. Each analysis takes about 5 minutes and I find that it takes me about 30-45 minutes (ie several analyses per axis) to achieve fairly precise polar alignment which will allow me to image for 5 minutes without noticing any star drift in the Dec axis.
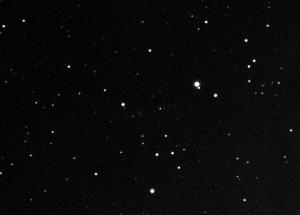
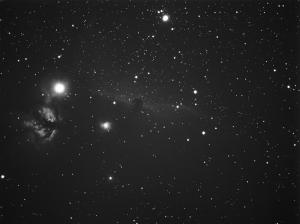
First LightThis is a very quick shot I took to test the “out of the box” tracking ability of the mount.
Pro’s and Con’sPro’s
Cons
Titan Specs
ConclusionI’m very impressed with the overall quality of the Titan mount. I bought the Titan hoping that it would meet my imaging needs well into the future and all current indications are that this is the case. If you’re looking for a solid and accurate GEM for your observatory that will not cost you the earth but still handle significant OTA loads, then I would not hesitate in recommending the Titan.  |
|
||||||||||||||||||||||||||||||||||||||||||||||||||||||||||||||||||||||||||||||||||||