ICEINSPACE

|
Sharpening Images Using Deconvolution
Submitted: Friday, 25th January 2008 by Stuart Hodgson
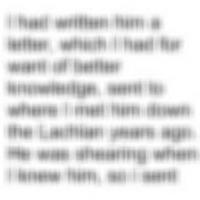
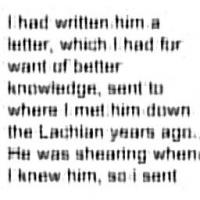
Almost everyone with a digital camera, at some point, wants to sharpen their digital images. There are many applications out there that will sharpen an image using simple methods like convolution filtering or unsharp masking. These methods can work very well and provide pleasing results. But if you only used convolution filters or unsharp masking, you would be missing out on some very powerful techniques that can sharpen and enhance your images like nothing else. As one of the developers of Astra Image, I am asked a lot about image sharpening (which makes a nice change from the torrent of family and friends who call me, being a computer guy, and say something like: “My computer has just crashed and I don’t have a backup. Help me!”) And many of the questions about sharpening involve deconvolution. So this article is a brief, practical tutorial on how to use deconvolution effectively to sharpen your images. You can download Astra Image1 and try out deconvolution, or you can use another program. The principles outlined here will be the same. Why is Deconvolution Different?Many sharpening methods seek to enhance edges or the high-frequency components in an image. Deconvolution, however, allows you to specify an error in the image (called the point-spread function (PSF)), and attempt to remove it2. You can see a simple example of this below. The original image is very blurry. Convolution filtering helps a little bit and makes the text more legible. But deconvolution has tried to remove the error (which in this case was Gaussian blurring) and the result is much more readable text.
Deconvolution can produce really good results and provides unique power to the user. Are there any drawbacks? Well, it is a relatively slow process. It requires millions of calculations for even a small image, so a speedy computer is of real benefit. Sharpening the MoonDeconvolution can produce excellent results with lunar and planetary images. Let’s take an image of the moon and sharpen it with deconvolution. We will use Lucy Richardson deconvolution for this because it is a fast deconvolution method and suppresses the noise quite well. You could also use maximum entropy, Van Cittert or another deconvolution method to achieve a similar result.
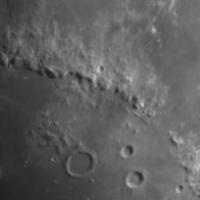
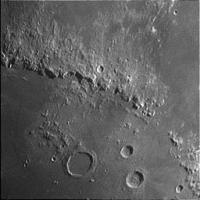
Above you can see the original image of the lunar surface. While it’s already quite a good image, we can make it sharper. First of all we need to set the curve width of the PSF. Generally, if you are starting with a blurry image, you need a larger curve width. If you are starting with an image that is already quite good, you need a lower curve width. Let’s try a curve width of 1.5, Gaussian PSF, run 10 iterations of Lucy Richardson deconvolution and see what happens.
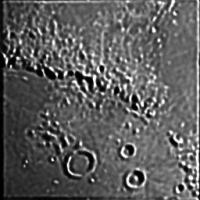
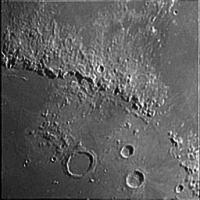
As you can see, the result is not good. The image has actually become more blurry! This means that the curve width of the PSF is too large. So let’s try a curve width of 0.5.
Now the image is much sharper. There’s a lot more detail visible everywhere! Now let’s try enhancing a blurry image of Jupiter. We will use Lucy Richardson deconvolution again.
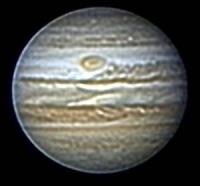
We will start with a Gaussian PSF with a curve width of 1.5. We will run 10 iterations of Lucy Richardson.
Well, once again the curve width of the PSF is too large. We need to reduce it, so let’s try a curve width of 1.0.
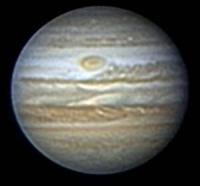
Jupiter is looking better! Notice how the detail in the great red spot is becoming more visible. But we could probably get a better image now by running more iterations, and a slightly smaller PSF. So let’s try 14 iterations.
That’s looking much better. A lot of detail is visible all over the surface of Jupiter. A good result for Lucy Richardson deconvolution! IterationsThe number of iterations you need to run varies from image-to-image. If you run too few iterations, the image will not be enhanced. If you run too many iterations, noise may well become a problem. Usually, 10 iterations is a good starting point and you can go up from there. If you need to run a lot of iterations, maximum entropy deconvolution is usually the best method to use because of its excellent noise-suppressing techniques. PSF TypesThere are many types of PSF that you can use in deconvolution. The two most common are those that produce Gaussian curves (like we used above) and exponential curves. Generally, Gaussian PSFs are good at removing the effects caused by atmospheric turbulence. Exponential PSFs are good at removing problems caused by bad focussing or bad optics. Deconvolution EverywhereOf course, you can sharpen more than just astronomical images with deconvolution. It works well with x-rays, scanned images and even family photos. So why not give deconvolution a try next time you need a sharper image. References
Article by Stuart Hodgson (wallabystu). Discuss this article on the IceInSpace Forum.  |
|
|||||||||||||||||||||||||||||||||||||||||||||||||||||||||||||||||||||||