ICEINSPACE

|
Modifying a Newtonian Tube for DSLR Photography
Submitted: Tuesday, 6th November 2007 by Alchemy
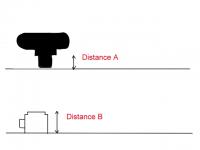
Newtonian Telescopes represent extremely good value for your money, you get a large aperture none of the color problems associated with refractors and often a fast focal ratio, so they are ideally suited for astrophotography. Of recent times with the advent of high performance digital SLR cameras by companies like Canon, a number of imagers have made this their preferred method of capturing the heavens. So what is to be done? A low profile Focuser? I found that with the reduced length of drawtube of the focuser, normal eyepieces could not be used easily, and I was not thrilled about the quality of the focuser I tried. Baaders Multipurpose Coma Corrector, used to correct coma, gave me some extra backfocus. The combination of these two items may be sufficient for some setups and requirements. I could not get the camera closer to the mirror, so the way I overcame the problem of focus was to move the mirror up the tube to achieve the same result. I will describe the process so that if you wish to pursue this method you can follow step by step. I suggest you read it completely before you attempt anything. Determine Focus Adjustment RequiredTo determine the amount of infocus required:
In my case it was about 49 mm. As 50mm extensions for 2 inch focusers are readily available, this was the amount I decided to cut off the tube. Both allowing for focus with the DSLR, and by inserting the adapter, normal visual viewing can be done.
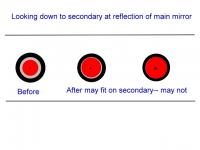
Check Secondary / Primary RatioLook down through your focuser to the secondary and you will see the reflection of your primary mirror. The process of moving your mirror further up the tube will make it appear larger in the secondary, if your secondary is oversized it will still reflect all the light. If as in the case of some scopes you don’t have any extra room you will lose a very slight amount of light. There is nothing you can do about this but it's information you should be aware of.
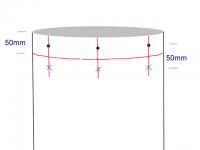
Remove Primary Mirror and mark cutting linesRemove the primary mirror assembly, noting the screw alignment so reattaching is easily done. Place the mirror in a safe location away from work area. Scribe a line the required distance up the scope tube from the bottom (50mm in my case). I used a set of vernier calipers set to the required distance and with the sharp edges scibed a neat line around the tube. Using a square mark with texta the line of the screw holes and extend them up the tube the rquired distance. It should end up as the picture below.
Cutting and drilling the tubeYou can now purchase thin blades for 5 inch angle grinders that are about 1mm thick, these blades cut extremely neatly if used properly. Obtain one of these and all appropriate safety equipment ( goggles, ear protection, Gloves, etc). As the cutting process will produce plenty of sparks make sure you are working in a safe environment and cover your secondary; you can use a freezer bag then layers of tin foil over it or place a damp towel or similar about a foot up the tube to protect it. Please note if you have lined your tube with any flammable material other than a coat of paint, reassess the viability of cutting. Remove the focuser and put in a safe location. Having another person to help makes life much easier at this point. Place the tube on a flat surface with a wet folded towel underneath each end so it sits securely, and have your assistant (also with safety gear) hold the tube at the other end. GENTLY cut to the outside of the line, let the grinder do the cutting DON’T force it. Cut about 1/5th of the way around and while grinder is still spinning take it out of the cut. Make sure nothing has caught fire inside the tube (if you have prepared properly you will not have a problem). Rotate tube. With the grinder back at full revs place it gently into the cut and continue the process till completed. The worst is now passed. File any sharp ends smooth. Using a metal punch set where the holes need to be drilled for the main mirror to be bolted in. Have your assistant support inside the tube with a folded T towel so they lift the tube just off the table, this way you will only punch a neat little mark and not flatten the tube. Have your assistant rehold the tube for you and drill holes to the same size as the previous holes GENTLY. Paint any exposed metal surfaces. Congratulations you did it! Final step is to re-assemble and collimate, and take pictures! Article by Alchemy. Discuss this article on the IceInSpace Forum.  |
|