ICEINSPACE

|
Secret of the Hartmann Mask... Revealed!
Submitted: Tuesday, 5th April 2005 by Paul Russell
Mike PMed me the other day and asked if Id do an article on how to make a Hartmann Mask. This was a good thing as it got me off my backside during the days of my holiday, once I finished my books that is. :) So I thought while I was at it Id do a review of the effectiveness of different hole patterns just to see which ones worked the best. The results quite surprised me. Ive been thinking of different patterns for the Hartmann Mask lately, trying to work out what sort of pattern and hole shape would give the brightest final image with the sharpest diffraction spikes. Im quite sold on the diffraction spikes. Once Id worked out how to look at them when focusing they really made a difference in my ability to get a really sharp focus. (An aside point using red green or blue filters give different foci for each colour due to their different wavelengths) As I said the results quite surprised me.
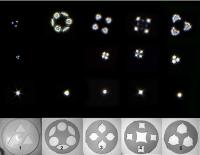
From some of the shapes I tried I expected to get very defined diffraction spikes. As you can see this was not the case. Apart from the top two images using the triangular pattern, all images were done using quite high levels of gain and brightness. All images were taken using a ToUcam and seeing was quite poor, maybe 1 ½ - 2 out of 5. I didnt wait for good conditions as I felt this would represent the usual conditions we would find. Better seeing conditions may improve the focal patterns of them all, but after seeing the outstanding difference of the triangular pattern in average conditions I decided not to worry about it. The exception may be pattern number 4 in good conditions though I dont think it would still beat number 1, the triangle pattern.
Using the Hartmann MaskSome of you are probably asking yourself, But how do I use a Hartmann Mask? Well, to a certain extent that depends on the type of scope you are using. For those using refractors, Newtonians, LX200 with mirror lock and other fixed lens/mirror scopes, the process is quite straight forward. For those using other types of telescopes including other SCTs a few precautions need to be taken. BTW I dont worry about a mask for visual work only imaging so the following information relates to that. If you want to try it for visual work by all means it will certainly improve your focus, just ignore or modify the appropriate steps that follow. If you are using one of the latter types of scopes then select a star for focusing on that is within a few degrees of your final viewing/imaging object. Avoid stars that require you to cross the meridian or zenith. The reason is too much movement away from your focusing star or crossing the meridian or zenith may well cause mirror flop which will put your scope back out of focus. Refractors, Newtonians and scopes with lockable mirrors shouldnt suffer from this. If you are using one of these scopes and find that you are loosing focus maybe check your mount. It might have some unknown free play/movement in it somewhere. The other main problem occurs when you try to focus on a telescopically visual multiple star. If you are able to split the star into its components under normal conditions then trying to achieve focus can be a challenge. See Secret of the Hartmann Mask. I found this out the hard way one night while trying to focus in preparation for an imaging session. I spent more than 20 minutes trying to get a single star image with out success, only to get one in less than a minute with the star beside it. Yep it was a single while the first was a double. Also try to get a star that is at least mag 2. and up to mag 0. I often find Sirius can be too bright for accurate focusing. So youve selected and centered your star, its close to your imaging object and its not a double. Now what? First place your mask over your objective aperture, (well some people have to be told :P ). Select your parfocaled eyepiece (if your not sure what this is, it is an eyepiece that has a close focal length with your imaging equipment. For example my ToUcam is almost parfocal with one of my 15 mm lenses), and place it in the eyepiece holder. If your scope is out of focus you will see three triangular stars, how well they are triangular will depend on seeing conditions. Now by focusing your telescope the triangular stars will start to move closer together. As you reach critical focus the stars will start to merge and you will notice a number of diffraction spikes appear. Each diffraction spike is in fact two spikes. The aim of using this type of mask is not necessarily to get a single star image but to merge each of the double spikes into a single spike. It is much easier to do this than trying to decide if your triple star image has become one. At this point dont be too fussy about whether its spot on or not. Make sure the image is now dead center of your eyepiece. Remove the eyepiece and attach your imaging equipment. If you are using a DSLR you may have to modify the following steps slightly. Insert your ToUcam or other capture device and set it to live view. If your star was centered in your eyepiece it should be close to center in your eg ToUcam. Adjust your gain and brightness so that the diffraction spikes are clearly visible on the screen. Set your exposure to 1/25 and fps to 10 15. You want a bright image that doesnt take too long to change as you focus. Again adjust your focus until your spikes are as sharp as you can get them get (I usually run backwards and forwards through the focal point a few times to get a good visual feel as to when the spikes are sharpest). Another good thing about using the spikes is that they are less affected by poor seeing than the actual star image. Once your feel you have it as good as youre going to get it, remove the ToUcam (DSLRs can probably omit this step) and place your parfocaled eyepiece back in. Do not adjust your focus! Meade LX200 users Lock Your Mirror Now (and dont forget its locked for when you refocus on something else). REMOVE THE MASK!!! How many times have I forgotten to do this and wondered why I couldnt get a bright image without upping the gain and brightness. Now slew to your desired imaging object and carefully center it in the eyepiece. Remove the eyepiece and reinsert the ToUcam and center it again. You are now ready do any exposure, gain, brightness, saturation etc adjustments and take your image knowing that your focus is as good as its going to get on that night. This sounds like a lot to think about, but once youve done it a couple of times it becomes second nature. Believe it or not practicing during the day on a distant street lamp or mobile phone tower helps a great deal.
Constructing a Hartmann MaskSo how does someone go about setting out a Hartmann Mask. Well there are probably a number of ways. Ill share two of them here. The first is the one I use and is for those that feel confident using rudimentary drafting tools; ie a compass, a ruler and a pencil. You can either mark these designs directly onto the material you are going to use for the mask or mark them onto a sheet of paper and use it as a template. I go straight for the material. It doesnt matter what final material you use as long as its fairly rigid and can tolerate dew at night without becoming damp and flimsy. For my 8 Meade I find the lid of a 20 litre plastic bucket the perfect size. Those with scopes larger than 8 might want to consider the lid of a large Styrofoam broccoli box. If you use the Styrofoam then you might find using the template idea easier than trying to draw onto it.
Step 1: Draw a circle of the outer circumference of your OTA. For the 8 (20 cm) Meade that means a radius of almost 12 cm, not 10 cm. Remember the 20 cm is supposed to be the diameter of the primary mirror, not the OTA itself.
Step 2: Scribe six arcs with the point of the compass initially placed at any spot on the circumference. The radii of the arcs are the same as the radius of your original circle. Once you have drawn your first arc the point of the compass is then placed on one of the points where the arc crosses the circle. Continue making arcs until you have a six petalled flower pattern. The arcs should all pass through the center of the circle and each petal should end up with closed points on or near the circumference circle.
Step 3: Draw a line from the center of the circle out to the circumference circle through the middle of three of the petals. This will give you an angle of 120 degrees between each line and space your final triangles evenly around the mask. Then scribe a small arc across each line. The radius of the arc will be about 1 cm smaller than your original radius. You can have a smaller radius if you wish but it may mean having smaller triangles when youre finished. In the triangular masks Ive made Ive found that a better image is obtained if you keep your triangles away from the edge a small distance.
Step 4: Measure the diameter of your central obstruction. Halve this to get the radius of your CO then scribe a circle in the middle of your mask. This sets the outer limit of your CO. Then using the same radius, scribe three circles on each of the previously drawn lines. I rest the pencil of the compass on the small inner arches to find the point at which I set the compass point on the line. Strictly speaking these circles are not totally necessary. You could complete the marking of the triangles without them, though for those with large OTAs very large holes may not be needed as your triangles will get proportionally bigger as you upscale the mask. So to keep the holes a bit smaller we will use the circles.
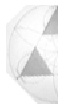
Step 5: Using your ruler draw a large triangle using the arc/line connections as the points of the triangle. Now for those with larger OTAs draw a line across each circle where the triangle sides cross it. Or for larger mask triangles draw a line across each circle where the triangle sides cut across an adjacent flower petal (see image 2 down.) This 2nd method will give you large individual triangles but will keep them sufficiently away from the outer edge and the inner CO.
Step 6: Cut out the triangles. If you have used a plastic lid like mine, I find placing it on a wooden block and using a chisel works fine for me as long as I cut using the chisel at an angle to slice through the plastic and not chop through it. Styrofoam users, Ive used a sharp craft knife to cut it but if you have a safer suggestion Id love to hear it. I tried to track down a Styrofoam heated cutting wire but without success.
Example of larger triangles.
Finally trim your template around the circumference and its finished. Lay this onto your mask material and mark the outer edge and the triangles. DONT CUT YOUR MATERIAL TO THE OUTER CIRCLE MARK. You need to leave at least 2 cm to mount your mask to a rim or sleeve that will fit over the outside of the OTA. This is the lid after cut out. You can see how close the triangles end up to the edge.
As you can see from the following two images I have cut a circle of Styrofoam to form the sleeve that will fix to the mask and slide over the OTA. I simply glue these together with contact adhesive such as liquid nails. The inner diameter of the sleeve is the same as the first circle drawn to create the mask.
This edge on view shows the thickness of the Styrofoam and also I strengthen the Styrofoam by wrapping the outer edge with that grey heavy duty tape. After adding the tape it is surprising how strong and robust the overall mask is.
Ok. So that is one way. What is the second? Well you click on the link of the mask outline you want above, save it to your computer and scale it up to any size you want using Photoshop :P Remember the diameter of the outer circles Ive drawn here is 24 cm. You should be able to work out what you need from there. One problem though is that a full size image wont fit on an A4 page. Solution? In Photoshop (or other) crop the image straight down the center like so, print it out at the size you need, mark your triangles and then flip it to mark the other side. If youve go an OTA larger than about 40 cm you might have to take the long way. Unless you can get hold of an A3 printer.
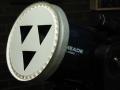
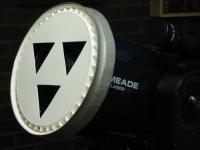
And how does the final product look and work, bewdiful! Article written by Paul Russell ([1ponders]). Discuss this article at the IceInSpace Forums.  |
|
|||||||||||||||||||||||||||||||||||||||||||||||||||