RGB Planetary Imaging with a Monochrome Camera
Submitted: Friday, 29th February 2008 by Mike Salway
IntroductionPlanetary Imaging is a fast growing field of astrophotography – boosted by tech-savvy amateur astronomers, larger and cheaper (but good quality) telescopes becoming more accessible, and the proliferation of low-cost webcams as imaging devices which can capture up to 60 frames per second (fps) without compression. It’s never been easier to try your hand at astrophotography and capture that first image of the moon or a planet. The aim of this article is to serve as a tutorial for creating an RGB image using a monochrome camera, and/or to help you to decide whether mono RGB imaging is right for you. The article will describe exactly what you need to buy (in both hardware and software) and what you need to consider (in capturing and processing) to start down the road of capturing and creating your first RGB Planetary Image. The article is aimed at an audience of intermediate level planetary astrophotographers, who most likely have already had some previous experience using a colour camera (like a ToUcam/NexImage or a DBK/DFK camera) to capture and process planetary images and are looking to go to the next step of a monochrome camera, but aren't sure what's involved. I'm certain though that a lot of the techniques and tips described in here will be just as useful to beginners and will hopefully reduce the huge learning curve that they're starting down. Most advanced planetary astrophotographers are already using a monochrome camera and are creating wonderful RGB planetary images, but hopefully there may be something of interest to you in here as well. I welcome all of your feedback and suggestions for future revisions of this article. As a first step, I’d suggest having a read through my previous article, Planetary Imaging and Image Processing. It discusses the factors that influence high-resolution planetary imaging, as well as a step-by-step guide to processing planetary images. It's almost 2 years old but the content is still extremely relevant. I won’t repeat much of that information in here – it’s best to use both articles side by side to determine if RGB Planetary Imaging is for you, and also the environmental and technical factors you need to take into account to get the best images you can. BackgroundIn general, there are two types of cameras that can be used for imaging the planets – monochrome (mono) and colour (one-shot colour, or OSC). Colour cameras have a colour CCD chip in a bayer filter configuration, where 50% of the sensor captures green wavelength light, 25% captures red and 25% captures blue. This means you’re not getting the whole resolution in each colour channel. A Monochrome camera on the other hand, when used in conjunction with RGB colour filters (special imaging filters that let through specific wavelengths, not the coloured filters for visual observing) use the whole resolution to capture each colour channel. You then create a colour RGB image in post-processing. Benefits of Monochrome over One-Shot Colour:
Benefits of One-Shot Colour over Monochrome:
Obviously the benefits of one are the disadvantages of the other. The comparison above also assumes that both types of cameras use a lossless codec and can transfer all the data at the fastest frame-rate without compression. If you want to get the most out of your imaging setup, you should get a monochrome camera – it will deliver superior results over a one-shot colour camera. HardwareSo, assuming now you’ve made the decision to get a monochrome camera – exactly what do you need? Monochrome CameraObviously, the starting point is the camera. There are a number of options, however most times the choice comes down to two cameras – the DMK21 series from The Imaging Source Astronomy Cameras, and the SkyNyx 2-0M from Lumenera. A third option that is likely to become more popular in the next 6-12 months, is the Dragonfly 2 from Pt Grey Research. All have their pros and cons (specifically for use in planetary imaging), which will be discussed here.
Subjective ComparisonNB: I haven’t owned or used a SKYnyx 2-0M or a Dragonfly2, so I’m basing my comparative analysis on the specifications and from speaking with users of those cameras.
For me, I started out with the DMK21AF04 (firewire version) – the USB model wasn’t available at the time. I have since moved to the DMK21AU04 because it means I don’t need to use a powered hub or PCMCIA card to power the camera, giving me greater flexibility and portability. The DMK21AU04 is the right camera for me right now, delivering excellent performance for people on a budget. There are also some larger format monochrome cameras that weren’t considered in the comparison, such as the DMK31, DMK41 and Astrovid Voyager X (review). These cameras can be used for planetary imaging, however the slower framerate and larger format makes them primarily suited to lunar astrophotography so they won’t be discussed here. FilterwheelOk so you don’t absolutely need a filter wheel – you could screw the filters onto the camera nosepiece manually between each capture, or you could use an exposed filter slide – but neither of these are recommended if you’re serious about your planetary imaging. The cheapest option for people on a budget is a manual filter wheel, such as these ones from Atik or Orion (they are exactly the same). They have 5-slots, which give you room for your R,G,B filters as well as 2 extras for clear (Luminance), IR or UV filters. You unscrew the top housing of the wheel, screw your filters into the slots and put the cover back on. Not a difficult task, but not something you'd want to do out in the field at night. A tip I was told and appears to work well - don’t screw the housing cover back on too tight; leaving it a little bit loose will make turning the wheel (changing filters) easier and smoother, meaning less shake and therefore less dampening time. I use the Atik manual filter wheel, and if I’m careful not to be too rough, at high-resolution (> 10m focal length) I can change filters and start the next capture within 3-6 seconds.
Manual filter wheels are great, easy to use and cheap – but it does mean getting up from your chair and changing filters 2 or more times for every capture run. It would be nice to control everything from the convenience of your laptop or table. For people who want that extra convenience, at the extra cost, you can get motorised filter wheels such as these ones from Atik (cheapest I've seen), Andy Homeyer and TruTek . They start from around US$350 and go up from there but can be controlled from your laptop or a hand controller – definitely more convenient. They still have a dampening down time of 2-4 seconds. You’ll need to connect the camera to the filter wheel, and depending on the camera + filter wheel you get, you may also need to get the right adapters to screw them together. Discuss your requirements with people like Steve Mogg from MoggAdapters, who make custom adapters for all sorts of cameras and filter wheels.
FocuserIf you can, get a motorised/electric focuser – it’s much, much easier if you don’t need to touch the focuser and wait for the dampening to die down to check whether you got it right. I’d say it’s almost essential if you plan to get serious about planetary imaging. It doesn’t need to be expensive – I used a home-made motor on my Moonlite CR2 when I had my old 10” dob. At the very least, try and get a focuser with 2-speed fine-focus control like the GSO 10:1 or Moonlite CR2 etc. Also stay away from Newtonian rack and pinion focusers or SCT mirror flop focusers – crayfords are much smoother and more accurate. For the best results, an electric focuser that can be computer controlled is essential. An example of this is the Smart Focus unit from JMI that connects to their Moto Focus motorised focusers. You'll be doing critical, small focus changes almost constantly through any session to keep the ccd right in the middle of the best focus region. At longer focal lengths of >10m a change in focus position as small as 20 microns (0.02mm) makes a clear change to the image. You simply can't do this by hand. Even with parfocal filters, you'll find that each colour channel comes to critical focus at a slightly different location, likely due to the combination of barlow lenses in the system. You will have to adjust focus for each filter to compensate, again impossible to do by hand. Without an electric focuser, you will always struggle with focus and never be sure that you’re nailing it each and every time. I'm currently using a single-speed crayford with an Orion AccuFocus unit fitted to one focus knob. It's not repeatably accurate and has some backlash, so it's not ideal. I ensure I spend a lot of time getting focus right to compensate for the problems with my focuser.
LRGB FiltersetWith a monochrome camera, you’re going to need to get a set of RGB filters so that you can produce a colour image. The ideal requirements for a filterset, is that they should be:
There are a number of RGB filtersets around, but I’d recommend getting the best you can afford. There are cheaper alternatives, but the bandpass may not be as accurate and transmission may not be as high. This will result in dimmer raw data, and will make it harder to calibrate the colour balance in your images. If you buy a cheaper set, like I did the first time around, you’ll have to spend more in getting it right the next time. After starting with the Baader set, I now use the Astronomik LRGB Type II filterset and love them.
SoftwareYou’re going to need to get some software to help you capture and process your images. For capture software, the DMK series comes with IC Capture – a very good program which does almost everything I’d like in a piece of capture software. If you’d like to though, you can use any third party software which can use the WDM driver for the USB DMK (such as virtual dub, k3ccdtools etc). For the SKYnyx 2-0M, most people use the third party Lucam Recorder because the supplied software isn’t up to scratch. If you’re using a firewire camera, then you can use Coriander under Linux which is one of the best capture programs available. The processing software you need depends on your processing routine. I do some pre-processing of the data before processing in registax and photoshop, but that’s not for everyone. You can read about my processing routine in the Planetary Imaging and Image Processing article. My current software stack consists of:
Preparing to Capture the DataOk you’ve got everything you need in hardware and software, now it’s time to capture some R,G,B avi’s. In this section I’ll explain my workflow for capturing the data, and the settings I use in IC Capture. IC-Capture Settings
HistogramUsing and interpreting the histogram is absolutely essential. You want to ensure the histogram peak is the same for all 3 colour channels – it makes colour balance easier and more accurate. You also want to get the histogram as exposed as possible– ideally you want all 3 channels to reach 250 or so without overexposing. You will need to adjust your framerate and gain to get the right exposure, and will depend on the size of your telescope, the focal length you’re working at and the object you’re imaging. A faster framerate is great if the object is bright enough, but there’s no point capturing at 30fps (1/30s exposure) if your histogram falls off at under 120 (see image on the left below). The dim image will need to be stretched more during post-processing, which will reduce the depth and quality of the final image. Ideally you should change back to 15fps (1/15s exposure) and get more light in with each frame if the seeing is very good, as there won’t be much movement within each frame so the longer exposure won’t hurt your resolution (see image on the right below). In practise, if the seeing is less than very good, sometimes a faster shutter will deliver better individual frames and better spatial resolution, with the tradeoff of having a dimmer image. So there’s a balancing point you’ll need to experiment with to find the right framerate and exposure for the object, your telescope and the local seeing at the time.
Capture WorkflowPreparation“Preparation Prevents Problems”, as my son now knows after his teacher made him write lines of it :) Due to the fast rotation rate of some objects at long focal lengths, once you’ve started a capture run you’re under the pump and will be pressured to get all 3 channels captured in a set amount of time. Spend the time before you press “record” to get things right – it’ll make it much easier when you’re in the middle of a capture run and changing filters. Go through each of the colour channels and experiment with the framerate and gain in preview mode to determine the correct exposure for each channel. Depending on the object, one channel may be the brighter than the others. The blue channel is almost always the dimmest as it’s the most scattered by the atmosphere, and is the most likely to need a much higher gain, or even a slower framerate to get the histogram peaking at the same point as the red and green channels. Make a mental note of the adjustments required for each colour channel so you can do it quickly and efficiently once you’ve started your capture run and change between filters. FocusI’m sure I don’t need to tell you how important focusing is. You don’t want to throw away data captured in a night of good seeing because your focus was off. Some tips for focusing:
Recording the DataThe preparation has been done, you’ve got critical focus, now it’s time to record. How long do you capture each channel for? It depends on the object and the focal length you’re working at. What you want to avoid is rotational blurring as a result of capturing for too long, and when the frames are stacked together the small-scale features get mashed together because registax will align on the high contrast limbs. Here are some rough guides for capture time for planetary objects (remember these are per channel capture times for a monochrome camera). Where capture time is irrelevant, ensure you capture enough frames for a smoother, less noisy image.
|
||||||||||||||||||||||||||||||||||||||||||||||||||||||||||||||||||||||||||||||||||||||||||||||||||||||||||||||||||||||||||||||||||||||||||||||||||||||||||||||||||||||||||||||||||||||||||||
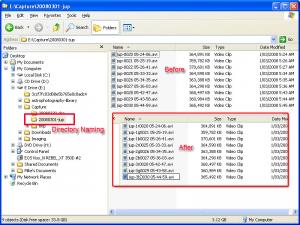 |
Click to Enlarge Before and After - directory and file naming |
The avi’s can now be fed straight into registax, but I do some pre-processing on them using ninox (ppmcentre). To do this they need to be saved as bitmap files, so I use virtual dub to save the avi as a set of bitmaps. I then crop, centre and rank the bitmaps using ninox and PCFE. For a full step-by-step guide on exactly how this is done, see the Planetary Imaging and Image Processing article.
Once Ninox/ppmcentre has finished, the set of bitmaps is ready for processing in Registax.
Processing images from a monochrome camera can take more time – you need to process the individual colour channels separately, and then recombine them at the end. The benefit is that you can apply individual processing for each colour channel – more noise reduction, more sharpening etc.
The Planetary Imaging and Image Processing article discusses the step by step process of feeding the bitmaps into registax for aligning, stacking and wavelet processing so I won’t go into it again here.
Instead i’ll concentrate more on the recombining of the monochrome images back into a colour image; from reading forums that seems to be the step most people are confused about.
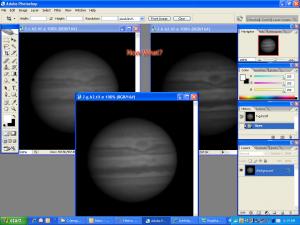 |
Click to Enlarge You've processed the 3 colour channels - now what? |
So you’ve done all of your wavelet sharpening and/or deconvolution on your monochrome images, and now it’s time to recombine them. I use one of two programs to do this – AstraImage or Photoshop.
It is important to align the colour channels as accurately as possible. Where you have captured for a long time and there is some rotation between the red and blue channels, it is best to align on the “features”, not the limbs. This can mean your image ends up with red/blue limbs but the middle of the planet contains the important detail.
For aesthetics, you can re-combine twice – once aligning on the limb, and once on the middle, and then using photoshop, select the outer 10-20 pixels of the limb-aligned image (feathered by a couple of pixels) and paste it on the middle-aligned image.
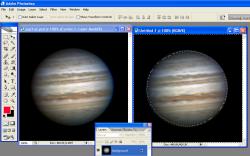 |  | |
Click to Enlarge Showing the 2 images - one aligned on the features, one on the limb |
Click to Enlarge Combining them using a feathered selection of the limb |
|
Now that you’ve got a colour image, you most likely need to do further post-processing to improve the colour balance, levels, curves etc. This part is subjective, and depends entirely on the image – ie; the quality of your seeing, transparency, how well you kept the histogram exposed and equally exposed for each colour channel.
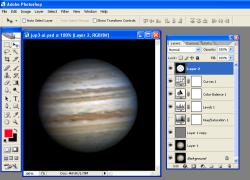
I use layers in photoshop to adjust the saturation, levels and curves and sometimes do some final sharpening of the combined image.
Again, keep an eye on the final histogram in photoshop. Check that you’re not clipping any detail from either end – ie: removing faint detail, or blowing out the highlights.
Save your final image as a photoshop file in-case you want to go back to it later, and also do a “file->save for web” to save it as a web-quality jpeg (ideally under 800px wide, under 200kb).
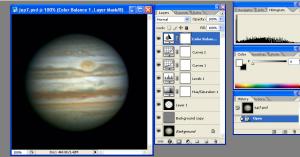 |
Click to Enlarge Final post-processed image before saving for web |
LRGB is “Luminance” combined with RGB data. Luminance is the unfiltered data – either no filter is used, or the “Clear” filter from your LRGB filterset is used – which usually blocks IR/UV wavelengths as your RGB filters do.
An LRGB image takes the detail from the luminance channel, and the colour data from your RGB channels. For planetary imaging this isn’t often used, but it can be useful when you have a short capture window or a dim object. You can capture more luminance frames over a longer time (to get a smoother, less noisy image), and use a shorter time to capture the RGB frames to get the colour data. The clear filter allows greater light transmission so you can use a faster framerate, shorter exposure and/or less gain.
I’ve tried using this technique on Jupiter on a number of occasions during the 2007 apparition, and in most cases, the straight RGB image ended up sharper with better resolution of the fine details. Only once has the luminance channel been sharp enough to use in an LRGB image. It appears that the spread of wavelengths being captured actually softens the image and can result in a more blurry appearance.
You capture and process the luminance channel the same as any other colour channel – align, stack, wavelets, etc.
If you do end up with a sharp luminance channel, you can create your LRGB image by following these steps in Photoshop:
Now you can blink the RGB layer on and off to see the effect it has had on your image. The detail is taken from the base luminance channel, and is being coloured by your RGB data.
You can adjust each layer independently, using noise reduction or sharpening, levels or curves on your luminance layer, and similarly for the RGB layer – adjusting saturation, curves, etc. until you are happy with your image.
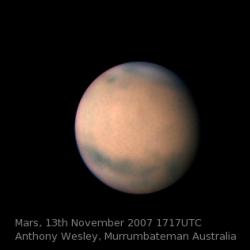
The luminance channel doesn’t need to be an unfiltered (or clear filter) image. For different types of objects, other wavelength filters can be used as the “Luminance” (detail) channel. For example:
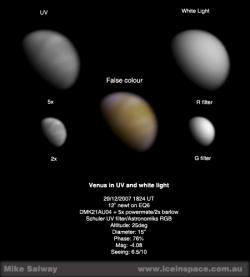 |  | |
Click to Enlarge Venus in UV false colour |
Click to Enlarge (R+IR)RGB Mars by Anthony Wesley |
|
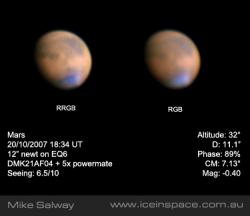 | ||
Click to Enlarge Mars in RRGB and RGB |
||
Care must be taken with this type of approach, as some detail is only visible in some wavelengths – so by using a specific channel as your luminance, you might be misrepresenting the features visible on the planet at the time. See this article from Damian Peach which discusses colour balance using Mars as an example, and the various combinations of channels to achieve your final image.
I hope this article has helped as a tutorial for creating an RGB image from a monochrome camera, or helps you to decide whether mono RGB imaging is right for you.
It is more work in capture and processing, but the greater control and flexibility, and enhanced resolution make it the obvious choice if you’re trying to deliver the best quality planetary astrophotography that your setup and seeing will allow.
Thanks to Anthony Wesley (bird) for his review and contributions to this article.
Article by Mike Salway (iceman). Discuss this article on the IceInSpace Forum.