ICEINSPACE

|
16" Tri-Dob Improvements, including ArgoNavis and Servocat
Submitted: Wednesday, 11th June 2008 by Tim Nott
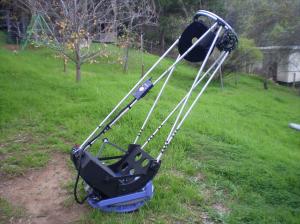
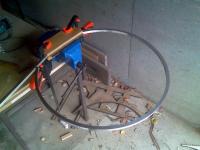
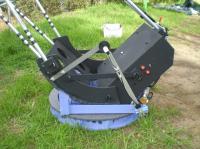
Top RingOne or two people had pointed out to me that the images were possibly not as sharp as they could be through my scope so I did some investigation to find out that the secondary was going out of collimation a little when moving from horizon to zenith. This is a common situation in big truss dobs, with people regularly collimating their scopes at an angle to compensate. Mine was moving too much however, affecting the sharpness of the image. On the wire spider, I replaced the 0.4mm beading cable with slightly thicker 0.7 mm wire but there was still some movement. The main problem turned out to be flexure in the top ring itself, specifically between the connection point of the apices of the truss poles and the posts that supported the wire spider. Next time I build a scope, I will make sure the support points of the spider are directly connected to these apices. To stiffen the top, I bent some square aluminium tubing into a ring using a jig cut out of plywood and a vice. I made sure the curve of the jig was about 13% smaller than the curve I wanted to compensate for the tubing springing back a little after pressing. After this, I put bolts through two aluminium rings with the plywood sandwiched in between.
The secondary holds collimation now and stars are much more pinpoint than before, with finer detail visible in all objects, even galaxies. In fact, one of my observing friends remarked that it was like a whole new scope compared to before. Luckily, I originally designed the scope to be slightly bottom heavy, having a bit of counterweight on the top. The aluminium tubing was the same as the counterweight so I did not need add counterweight at the bottom to balance the scope. It actually looks quite good too I think, just like I designed it that way in the first place!
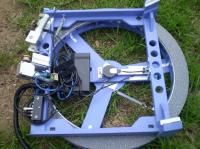
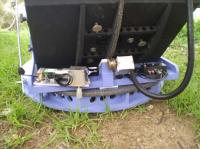
“Pizza Shield”I have never worried about the safety of the exposed optics of my scope with myself and other astronomers around, but wanted to provide a little more protection in the event of public nights with kids and people not experienced with telescopes. I did not want to add a shroud as it was difficult to design one with 6 truss poles, would increase setup time, drip dew onto the primary, catch the wind and possibly affect balance. Consistent with what Mel Bartels and other experienced amateur telescope makers have found, tests with a temporary shroud showed no improvement in contrast over the carefully designed, flocked baffles unless there was very strong direct light shone on the scope (such as car headlights). In the end, I made a plastic shield around the bottom end to keep pets, kids and flying objects - like pizzas - off the primary. I still don’t use it when it is just myself or other experienced telescope users around but it gives me feel more relaxed when showing views to members of the public. It could conceivably act as a dew shield for the primary as well in moist conditions but I have never experienced the main mirror dewing up without it. Argo NavisAlthough I have always successfully found objects using my star charts and enjoyed the hunt for things to look at, I was myself envious of a friend who had an ArgoNavis/Servocat combo fitted to his 18inch scope. I also found myself a bit fatigued after some long nights of spending more time craning my neck looking for stuff through the finder than actually observing the objects themselves. The problem I had, however, is that the Argo Navis digital setting circles require encoders to be fixed on both the axes of the scope and mine had none, with an open ground ring and horseshoe shaped altitude bearings. I eventually solved the azimuth problem by retrofitting a central pivot point to the ground ring from a cut-out piece I had left over from the original construction. I did similar to the square “flex-rocker” but had to use angle brackets to lower the piece, as the mirror box actually passes through the space in the middle. For the altitude, I achieved a central pivot point by having a double encoder arm, one part fixed rigidly to one of the side bearings, the other connected to the flex rocker. The unit is easily and quickly attached with a couple of wing nuts. I was very careful with my measuring and drilling to make sure that the points of rotation were exact on both axes.
ServocatAlthough the Tridob moves very smoothly manually and I have no trouble tracking by hand at high power, I liked the thought of being not having to keep re-centering objects in between viewers (yes, there is often a line up behind this scope at viewing nights). Again, I also liked the idea of having the more relaxed viewing and greater discernment of detail that tracking can afford. Though there are a number of equatorial platforms and drive systems available, I chose the Servocat Junior because of its small-sized gearboxes and reputation of working flawlessly with Argo Navis. Fitting the drive system required some thought, as the unit is designed for the more conventional Obsession-style truss dobs. After some experimenting, I mounted both motor units on the rear of the flex rocker, the knurled roller of the azimuth unit running on the upper of the ground ring and the cable drive running on the central back fin to avoid any sideways torsion. I also adapted the powered ground board kit to fit the scope which conveniently feeds power up through the centre of the ground ring, avoiding tangled cables.
Many people put the hand controllers of the Argo Navis and Servocat on a stalk attached to the rocker box but I have little space for this on the thin flex rocker on my scope. Instead, I mounted the Argo Navis controller on a truss pole with tool clips. The Servocat controller sits velcroed next to the eyepiece - convenient for centering objects in the field of view.
Now, I just need to sell it and build a bigger one…… Further Reading: 16" Tri-Dob: Building an Ultralight Telescope Article by Tim Nott (tnott). Discuss this article on the IceInSpace Forum.   |
|
||||||||||||||||||||||||||||||||||||||