ICEINSPACE

|
PST Scope Case from a Toolbox
Submitted: Wednesday, 2nd August 2006 by Alan Sheehan (B.E)
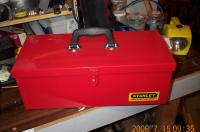
This little DIY project may suit anyone with a PST without the genuine PST hard case. To be honest, it wasn’t till after I bought my PST that I found out that a genuine Coronado hard case was available for the PST. No doubt it’s a little more expensive than the box we’ll use for this project, but it should definitely look the part. Had I known about the case I might have ordered one with my scope, but since I didn’t, I wasn’t about to lash out on more delay and postage and packaging. A simple toolbox, while pedestrian in appearance will adequately protect my scope. After doing the rounds of all the major hardware, tool and auto accessory stores without finding a suitably sized toolbox, I happened to find one very close to my needs in Big W. It was a little red Stanley tool box with dimensions of 455mm x 200mm x 165mm. The length and width were a perfect fit for the scope but the height is 10mm less than what is available in the genuine Coronado case. That would not be a problem, I figured, I would simply replace the top 40mm thick layer of solid foam supplied with the scope with a 25mm layer of foam rubber that I happened to have on hand. I would’ve preferred a plastic case over a metal box simply because they look a little less pedestrian and a plastic case is a little less harsh on surrounding gear and cases etc when packed and travelling.
Materials Required:
Tools Required:
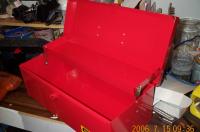
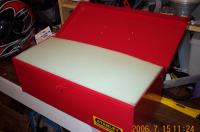
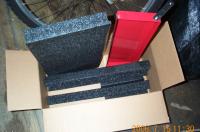
Procedure:Figure 1 above shows the box I chose to use: a metal Stanley toolbox which cost about $34 from Big W. The first thing that needs to be done is to remove the folding shelf or tool tray from the box. See figure 2 below. This folds too far into the box to be useful to us. Using the 3mm or 1/3” drill, drill out the 4 rivets attaching the shelf to the box and the lid.
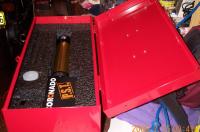
The solid foam packing that comes with the PST is already scored so that the excess foam on the end and one side can be removed easily by hand for fitting into the box. Figure 3 shows the foam and the scope fitted into the box. The fit is very neat, and this makes the scope quite tight in the foam. I am hopeful that with wear the scope will slip into and out of the foam a little easier. Once I pushed the scope in, I found it quite difficult to pull it out again. To make this easier to live with in the short term, I cut two lengths of plastic packaging strap to place under the scope. I can use these to lift the scope out of the foam until it wears in enough to be simply lifted in and out normally. Alternatively you could cut slots around the scope to help get a grip on the scope, or even enlarge the cut out, but I preferred not to at this stage. I did however cut a couple of finger slots each side of the eyepiece hole to make extraction of the eyepiece easier. These slots are only about 20mm deep – just enough to get a good grip on the eyepiece holder. See figure 4.
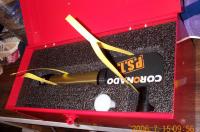
Next I cut a piece of 25mm foam rubber that I had on hand to place over the scope. See figure 5. The original 40mm thick solid foam could be cut down and squeezed in but I preferred not to do that. I have kept it as is in case I end up buying a genuine PST case later on. That’s really the guts of this simple project, but if you would like to finish it off nicely, and you have a pop rivet gun, put a pop rivet in each hole that was drilled out to remove the tool shelf. It just looks that little bit better than having holes in the box. Figure 6 just shows the leftover bits of packing foam and the shelf from the toolbox. I’ll hang on to these in case I get a genuine PST case or decide to sell the scope in its original packing.
 |
|
||||||||||||||||||||||||||||||||