ICEINSPACE

|
D&G 6" f15 Achromat Lens
Submitted: Tuesday, 31st October 2006 by Andy Jackson
PreambleI have enjoyed tinkering with telescopes for 10 years now. I got hooked after reading some of my brother’s old astronomy magazines. I enjoy woodwork and had some experience from making a sailing dinghy and kayaks from plywood and epoxy. I have no experience with optical fabrication and all my telescopes have used purchased optics. I have no connection with D&G Optical other than purchasing one of their products. My first telescope was a 110mm f7.5 newtonian. I was amazed at what this little reflector showed me. My next scopes were also home made, an 8“ f6 dobsonian and then a 6” f5 dobsonian, using Meade mirrors. When I was able to get the 8” out of the city to dark sky sites, I learnt that I could see much more in the sky but also that it was a big hassle traveling to observe. With this experience in mind I knew most of my future observing was going to happen from my own backyard in the suburbs. I enjoy lunar and planetary observing so I wanted maximum contrast to make the most of light polluted skies and decided portability was not so important. I learnt about D&G on the internet (www.dgoptical.com) and also through astronomy magazine articles. They are a small American company based in Pennsylvania that specialize in achromat lenses and complete tube assemblies from 5” up to 12’’ in diameter. They also do repair work on historical telescopes and will manufacture 20” cassegrain optics to order. There is an article in Sky and Space (then called Southern Astronomy) from the early 1990’s detailing a 6” f15 refractor built with a D&G lens by Don Abbes in Melbourne. Also articles in Sky and Telescope by Ernie Pfannenschmidt (March 2001) extolled their virtues.
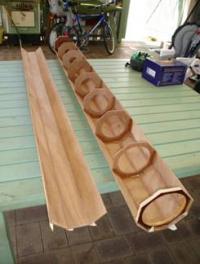
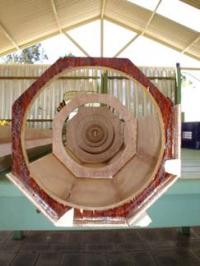
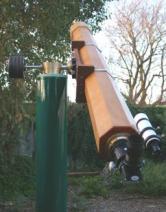
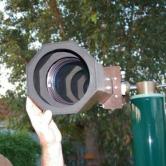
D&G LensThe D&G air-spaced doublet achromat lens consists of traditional crown and flint glass elements and is magnesium fluoride coated on all four surfaces. It is mounted in a robust aluminium cell with 3 pairs of push-pull hex head screws for collimation adjustment. I was expecting a wait of 4-6 months for delivery but it actually took over 9 months. However the lens arrived very well packed and in perfect condition. I had to pay customs fees and GST which added about 15 percent to the cost. My lens had a focal length of 91.75” (2330mm) so with that figure I was able to sketch a ¼ scale plan from which I could derive the ID of each baffle. I got a lot of ideas and inspiration from Richard Berry’s book, How to Build a Telescope (www.bintelshop.com.au). I purchased a William Optics Synta upgrade focuser and 2“ diagonal. (www.frontieroptics.com) Tube AssemblyThe OTA is constructed from 4mm okoume (also known as gaboon) plywood. This is lightweight high quality marine plywood used for making kayaks and canoes. The diaphragm baffles are made from the same material. The octagonal cross section design is similar to the dobsonians I had constructed previously. The baffles are spaced equally 250mm apart forming a box construction that is a lot stronger than you might expect with such thin plywood. The ends of the tube are made with 12mm plywood to allow fixing the lens cell and focuser more substantially. At the focuser end I also glued on some thin sheoak for the sake of appearance and at the lens end I made a dew shield using the 4mm ply with baffles. The interior was painted with two coats of flat black over one coat of Bondcrete sealer. The outside got 3 coats of polyurethane varnish. The complete OTA weighs about 14kg and is just less than 2.5 meters long. The William Optics focuser is designed to replace the original on Synta refractors so I had to make an adapter that would allow me to screw it on to the flat end of the OTA. I was able to machine this out of brass at my work. I made it so that it could be adjusted to collimate the focuser axis to the tube axis. I was also able to machine a substantial alt-az mounting from brass and stainless steel to mount the scope on a pier.
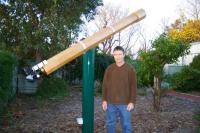
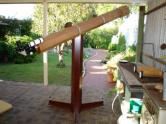
Pier MountInitially I made a mobile wooden pier but soon realised it was just too heavy and awkward to be practical even in my own backyard. However I was able to try the scope for the first time and also learnt that the pier needed to be taller especially when viewing near the zenith! I also needed a means to be able to mount and dismount the OTA more conveniently. Some time later I was able to purchase a scrap steel pipe suitable for a permanent pier (Di Candilo and Sons, Bellevue WA 08 9274 5777). This pipe is 220mm OD with a wall thickness of 8mm and a length of 2.75 meters. I am guessing the weight would be about 100kg as my brother in law and I could carry it together but only just. It was a bargain at $70 AUD. I welded on some steel spikes to act as concrete reinforcement then painted the pier with zinc primer and marine grade enamel. Digging the hole was easy as my local area is mostly sand. The hole was 0.9 meters diameter and 0.9 meters deep. This left 1.85 meters of pier above ground. After installing a power cable and carefully leveling the pier the hole was filled with concrete. This pier is rock solid and just the right height. With the scope aimed at the zenith I can view comfortably sitting on a mat on the ground. I don’t have any clear access to the horizon but the lowest angle I would normally view is at comfortable standing height. Using a William Optics dovetail plate combo I can now mount the scope on the pier in a couple of minutes and just as easily remove it after an observing session. I leave a simple canvas cover over the mount when not in use.
Telescope in UseThe views are superb and really show why refractors have such a great reputation. Using a 40mm GSO 3 element reverse Kellner (www.andrewscom.com.au), the field of view is a little less than 1 degree at 58x magnification. This simple eyepiece gives excellent contrast and is amazingly sharp in this f15 scope. I have had great views of the Jewel Box, Omega Centauri, Eta Carinae, M22, 47 Tucanae, etc. using this very inexpensive eyepiece. I have tried 30 and 50 mm GSO Superview (www.andrewscom.com.au) eyepieces but prefer the 40mm reverse Kellner. I use Meade SWA 24.5mm for medium power. I recently purchased Televue 15 and 11mm Plossls (www.bintelshop.com.au) after reading Daniel Mounseys interesting article on planetary eyepieces posted on Cloudy Nights (www.cloudynights.com). I like them both very much and they have given me great views of Jupiter and Saturn as well as Luna. I am still learning and can already appreciate the importance of seeing conditions and being patient and comfortable at the eyepiece. The lens does show some very minor false colour (chromatic aberration) on the brightest objects but only if you consciously look for it, it is not objectionable and not an issue for me. The contrast and detail observable are limited only by the conditions and the aperture (and the patience and comfort of the observer!).
ConclusionThe long focus achromat is certainly not portable but it does give superb images at a reasonable cost. I now have a very satisfying high contrast 6” telescope on a rigid, easy to use mount. This old fashioned type of telescope is not for everyone but I have a lot of fun with it. Future plans are to fit an 80mm f5 Synta as a finder scope, improve the tube cradle rings and fit a sliding counterweight system to conveniently allow for different eyepiece weights. Pros
Cons
Review by Andy Jackson (anj026). Discuss this review on the IceInSpace Forum.  |
|
||||||||||||||||||||||||||||||||||||||